The Avada WooCommerce Builder – Product Layouts
Last Update: February 17, 2026
Avada is a website builder for WordPress and eCommerce. You can design and build anything from a blog to a marketing website or eCommerce stores using the Avada WooCommerce Builder and more. Avada provides a wide range of WooCommerce features, allowing you to design and build a custom customer flow for your online shop. From using Avada Layouts for individual WooCommerce Products to creating a custom shop, cart, checkout, and product layouts, all using the design flexibility and power of Avada and the extended range of Woo Design and othe Avada Design & Layout Elements.
In this help file, we look at how to create a custom layout for your WooCommerce products. See below for links to customize the other main areas of WooCommerce, and watch the video below for a visual overview of the process for creating a custom product layout.
Creating The Content Layout Section
To display products dynamically we will use Avada Layouts. To create a Layout for WooCommerce Products, first create a new Layout Section. For WooCommerce products, this is, of course, a Content Layout Section, since the products are displayed in the page’s content area. The Woo Layout Elements are only available when creating this type of Layout Section. Once the Layout Section has been designed and completed, we add it to a Conditional Layout that will be used only on WooCommerce Products.
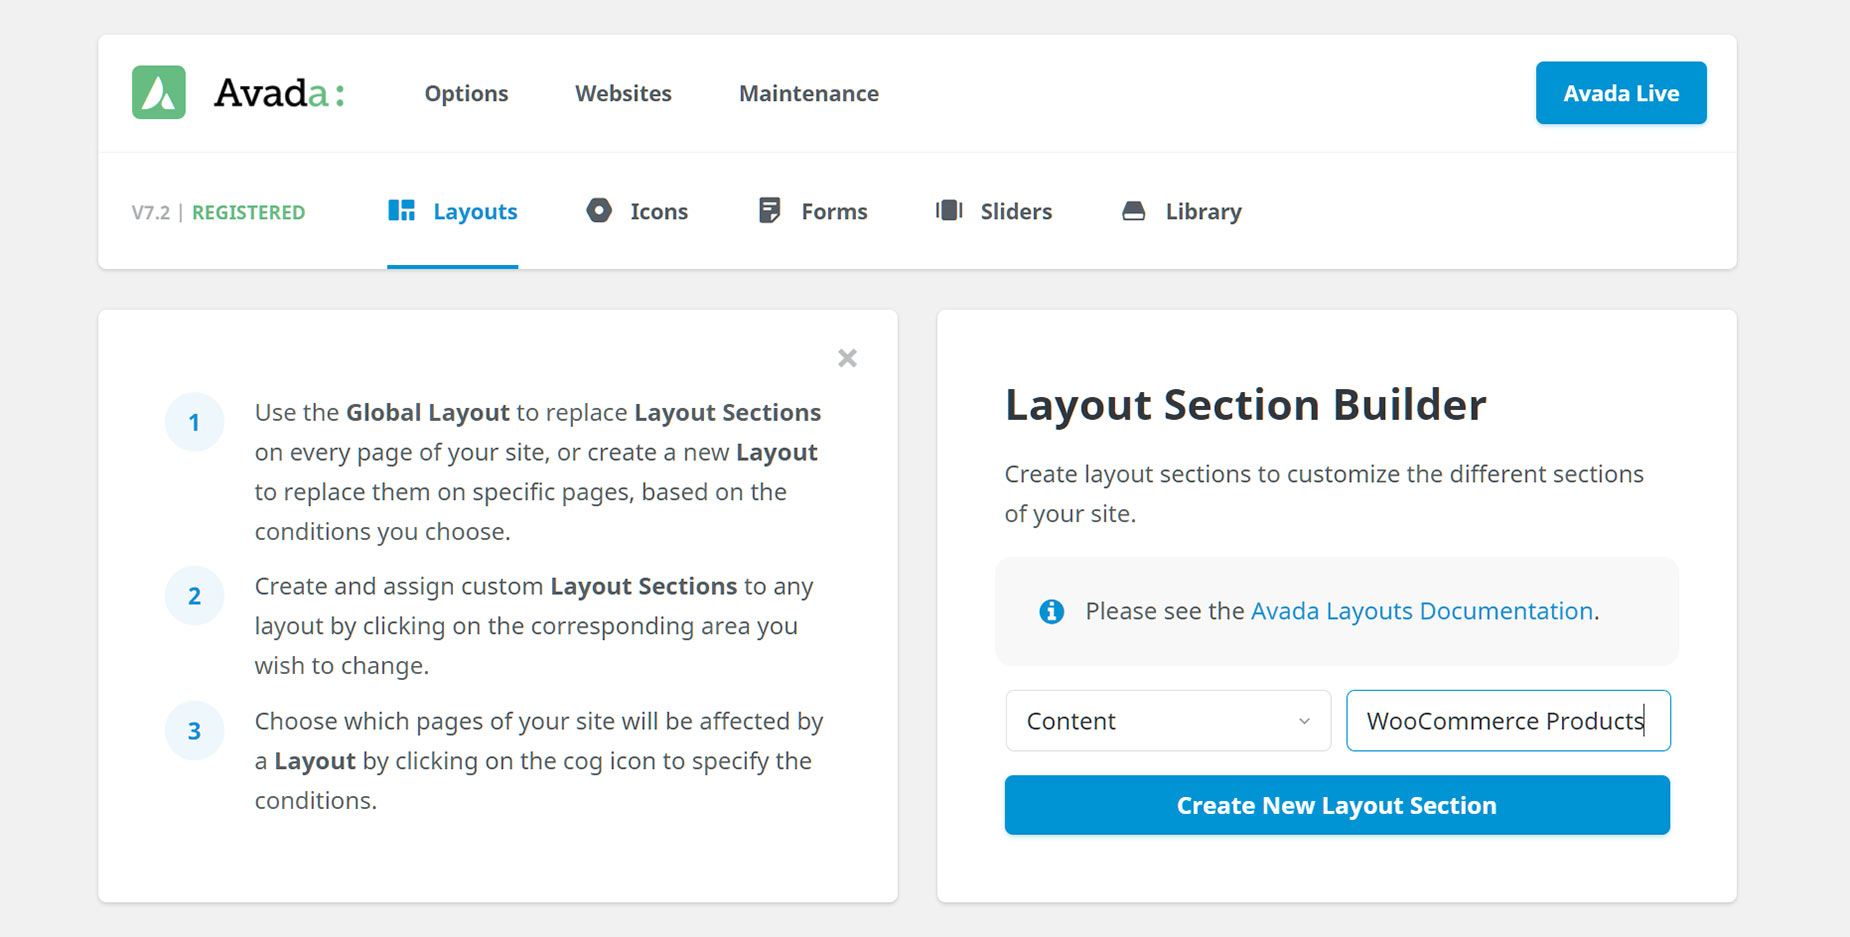
To make a Content Layout Section, as you can see in the screenshot below, navigate to Layouts > Layout Section Builder, from the Avada Dashboard, select Content as the type of Layout Section, enter a name, and then click on Create New Layout Section (or just hit Enter). Then, simply head to your Avada Builder interface of choice and begin building your Layout Section.
Adding Optional Avada Studio Content
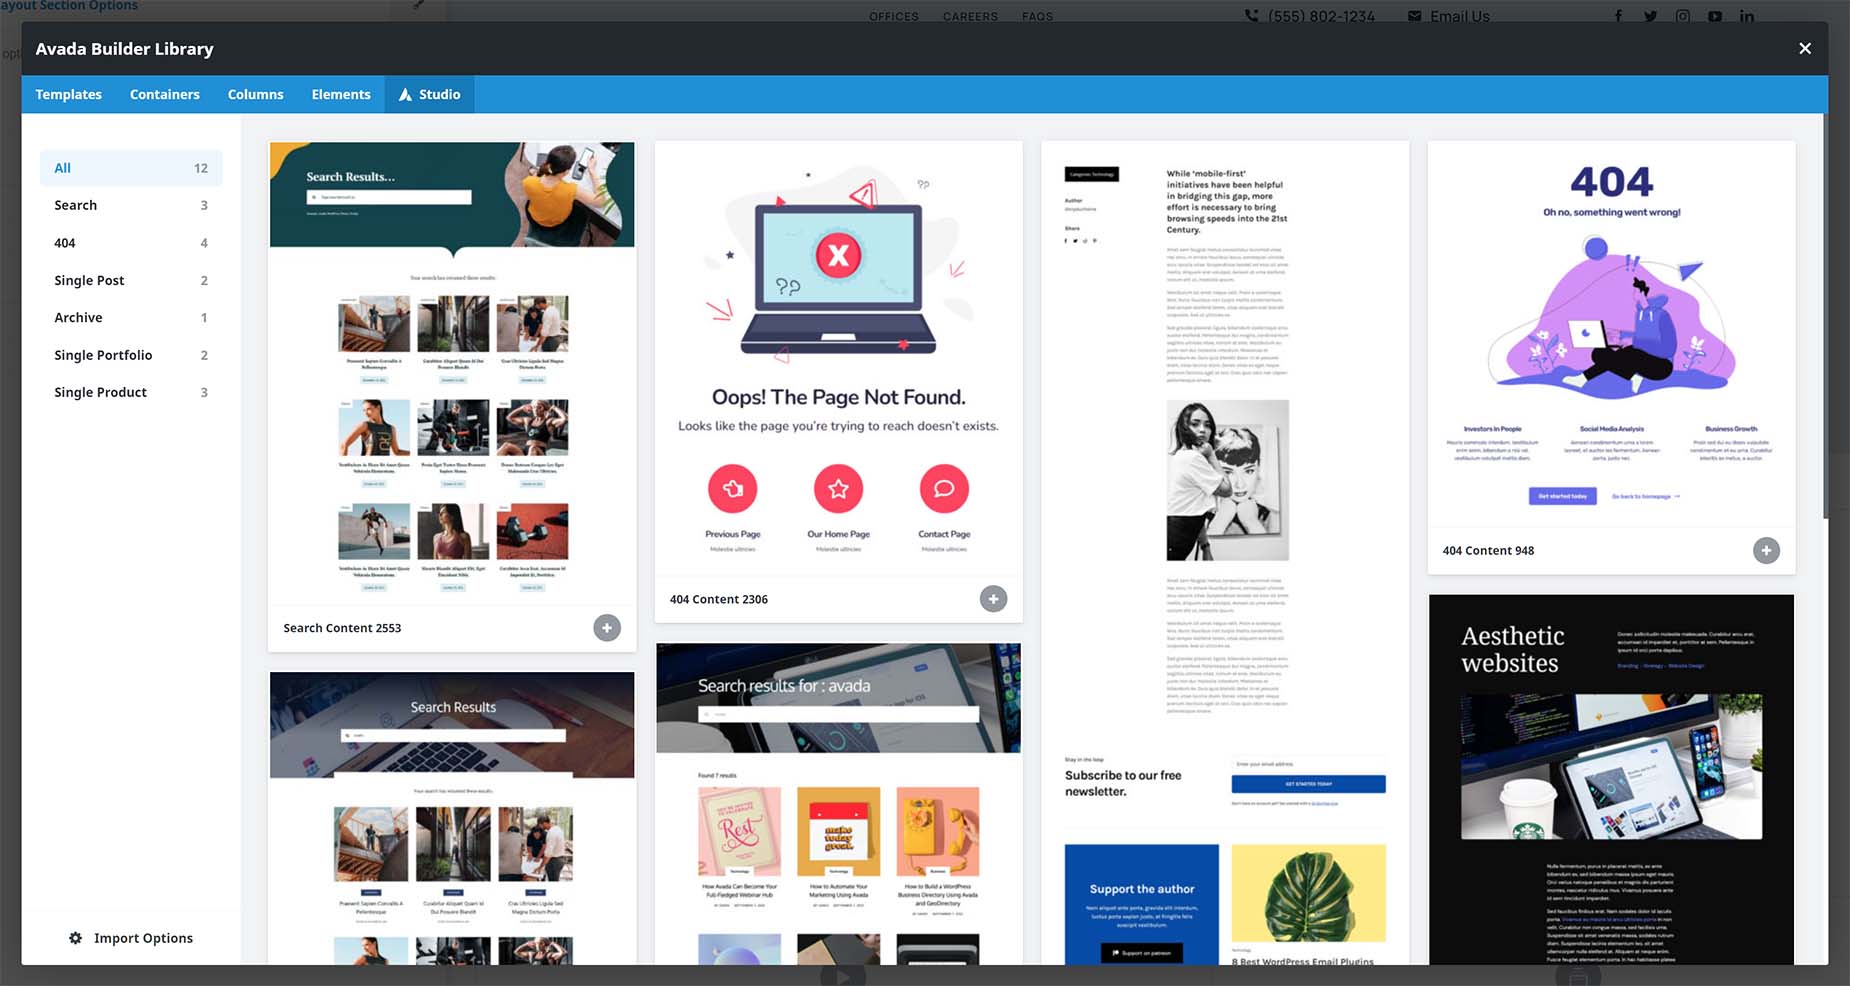
When you first create the Content Layout Section, you will see two buttons on the Starter page. One is “Add Container”, and the other is “Avada Studio”. You can build your Content Layout Section from scratch, or you can use a prebuilt content as a head start.
Clicking on the Avada Studio button opens the Library to the Studio tab, containing prebuilt creative content. As it’s a Content Layout Section, there are some for blog layouts, a couple for portfolio layouts, and there are several templates for WooCommerce single products. To use any of these, simply click on your preferred layout, and it will load into the builder. From here, you can save the layout or customize it as you wish.
Designing A Custom Layout
If you want to build a Layout Section from scratch, it’s just like building any page or layout. In this case, however, it’s important that you already have at least some WooCommerce products created before you build a Layout, as the Avada Builder uses product data to display the products.
Using the Avada WooCommerce Builder allows you to design any layout you want for your WooCommerce products. Start with a Container/Column Element. There are 36 dedicated Avada WooCommerce Elements with which to design your new Layout, and some changes have also been made to a couple of relevant existing Elements. See the “Special Features” section below for more info on those.
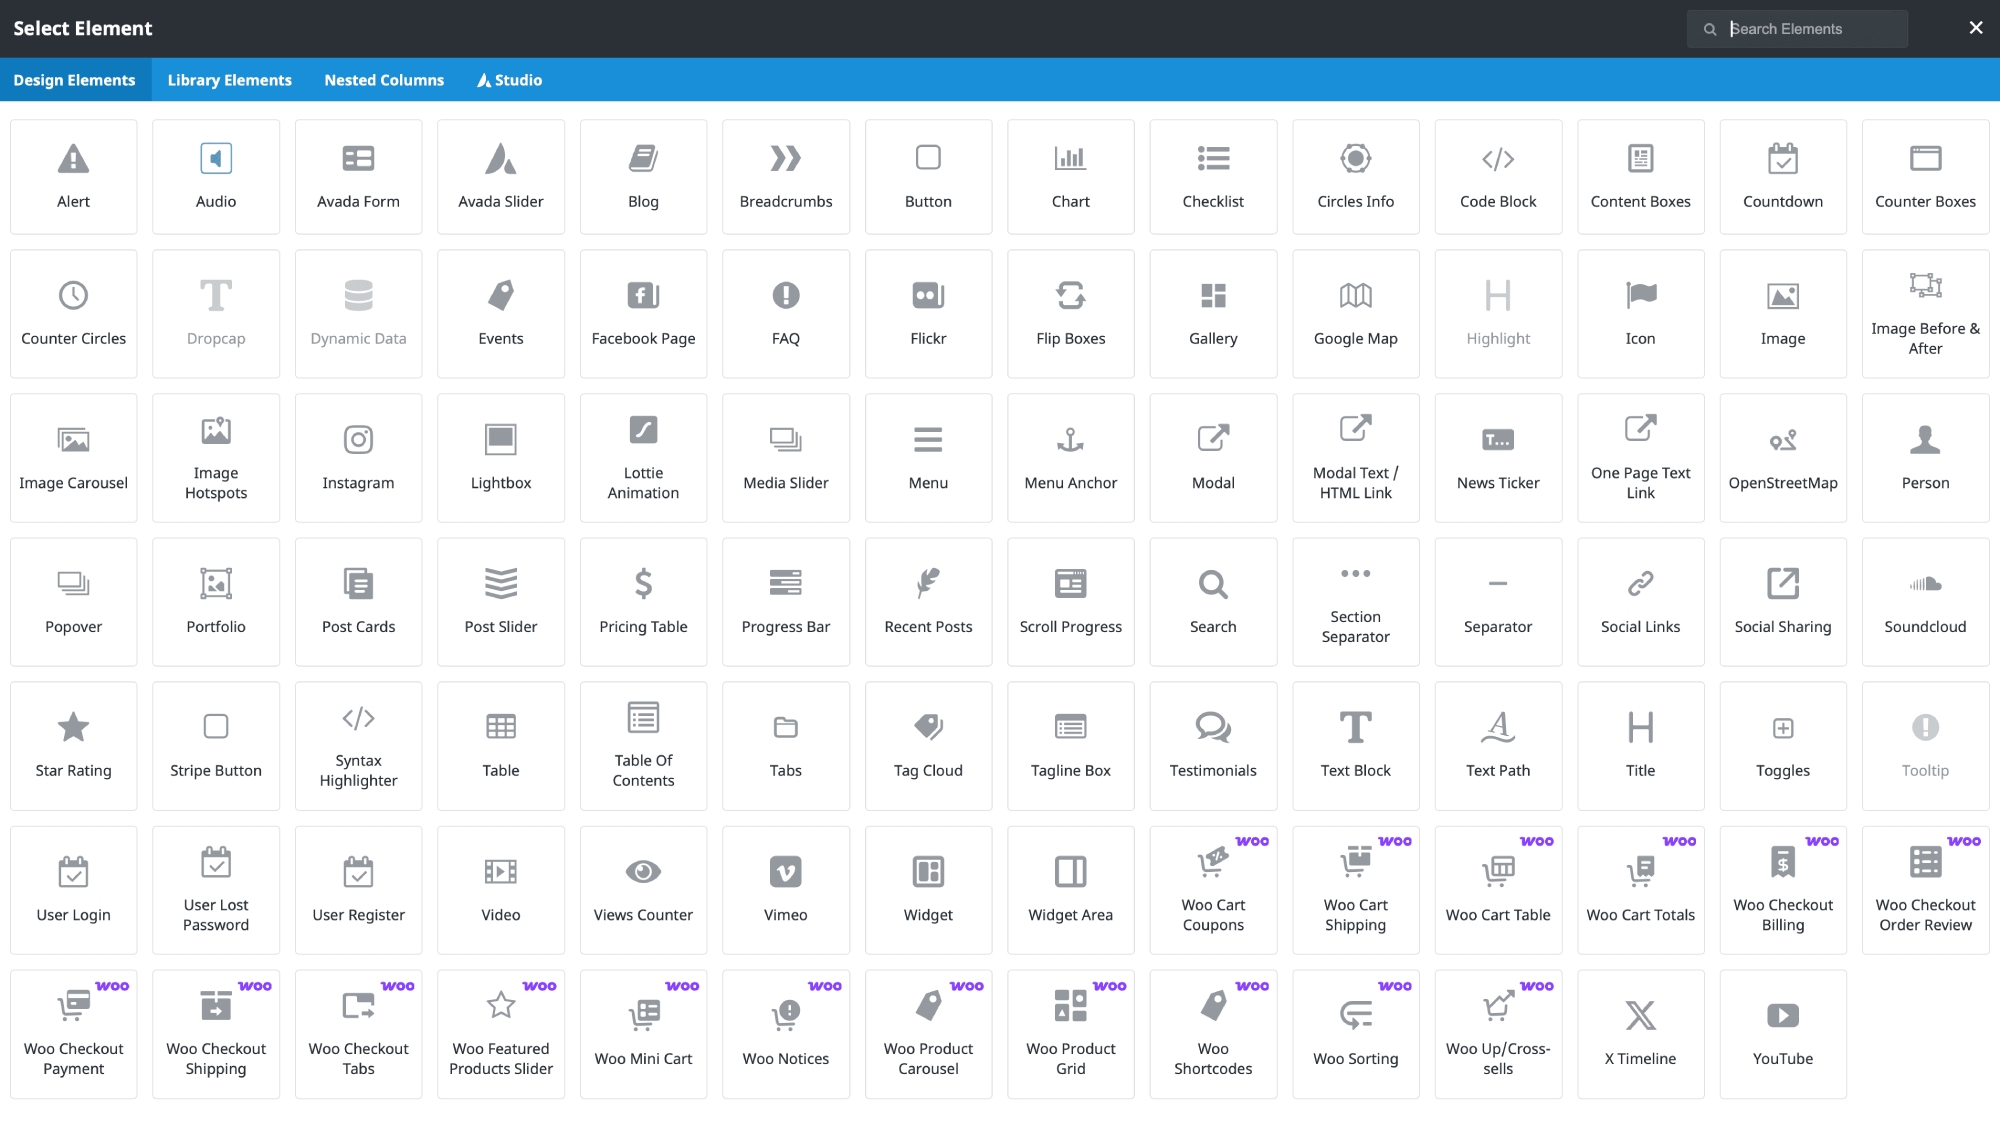
Each Avada Element has its own set of options, and you can add them to the Layout wherever you want. Some of the Elements, however, can only be used once in a Layout Section. These will appear greyed out once you have used them. You can, of course, also use any of the 150+ Avada Design and Layout Elements in your Layout Section.
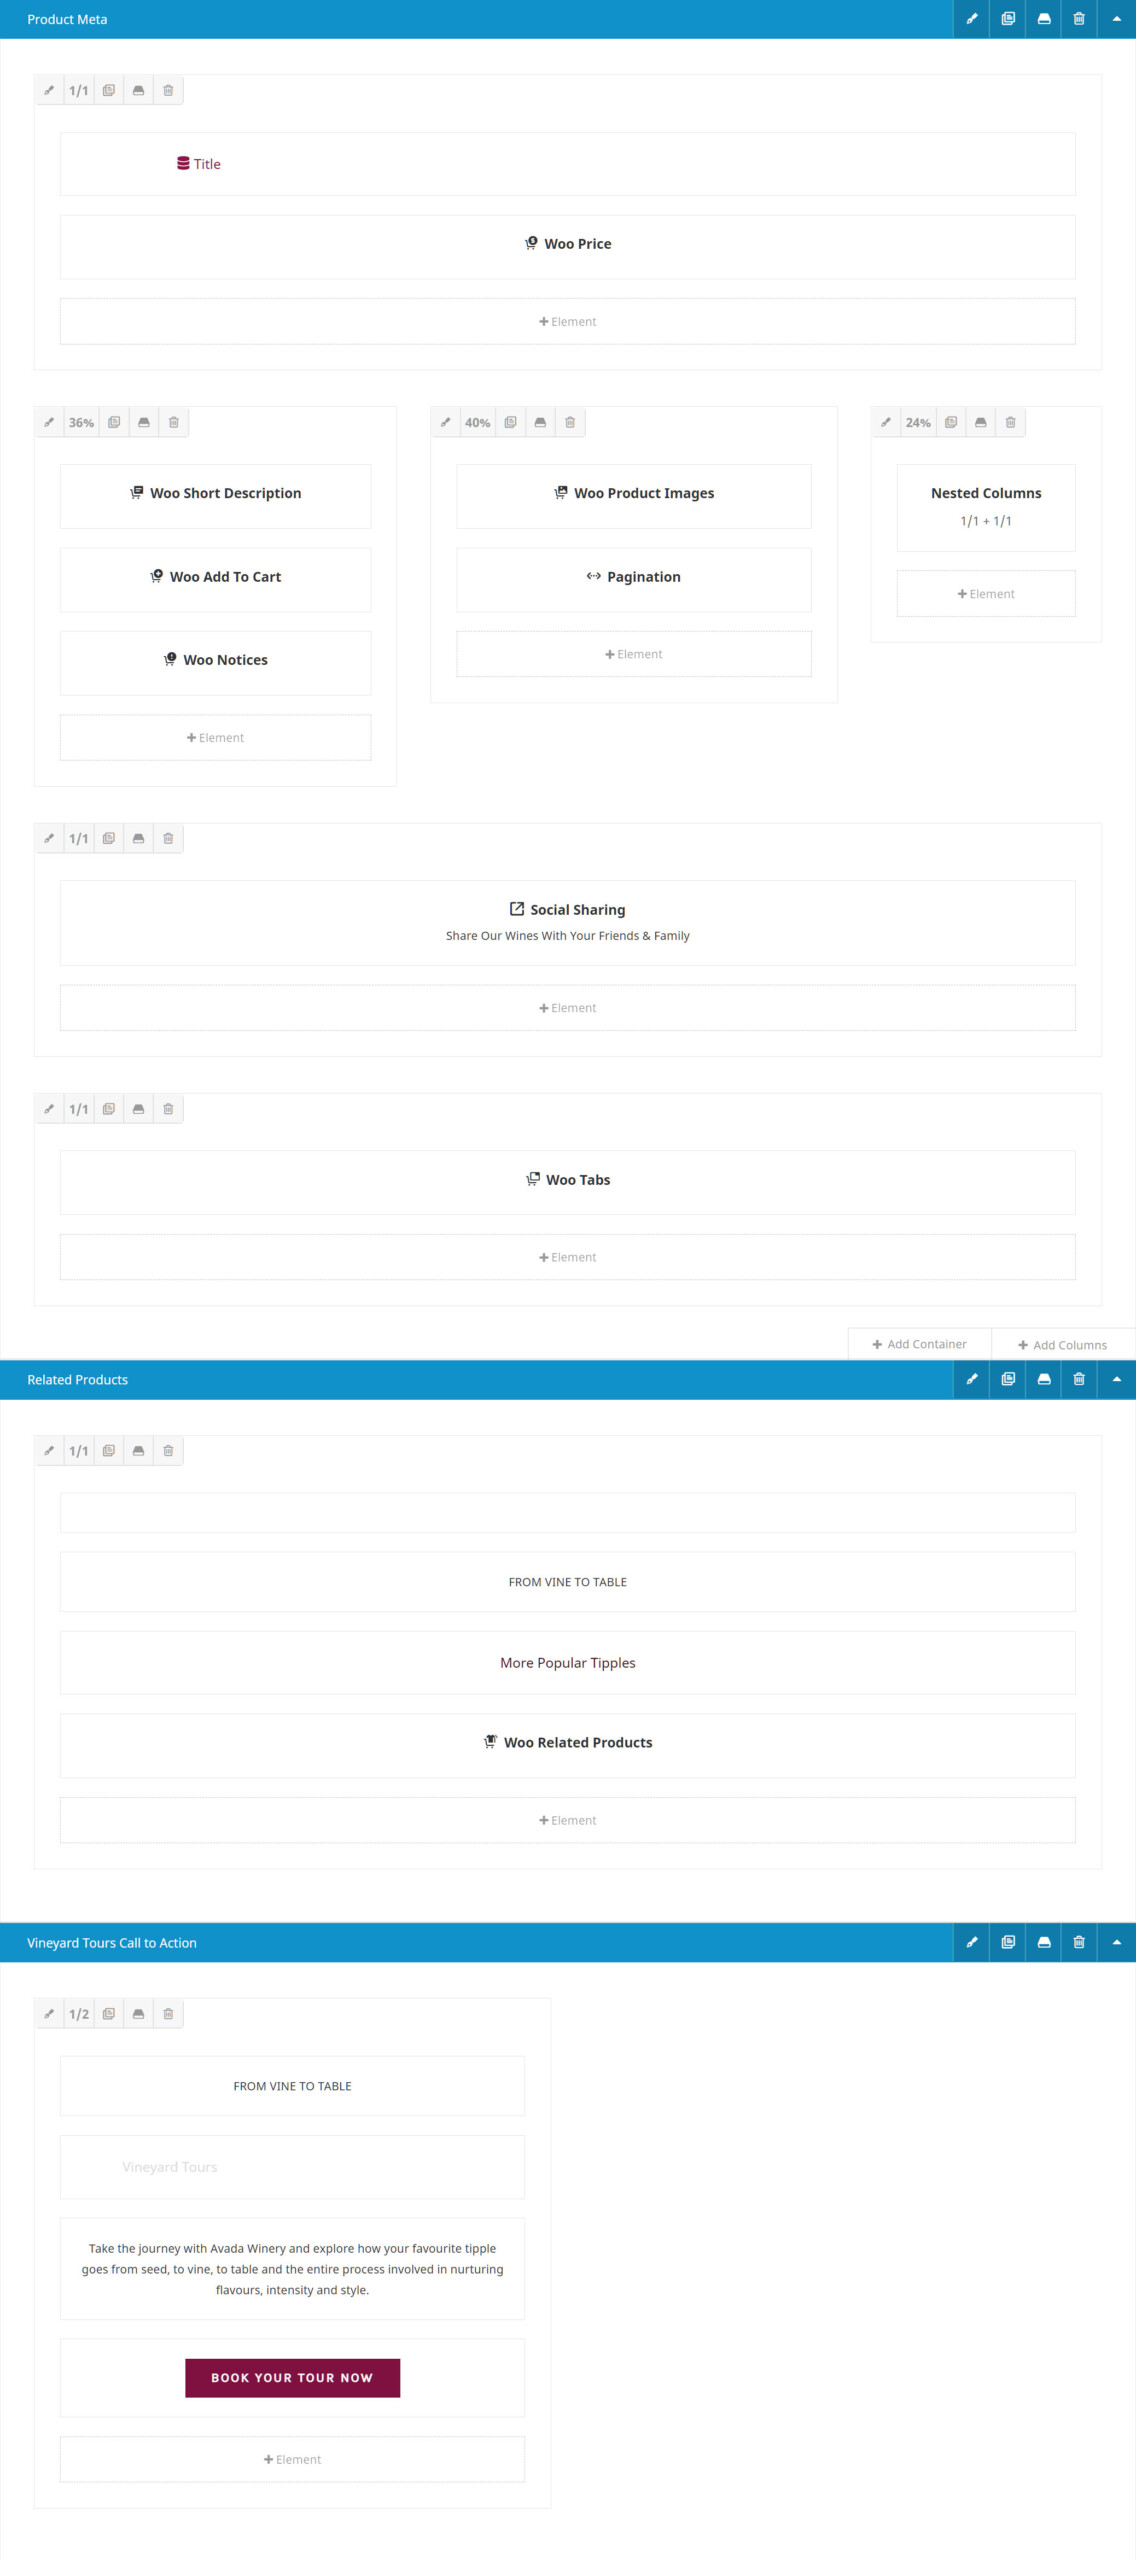
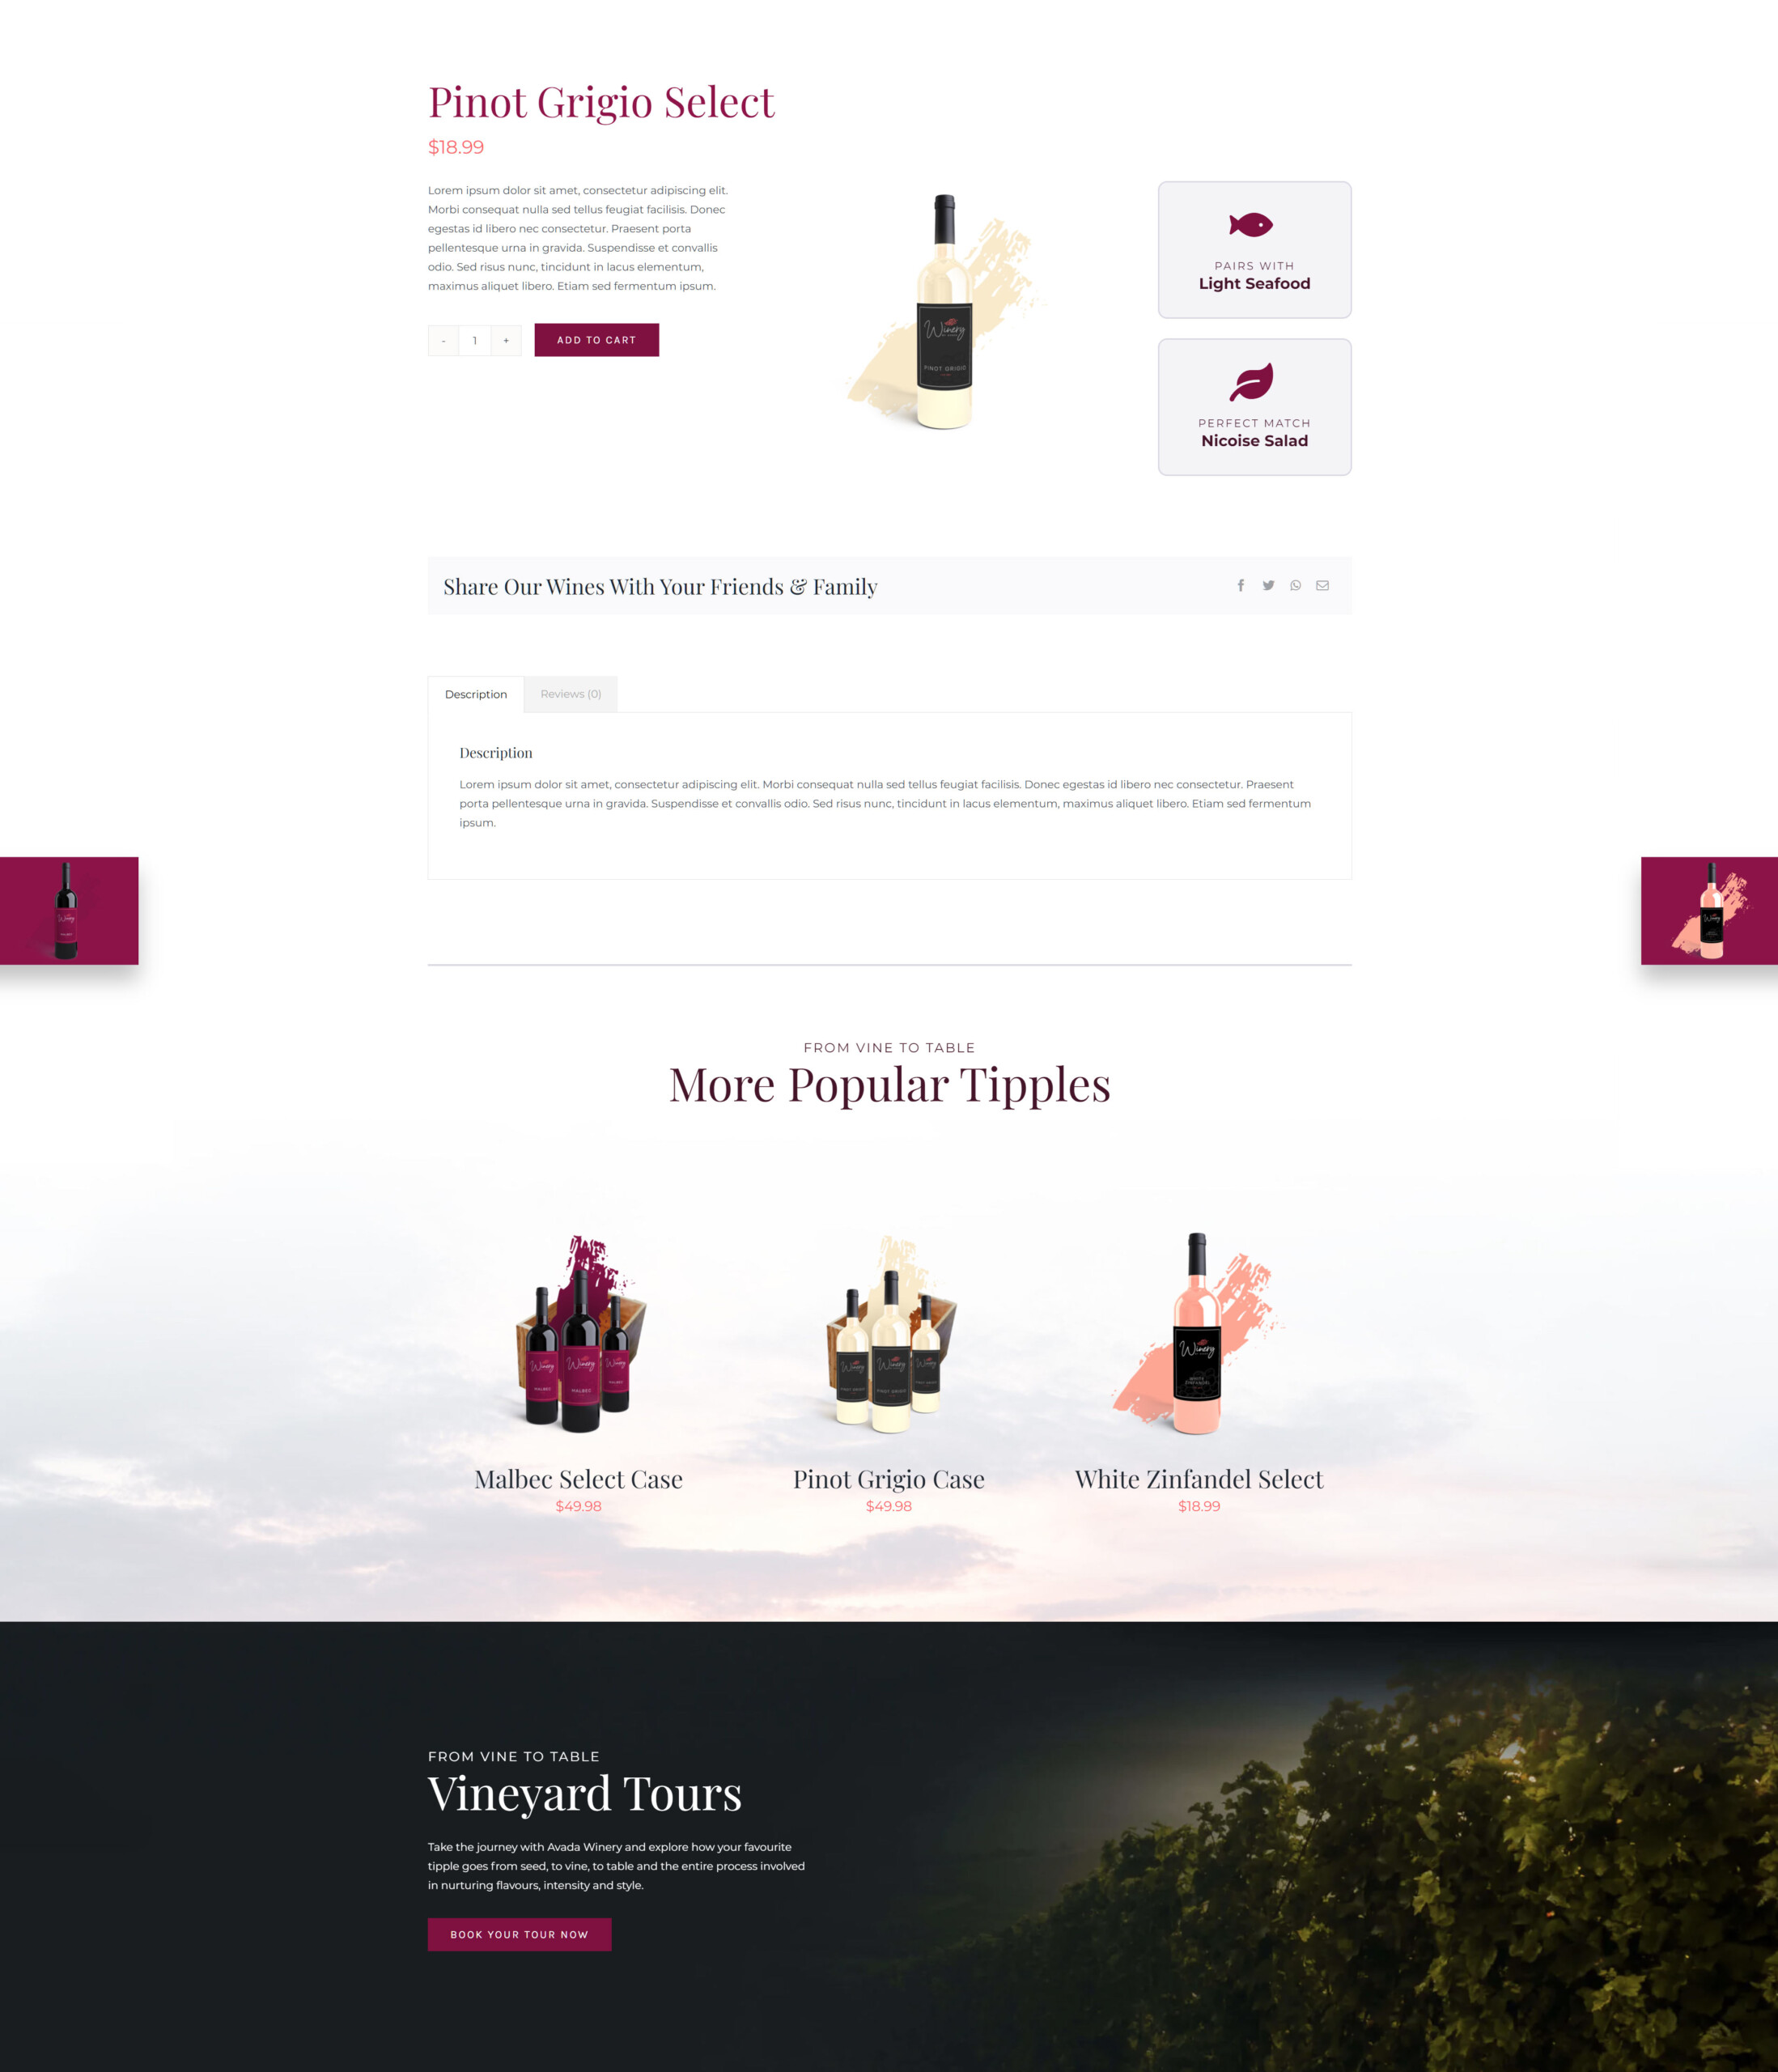
Example of a WooCommerce Product Layout
Below is an example of a custom single product layout design (back-end and front-end views) using the Avada WooCommerce Builder and the Avada Winery website as a starting point.
Below is a front-end view of the single product design discussed above. For some inspiration, please see this 10 Inspiring Avada WooCommerce Store Designs for WordPress article.
Creating The Conditional Layout
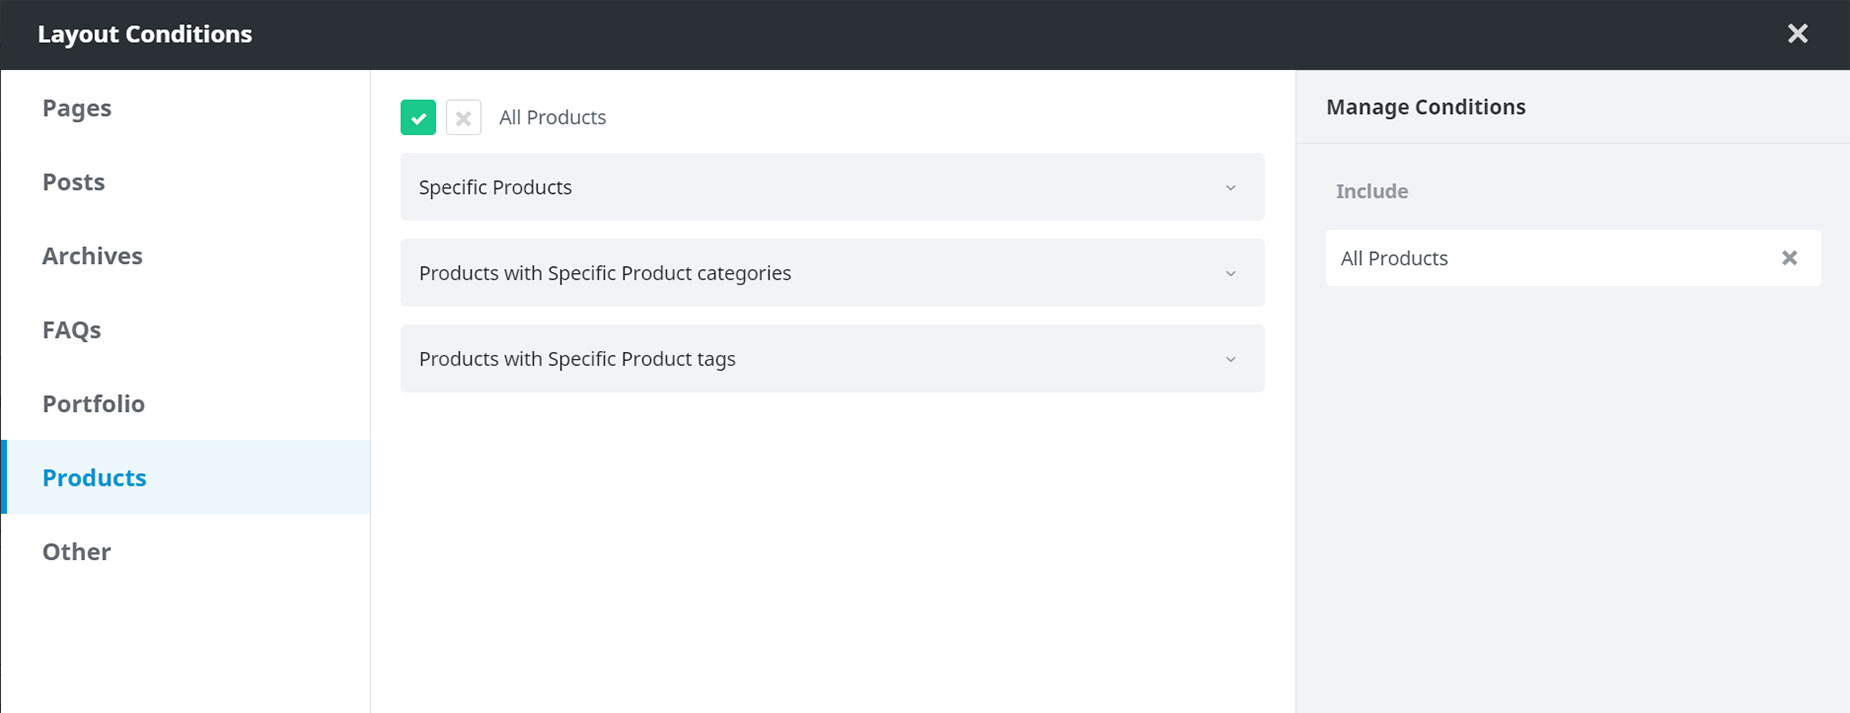
Once you’ve designed and built your Content Layout Section, it’s time to create a Conditional Layout that determines when it’s used. In most cases, the condition set would be to use the Layout for “All Products”. This ensures the Layout is used only on WooCommerce product pages, not on ordinary pages, posts, etc. Alternatively, you might want to create multiple product layouts and exclude certain products, or categories, etc. Follow the link for more information on Understanding Avada Conditional Layouts.
To create a Layout, head to Layouts from the Avada Dashboard, and in the Layout Builder section, give your new Layout a name (WooProducts, for example) and click on Create New Layout (or just hit Enter). From there, as you can follow below in the screenshots, it’s simply a matter of assigning the WooProducts Layout Section you have created to the Content Layout Section, and then adding the conditions to the Layout.
Click on “Select Content” on the Layout, head to “Existing Section”, and select the Layout Section you previously created. They click on “Manage Conditions” at the bottom of the Layout, head to the Products tab on the left-hand side, and then select “All Products”.
That’s it. Now, all single-product pages will use this custom Layout. If you now head to a product page on the front end of your site, the product will use the new Layout you created. Keep in mind that you could also create and assign custom Layout Sections for the Header, Page Title Bar, or Footer to this Layout as well, for completely unique product pages.

Special Features
Avada Pagination Element
The Avada Pagination Element provides three pagination styles for your products. There is the traditional “Text Style”, as used in blog posts, but now there is also a “Text With Preview” style, which shows a thumbnail of the product under the Previous/Next link on hover, and a “Sticky Preview” style, which shows a sticky thumbnail in the middle of the viewport, which expands on hover.
You can even limit the pagination to the same product taxonomy. For more details on the Element, including the various Layout Styles, please check the Pagination Element help file.
Avada Social Sharing Element
The Avada Social Sharing Element makes it easy for visitors to share your content on popular social media platforms with a single click. By placing share buttons directly within your posts, pages, or products, you encourage readers and customers to spread your content organically, increasing visibility and potential traffic without additional marketing spend.
Check out the Social Sharing Element help file for full details of all of the available options for this Avada Element.
Attributes, Variations and Swatch Styles
As part of the Avada WooCommerce Builder, there are three attribute display types – “Avada Color”, “Avada Image”, and “Avada Button”. These are added as Product attributes, and then variations can be added as well.
Another useful part of the Avada Woo Add To Cart Element is the Swatch Style options. Here, you can choose from Default or Custom, and if you select Custom, a range of styling options appear for the Avada Color, Avada Image, and Avada Button Swatches. For full details on how to use these new Product Attributes and Swatch styles, please see the How To Use WooCommerce Attribute Swatches document.


