How To Use The Avada Slider

Last Update: May 22, 2024

Avada Slider is our own beautiful and lean slider, developed especially for Avada. It has amazing flexibility and produces stunning results. The slider is 100% responsive, giving you full control over width and height to easily create fixed, full width or full-screen sliders. You can create both image and video slides with support for self-hosted videos, YouTube and Vimeo. You can add Title and Caption text, along with buttons, and control various styles and typography settings.

The Avada Slider consists of sliders and slides. The process is to first create a slider, and then create slides and assign them to the slider. Any slide you create can be assigned to any slider. The Slider itself is then assigned to a page, either from the specific Page Options, under the Slider tab, or directly in the page content using the Avada Slider Element.

Avada Slider is a simple and lightweight slider, and it’s not meant to compete with much more complex sliders like Slider Revolution or LayerSlider. Please follow the links to read the documentation on those if you have a more complex slider in mind. But for a simple, lightweight slider, Avada Slider is a great choice. Continue reading below to learn about how to use Avada Slider, or watch the video for a visual overview.

For privacy reasons YouTube needs your permission to be loaded.

How To Add An Avada Slider

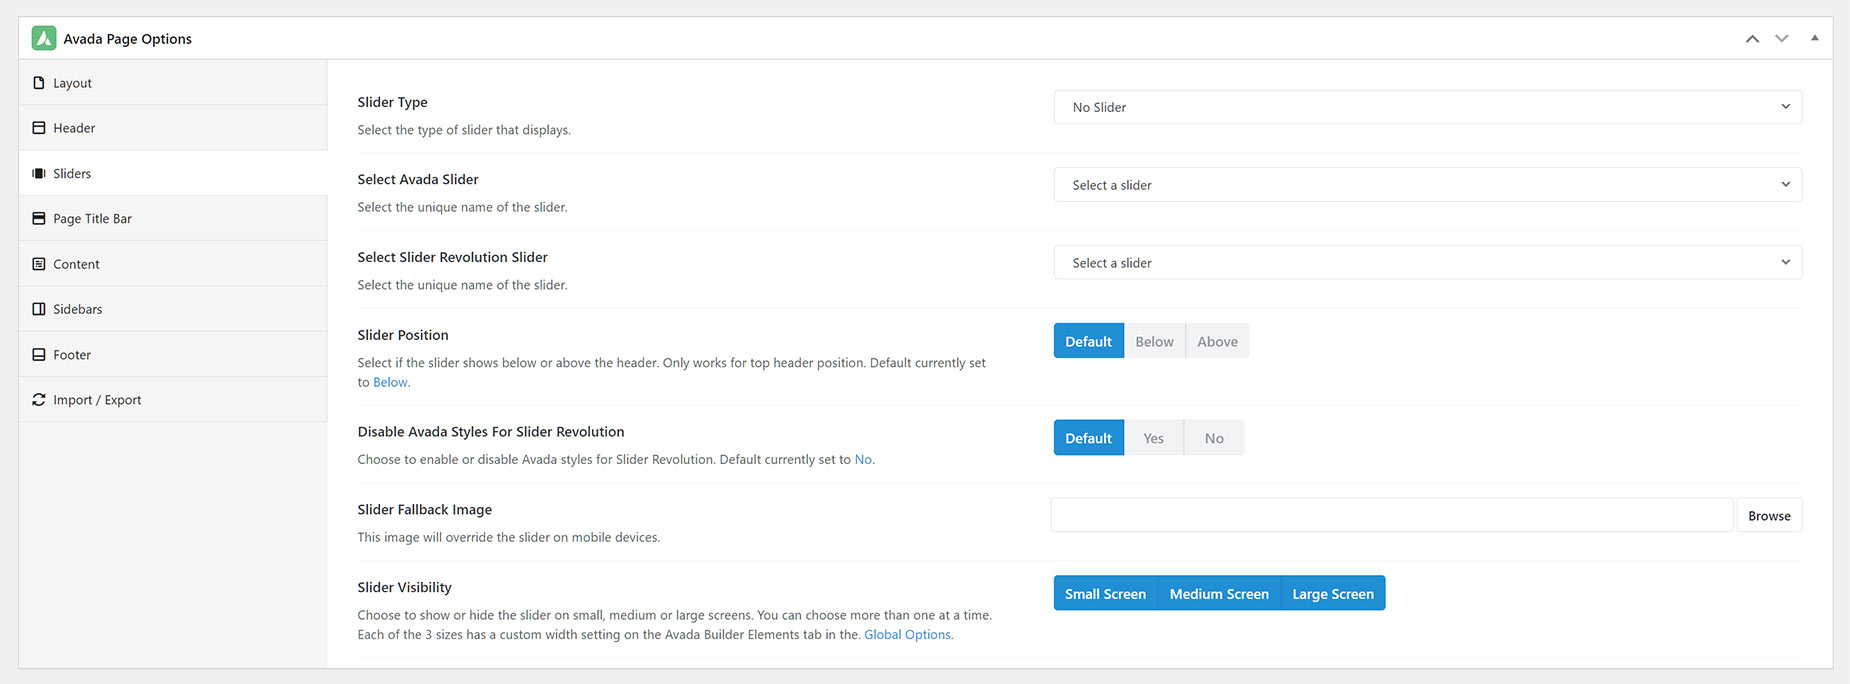
There are two ways to add an Avada Slider to your page. The first is through the Avada Page Options. With this method, you simply create your Slider first, and then go to the page options of the page you want the Slider to display on. On the Slider tab, you can select your chosen slider to display, as well as its position, and a possible fallback image. You can also choose whether to display the Slider on Desktop, Tablet or Mobile screens.

Avada Page Options > Sliders

The other way to add an Avada Slider to your page is with the Avada Slider Element. With this method, you can add the Slider anywhere in your content, in any size Column. See the Avada Slider documentation for more information on that method. The rest of this document covers the process of creating both an Avada Slider, and the Sliders inside it.

How To Create A New Avada Slider

Before you can display an Avada Slider on your site, you must of course first create it. The first step is to create a slider to hold your slides. In this section, we’ll be covering how to create a slider, and the options you can use to customize it.

Step 1 – Navigate to the Avada > Sliders > from your WordPress admin panel.

Step 2 – Directly under the Add Slider section, give your new slider a name by entering it in the ‘Name’ field.

Step 3 – Each slider you make can be used as a shortcode in a page or post. Enter a unique shortcode name in the ‘Shortcode’ field. Make sure to only use lowercase letter, numbers and hyphens.

Step 4 – Under the ‘Slider Size’ option, you can enter your slider’s width and height. The width value can be a percentage or a pixel value, while the height value should be a pixel value. So, if you would like your slider to be full width of the browser window, then you can set your slider’s height to 100%. Otherwise, set it to any pixel value to display the slider at a fixed width.

Step 5 – If you would like your slider to be full screen, then you can check the ‘Full Screen Slider’ checkbox. This enables your slider to display 100% width and 100% height of the viewing area, and overrides the height value.

Step 6 – If you’d like your slider to have a parallax scrolling effect, then you can check the ‘Parallax Scrolling Effect’ checkbox. Please make sure to read the important information for this option below in the Avada Slider Options section.

Step 7 – There are many other options you can customize, such as the navigation options, autoplay, slide loop, animation, and the like. Please continue reading below for a description about each setting.

Step 8 – Once you are finished customizing your slider, click the ‘Add Slider’ button at the very bottom to save your slider.

How To Create An Avada Slider From Avada Live

Adding or creating a new Avada Slider from within Avada Live, is also very easy. As you mouse over the header area, you will see a small panel of icons.

Step 1 – Click on the Add Slider Icon in the Icon Panel in the Header. The Slider tab of the Page Options will open in the Sidebar.

Step 2 – Here you can select an existing slider to add to the page, or you can create a new one. For a completely new Slider, there will be an Avada Slider link in the Important Note section. Click the Avada Slider link and you will be taken to the New Slider page.

Step 3 – Follow the same steps as with the normal process to create a Slider, as listed above.

Avada Builder Live > Add Slider

If the page already has a slider, there will instead be an icon panel in the middle of the slider itself, with options to Edit Slider Options, Edit Slider, or Remove Slider, also seen below.

Avada Builder Live > Edit Slider

Avada Slider Options

Name – Allows you to set a name for your slider.

Shortcode – Allows you to set a shortcode name that can be used in the post content area. This is usually all lowercase and contains only letters, numbers, and hyphens.

Slider Size – Allows you to set a width and height value for your slider. The width value can be a percentage or a pixel value, while the height value should be a pixel value. You can set your slider width to 100% to display it as full width on your site.

Slider Content Max Width – Allows you to set a maximum width value for your slider’s content. For example, 850px. Leave blank to follow your site width value.

Full Screen Slider – You can check this checkbox to display your slider as full screen. Your slider will be 100% width and 100% height of your screen.

Parallax Scrolling Effect – Check this checkbox to enable a parallax scrolling effect on your slider. This effect only works when assigning the slider in Avada Page Options. This effect won’t work if you are using a Slider Shortcode.

Slider Indicator – Choose from the dropdown if you want to display pagination circles or scroll down indicator.

Slider Indicator Color – Set a color for the slider indicator icon. Hex color code, ex: var(–awb-color1). The default value is var(–awb-color1).

Display Navigation Arrows – Check this checkbox to display the navigation arrows on each side of the slider.

Navigation Arrow Size – Allows you to set a pixel value for the size of the navigation arrows. For example, 25px.

Navigation Box Size – Allows you to set a pixel value for the width and height of the navigation box. For example, 40px.

Slideshow Speed – Allows you to set a numerical value that controls the speed of your slideshow. For example, 1000. 1000 is equal to 1 second.

Slide Loop – Check this checkbox to enable the loop feature and have your slides loop infinitely.

Autoplay – Check this checkbox to enable the autoplay feature on the slides.

Order By – Controls how the slides should be ordered. Choose between Date, ID, Title, Modified, or Random.

Order – Controls the sorting order of the slides. Choose between Descending or Ascending.

Animation – Allows you to set an animation type for slide transitions. Choose between Fade or Slide.

Animation Speed – Allows you to set a numerical value that controls the speed of the slide transition. For example, 1000. 1000 is equal to 1 second.

Responsive Typography Sensitivity – Allows you to set the responsive typography sensitivity on the slider. To learn more about this, please read our Responsive Headings article.

Minimum Font Size Factor – Allows you to set the minimum distance between headings and body text on the slider. To learn more about this, please read our Responsive Headings article.

How To Create A New Avada Slide

Once you’ve created a Slider, you now create a slide, or slides, which you can assign to any existing Slider. Slides are what hold the content to be displayed on the Slider. In this section, we’ll be covering how to create slides, and the options you can use to customize them.

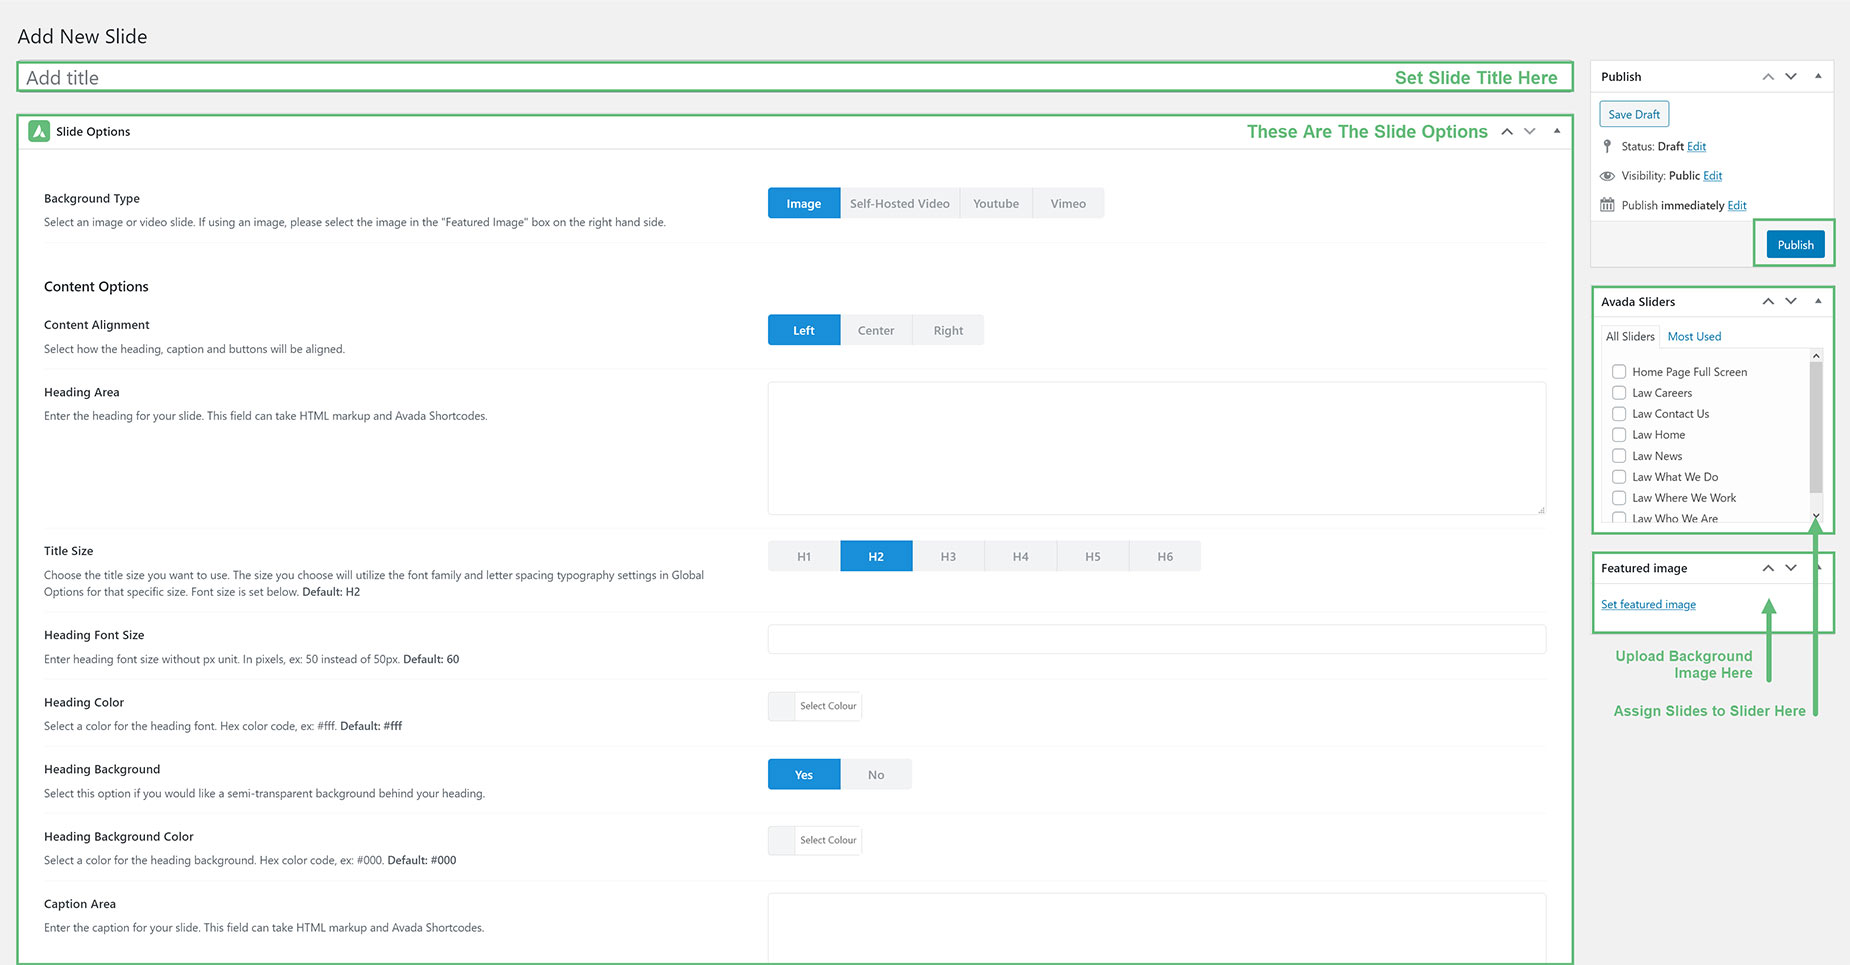
Step 1 – From the Avada Dashboard, navigate to Sliders > Slides. Alternatively, from the Sliders page, there is a link to the Slides page just under the page heading.

Step 2 – Click the ‘Add New Slide’ button just under the heading area.

Step 3 – Once you create a new Slide, don’t forget to give it a name.

Step 4 – Choose what Background Type you’d like to use. You can choose from Image, Self-Hosted Video, YouTube or Vimeo. Read more about each Background Type below. Depending on which type you select, there will be various options to choose.

Step 5 – Customize the Slider Content settings. Enter headings, captions, buttons and more. Read more about the Slider Content settings below.

Step 6 – Customize the Slide Link Settings. Choose to link a button, or the full slide. Read more about the Slider Content settings below.

Step 7 – To assign the slide to a slider, select the slider name in the Avada Sliders option box in the right sidebar. Any slide you create can be assigned to any slider.

Step 8 – When finished, click the ‘Publish’ button to save the slide.

See a visual representation of the Add Slide interface below.

Avada Slide Creation Overview

Slide Options – Background Type

  • Image Slide – Enter the background image you’d like to display in the Featured Image box on the right hand sidebar.

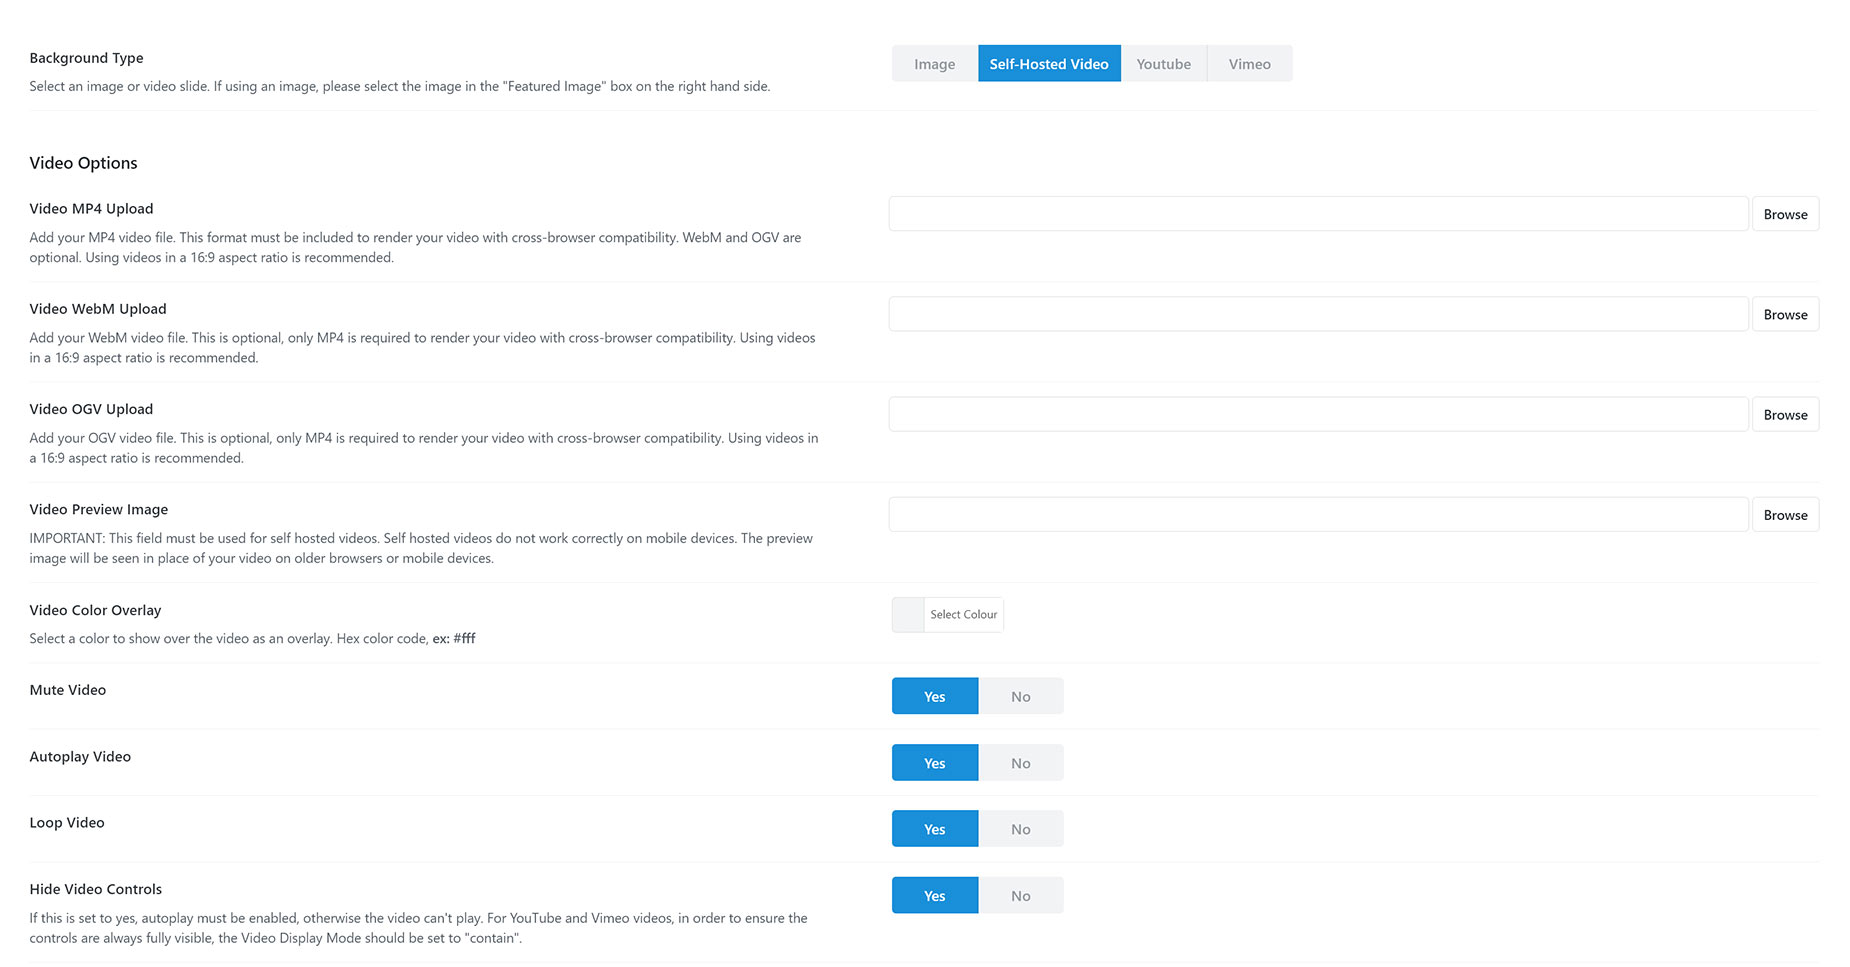
  • Self Hosted Video Slide – An MP4 format video file is required for self hosted videos. It is recommended that it is in a 16:9 aspect ratio. Enter the URL path or browse for the file via the Media Library. WebM and OGV files are now optional, but can be added to improve browser compatibility. You’ll also want to insert a video preview image for devices and old browsers that do not support these video types.

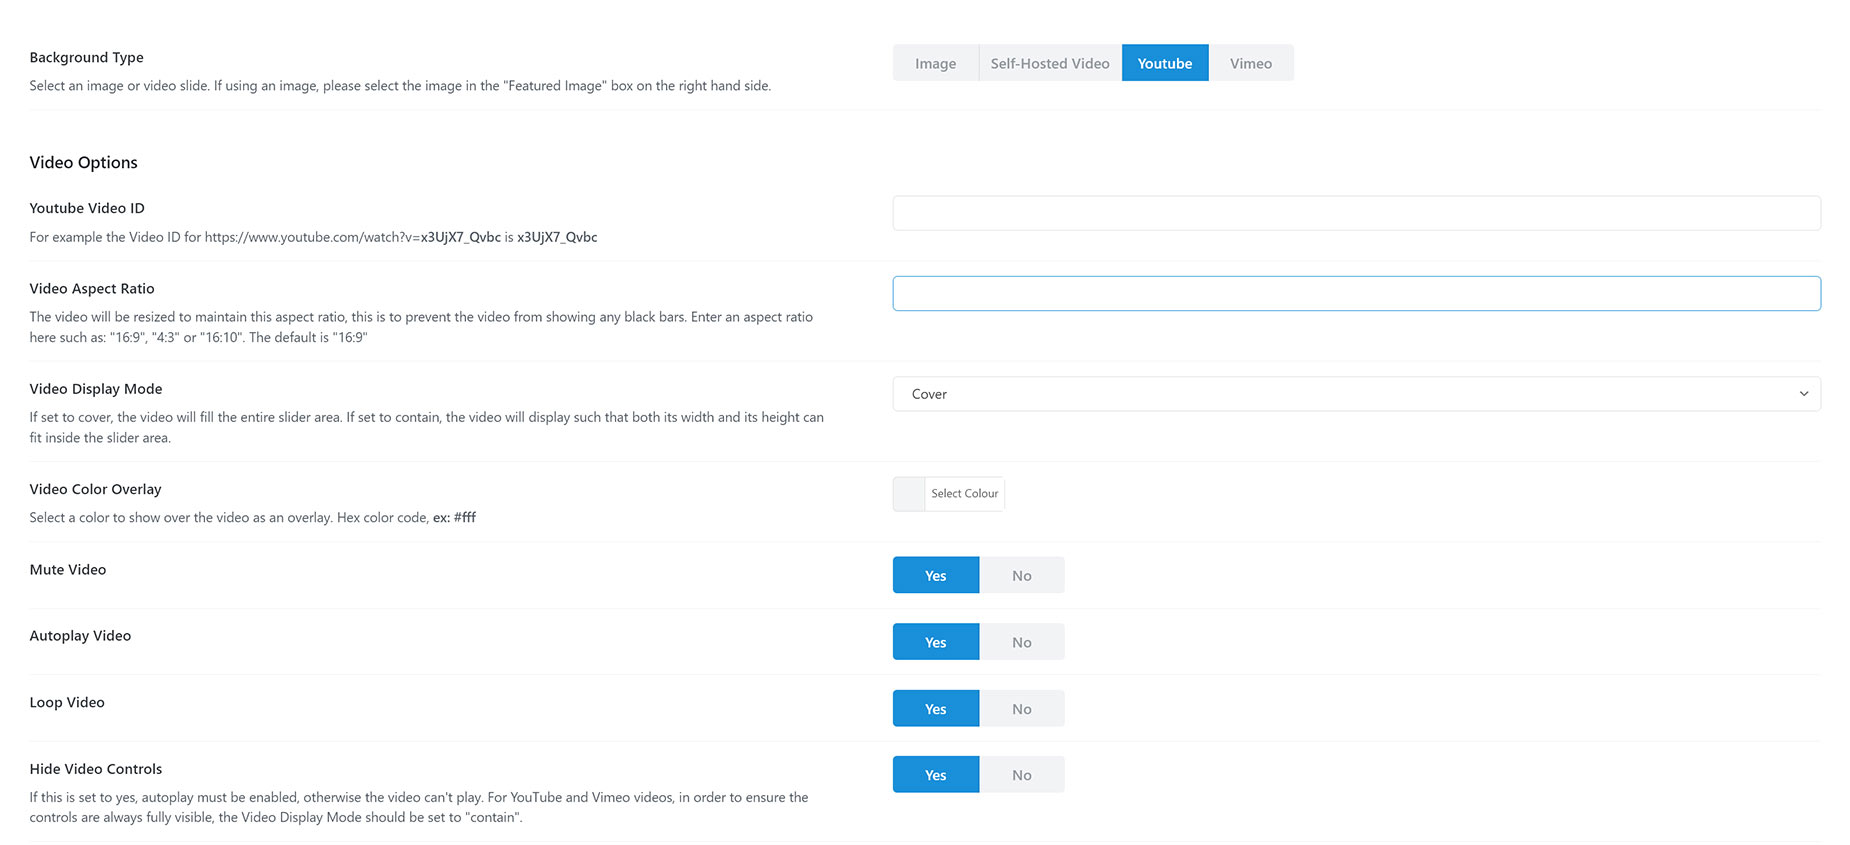
  • YouTube Video Slide – Enter the YouTube video ID. For example, the Video ID for http://www.youtube.com/LOfeCR7KqUs is LOfeCR7KqUs. There are also settings to mute, autoplay, loop the video, hide the video controls add a color overlay to the video.

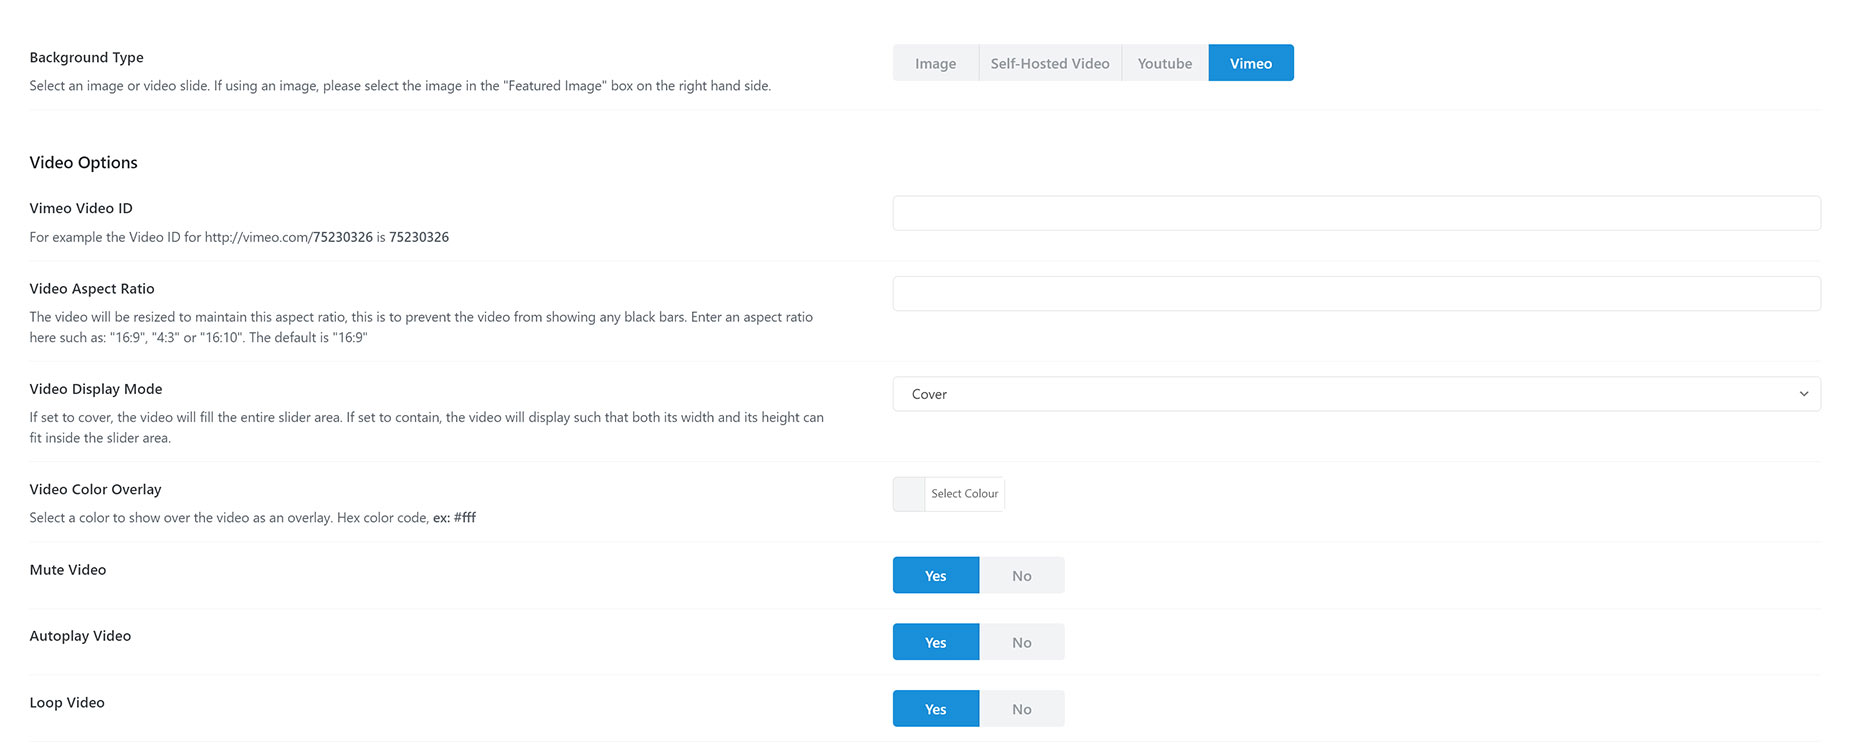
  • Vimeo Video Slide – Enter the Vimeo video ID. For example the Video ID for http://vimeo.com/75230326 is 75230326. There are also settings to mute, autoplay, loop the video and add a color overlay to the video.
Avada Slide Background Type Option

Slide Options – Video Options

Self Hosted Video Options

  • Add your MP4 video file. This format must be included to render your video with cross-browser compatibility. WebM and OGV are optional. Using videos in a 16:9 aspect ratio is recommended.

  • Add your WebM video file. This is optional, only MP4 is required to render your video with cross-browser compatibility. Using videos in a 16:9 aspect ratio is recommended.

  • Add your OGV video file. This is optional, only MP4 is required to render your video with cross-browser compatibility. Using videos in a 16:9 aspect ratio is recommended.

  • IMPORTANT: This field must be used for self hosted videos. Self hosted videos do not work correctly on mobile devices and older browsers. The preview image will be seen in place of your video.

  • Select a color to show over the video as an overlay. Hex color code, ex: var(–awb-color1)

  • Mute Video – Turn all sound off for the video.

  • Autoplay Video – Choose whether to autoplay the video or not when it loads.

  • Loop Video – Choose whether to loop the video or not.

  • If this is set to yes, autoplay must be enabled, otherwise the video can’t play. For YouTube and Vimeo videos, in order to ensure the controls are always fully visible, the Video Display Mode should be set to “contain”.

    Note: For true background videos, ensure the last four options are set to Yes.

Avada Slide Self Hosted Video Options

YouTube Video Options

  • Select a color to show over the video as an overlay. Hex color code, ex: var(–awb-color1)

  • Mute Video – Turn all sound off for the video.

  • Autoplay Video – Choose whether to autoplay the video or not when it loads.

  • Loop Video – Choose whether to loop the video or not.

  • If this is set to yes, autoplay must be enabled, otherwise the video can’t play. For YouTube and Vimeo videos, in order to ensure the controls are always fully visible, the Video Display Mode should be set to “contain”.

    Note: For true background videos, ensure the last four options are set to Yes.

Avada Slide YouTube Video Options

Vimeo Video Options

  • Select a color to show over the video as an overlay. Hex color code, ex: var(–awb-color1)

  • Mute Video – Turn all sound off for the video.

  • Autoplay Video – Choose whether to autoplay the video or not when it loads.

  • Loop Video – Choose whether to loop the video or not.

Avada Slide Vimeo Video Options

Slide Options – Content Options

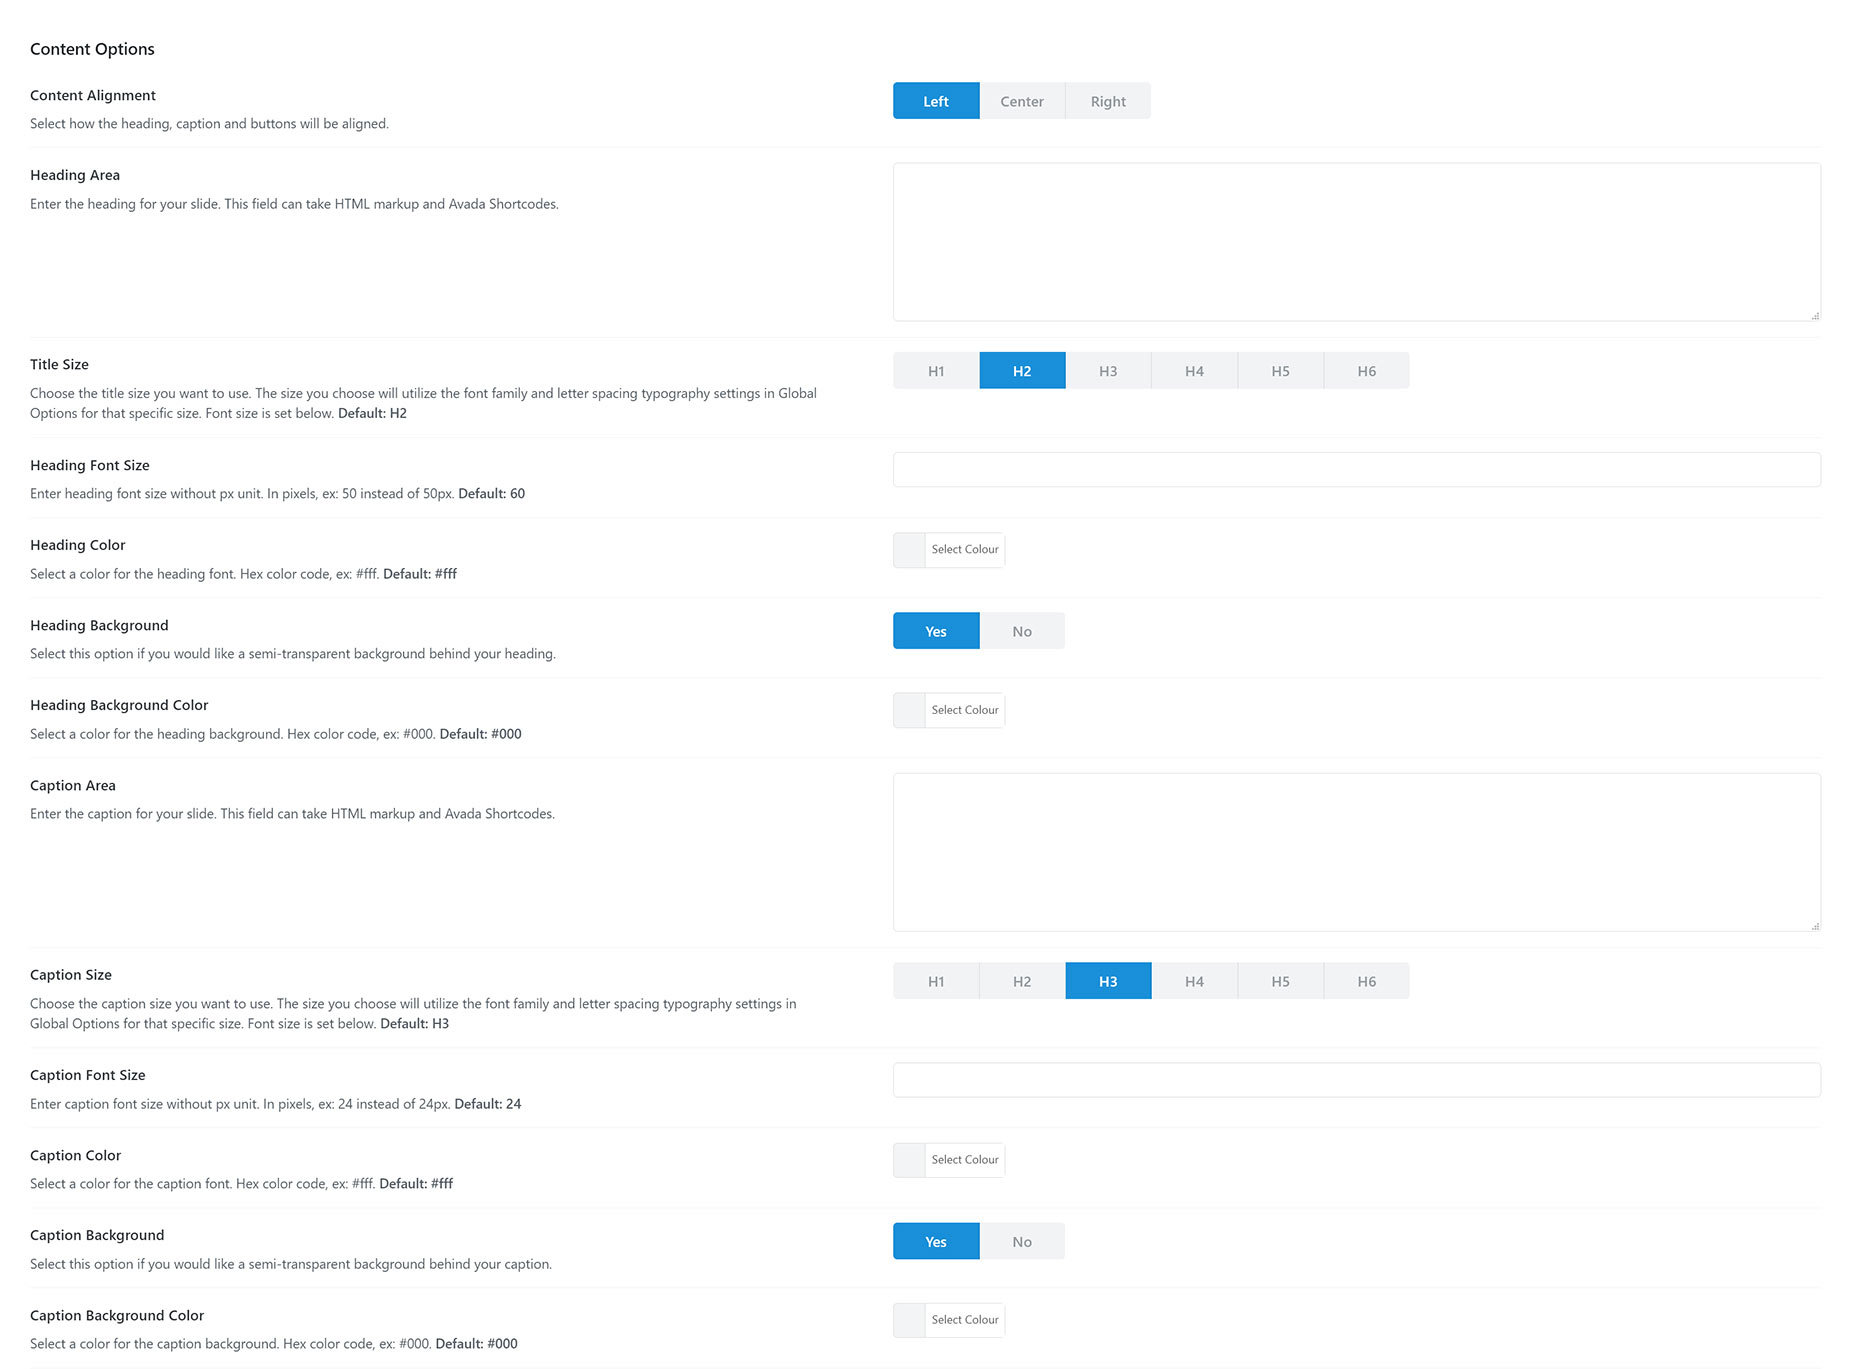
  • Content Alignment – Select if the content is left, right or center aligned.

  • Heading Area – Enter the heading text that will display on your slider. You can also choose to insert HTML markup and Avada shortcodes, such as a separator, into the text field.

  • Title Size – Choose the title size you want to use. The size you choose will utilize the font family and letter spacing typography settings in Global Options for that specific size. Font size is set below. Default: H2
  • Heading Font Size – Adjust the font size of the heading text by entering a numerical value. For example, 60.
  • Heading Color – Select a color for the heading font by entering a hexadecimal code. For example, var(–awb-color8).
  • Heading Background – Choose to display a semi-transparent background behind the heading text. Choose between Yes or No.
  • Heading Background Color – Select a color for the heading background by entering a hexadecimal code. For example, var(–awb-color8).
  • Caption Area – Enter a text caption for your slide. You can also choose to insert HTML markup and Avada shortcodes, such as a separator, into the text field.

  • Caption Size – Choose the caption size you want to use. The size you choose will utilize the font family and letter spacing typography settings in Global Options for that specific size. Font size is set below. Default: H3.

  • Caption Font Size – Adjust the font size of the caption text by entering a numerical value. For example, 60.
  • Caption Color – Select a color for the caption font by entering a hexadecimal code. For example, var(–awb-color8).
  • Caption Background – Choose to display a semi-transparent background behind the caption text. Choose between Yes or No.
  • Caption Background Color – Select a color for the caption background by entering a hexadecimal code. For example, var(–awb-color8).
Avada Slide Content Settings

Slide Options – Link Options

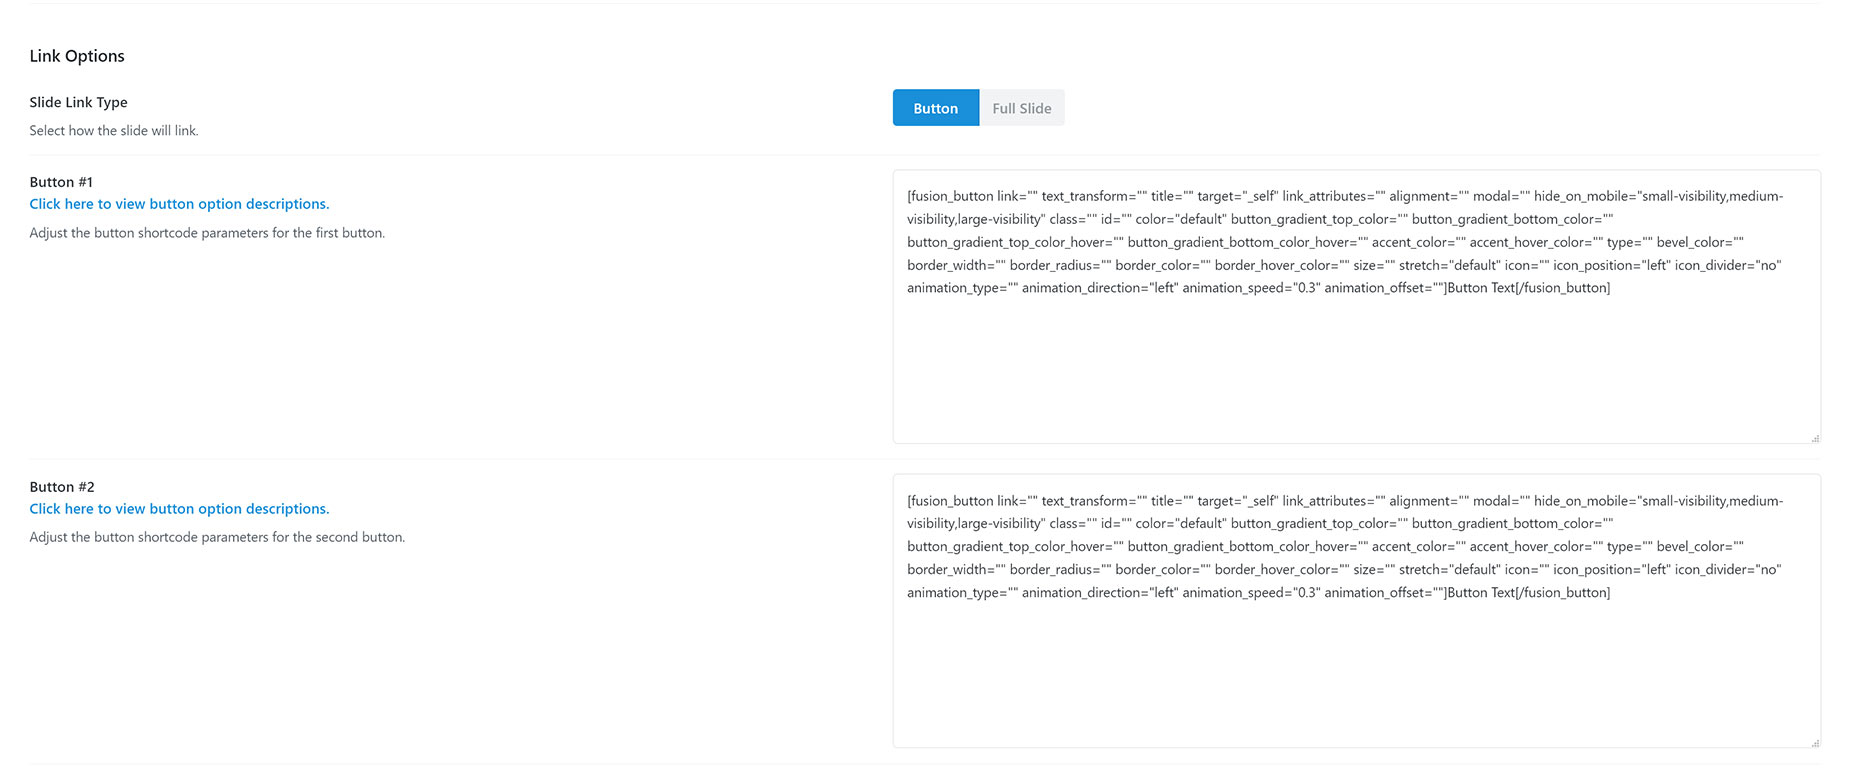
  • Button Link – Use one or two buttons. Each button has a text field with a full set of button shortcode options. Enter the settings for each button to display two buttons, or clear out one of the button fields to only show one button.

  • Full Slide Link – Enter a URL where your full slide background will link. You can also choose to open the link in a new window or not.
Avada Slide > Link Options

Avada Slider General Options and Import/Export

Under this section, we’ll be covering how to edit, delete or clone an Avada Slide or Slider, as well as how to import or export Avada Sliders. Continue reading below for detailed instructions for each of these processes.

How To Edit, Delete or Clone A Slide Or Slider

Step 1 – From the Avada Dashboard, navigate to Sliders > Sliders or Sliders > Slides, to access your sliders or slides.

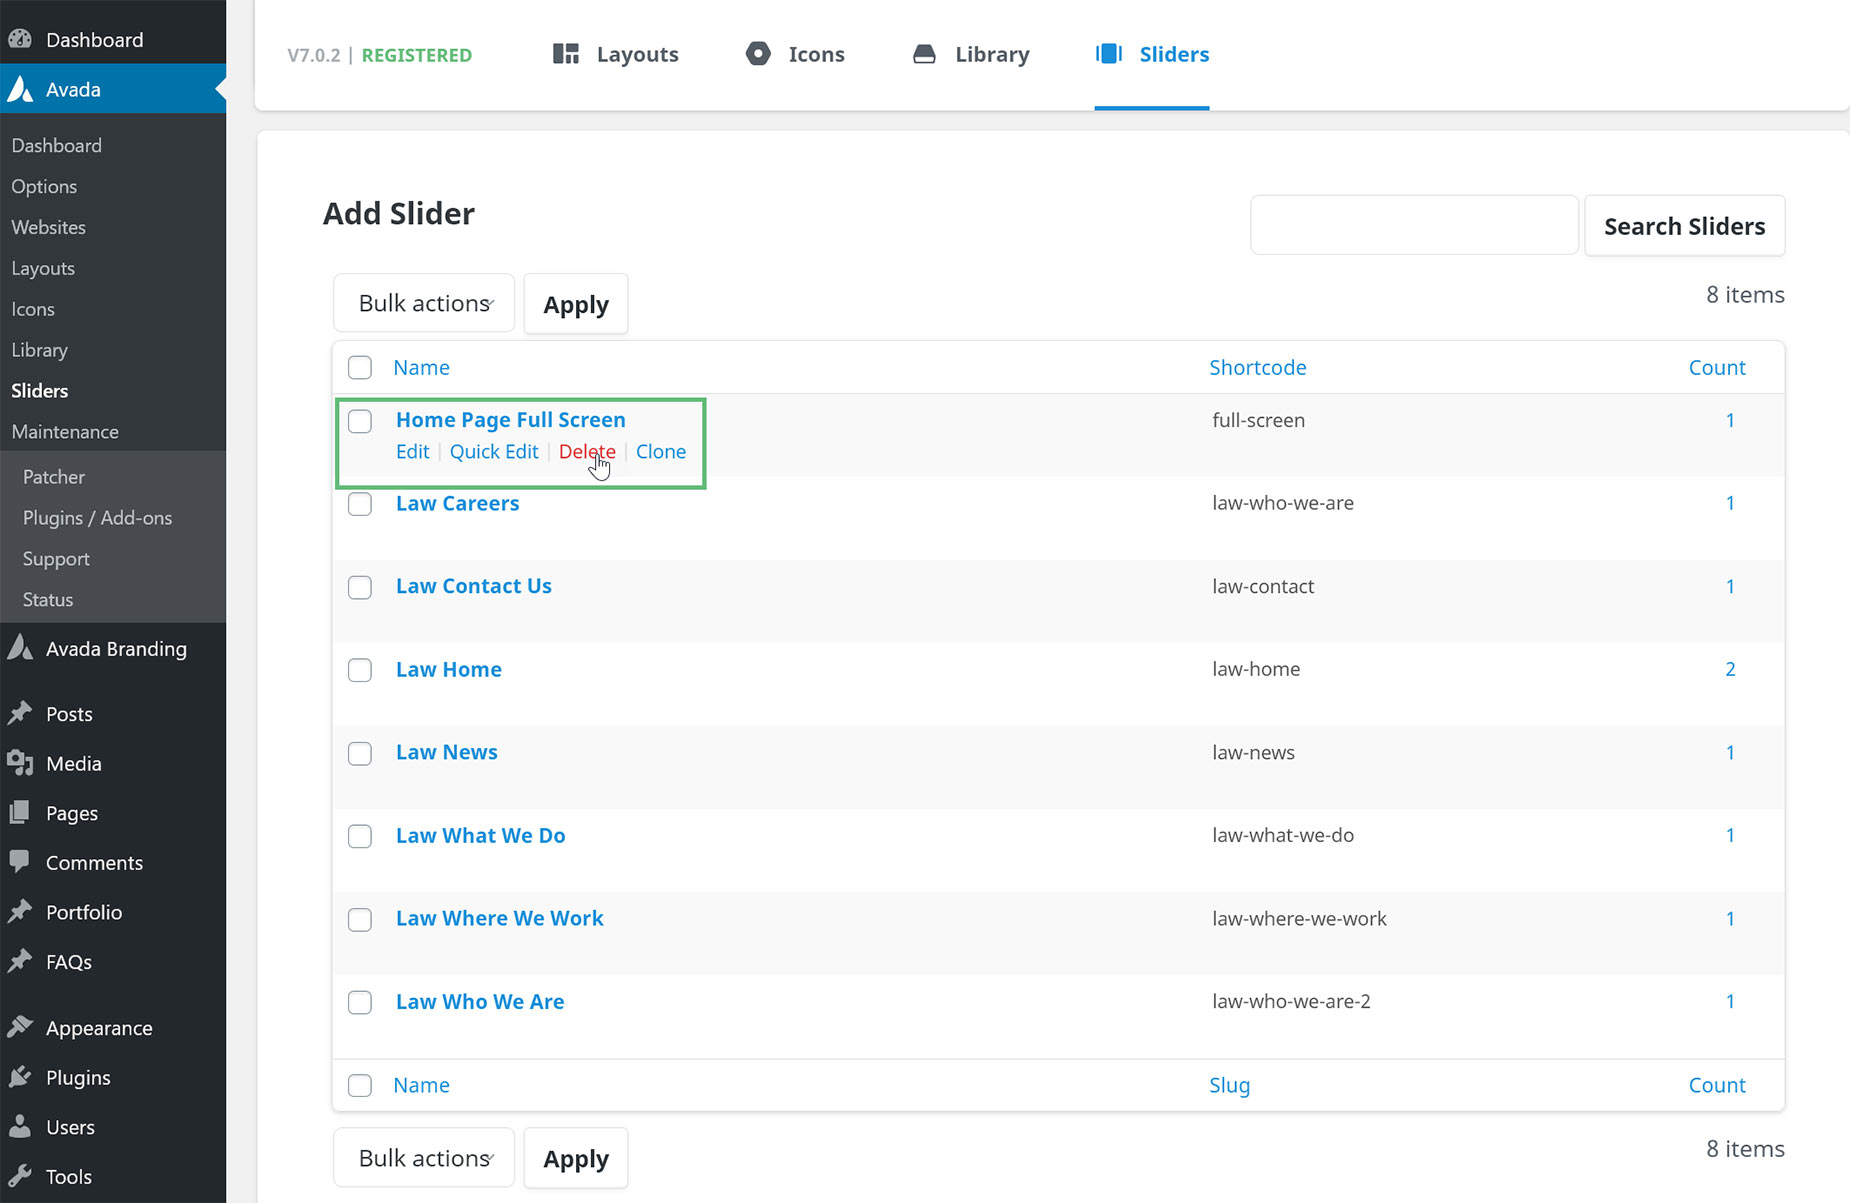
Step 2 – On these pages, you will see a list of all your existing slides or sliders. Hover over the slide or slider you’d like to customize, and a set of options will appear.

Step 3 – These options are Edit, Quick Edit, Delete or Clone. Edit allows you to edit the slide or slider, Quick Edit allows you quickly edit important options without leaving the page, Delete allows you to delete the slide or slider, and Clone allows you to duplicate the slide or slider.

Step 4 – Simply click on the specific action you’d like to do.

Avada Slider Edit Options

Alternatively, if you’re already editing a slider or a slide, there will be a ‘Clone This Slider’ or ‘Clone This Slide’ button at the top of the Edit Slider area, or directly under the Slide Title, as seen below.

Avada Slider > Clone Slider
Avada Slider > Clone Slide

How To Import / Export Avada Slides & Sliders

Step 1 – From the Avada Dashboard, navigate to Sliders > Export / Import Sliders.

Step 2 – To export all your Avada Slides and Sliders, simply click the ‘Export All Sliders’ button. Once you click this button, a file named avada_slider.zip will be downloaded. This file contains all your slide images, a settings.json file, and a sliders.xml file.

Step 3 – To upload all your Avada Slides and Sliders, click the ‘Choose File’ button found under Import, and select the .zip file that you received after exporting your Avada Sliders. Once you have the correct file chosen, click the ‘Upload File and Import’ button.

Step 4 – Wait until the import is finished, then go to the Avada > Sliders page from your WordPress Dashboard to see your newly imported slider and slides.

Troubleshooting

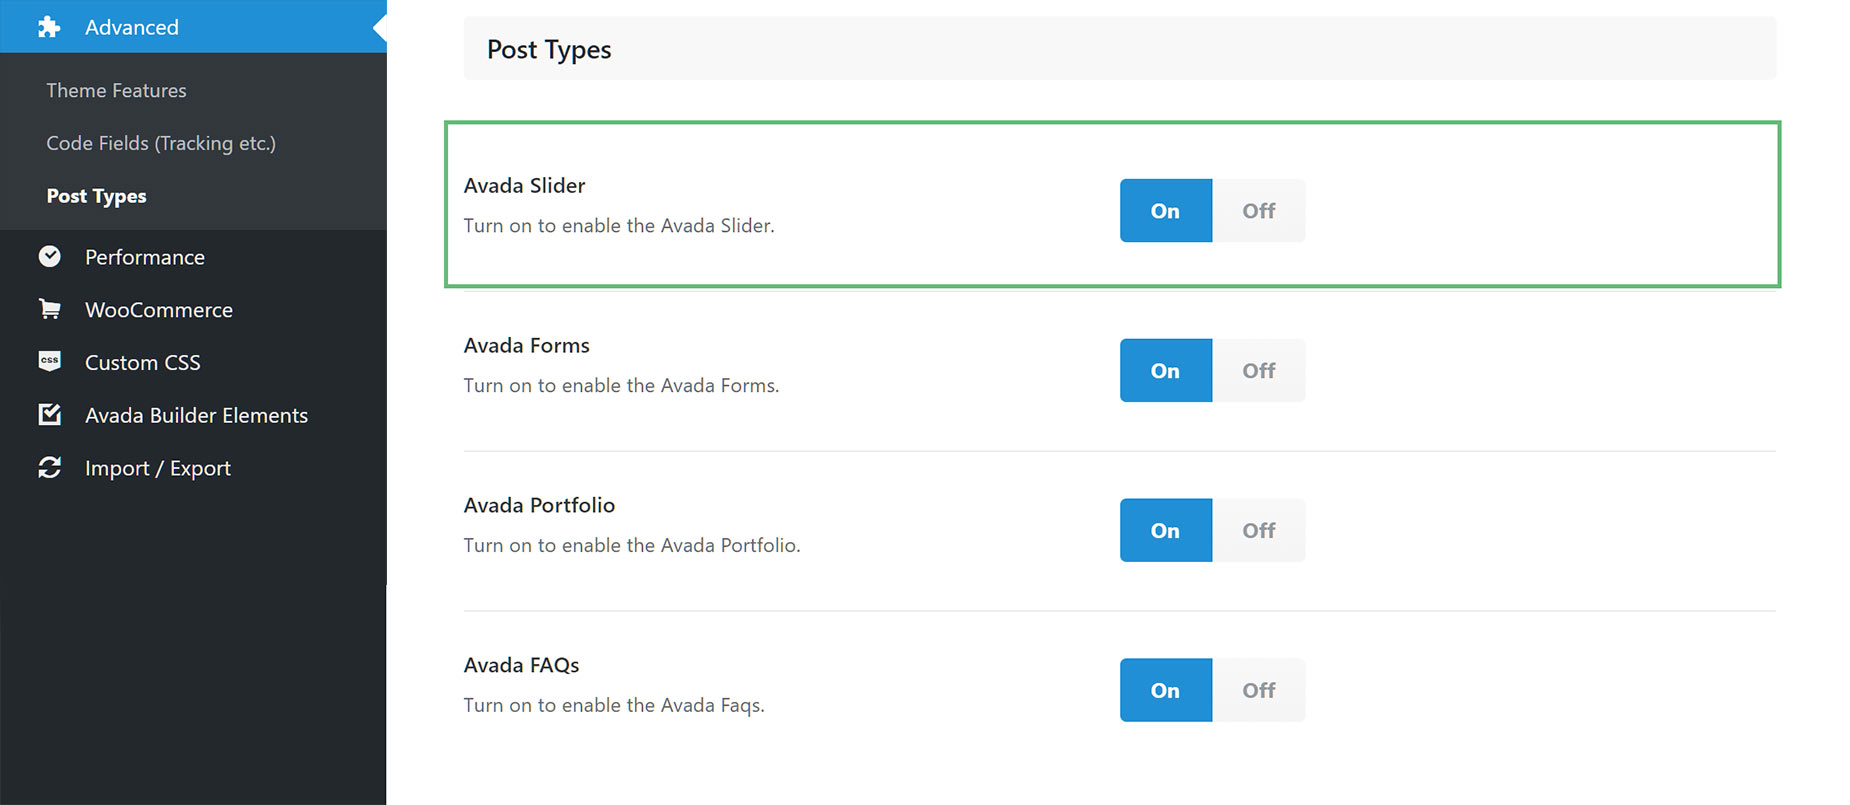
If you can’t see the Sliders menu in the Avada Dashboard, this is because you don’t have Avada Sliders enabled. To do this, simply head to Avada > Options > Advanced > Post Types, and ensure that the Avada Slider option is set to On. If it is Off, change it to On, save the options, and then refresh the page. Now you will see the Sliders Menu on the Avada Dashboard.
Enable Avada Slider