Social Media Icons
In the Social Media Icons panel, found at Avada > Options > Social Media > Social Media Icons, you will find a repeater field, to which you can add one social network at a time. You can add as many social links as you require. You can also add custom social links and icons here, which you can read more about below.
IMPORTANT NOTE: The social media icons and links that you insert on this tab will be the icons that will be displayed on your header or footer.
How To Add Social Media Icons
Step 1 – Navigate to Avada > Options > Social Media > Social Media Icons.
Step 2 – In the repeater field dropdown, select the social network that you’d like to add an icon for. For example, Facebook.
Step 3 – Under the ‘Link (URL)’ field, enter the URL you’d like the social media icon to link to. For example, http://www.facebook.com/avada.
Step 4 – Once done, click the ‘Add’ button to add it to the list.
Step 5 – To add another social media icon, simply repeat Step 2 to 4.
Step 6 – To delete a social media icon, expand the social media icon tab you’d like to delete, then click the ‘Delete’ button on the lower right side.
Step 7 – To rearrange the order of the social media icons, simply drag and drop each tab until you achieve your desired order.
Step 8 – Once you’re done adding social media links, don’t forget to click the ‘Save Changes’ button.
Once you have added Social Media Links, you can display them on your site. On the Header Content tab, found at Avada > Options > Header > Header Content, you can, if you have chosen a header layout that supports it, choose to show Social Links in the Header Content 1 or Header Content 2 field. Full instructions and screenshot below.
IMPORTANT NOTE: For social media icons to appear on your header, you must enable it and have the appropriate social media links set in the Social Media Icons tab.
How To Display Social Media Icons In Your Header
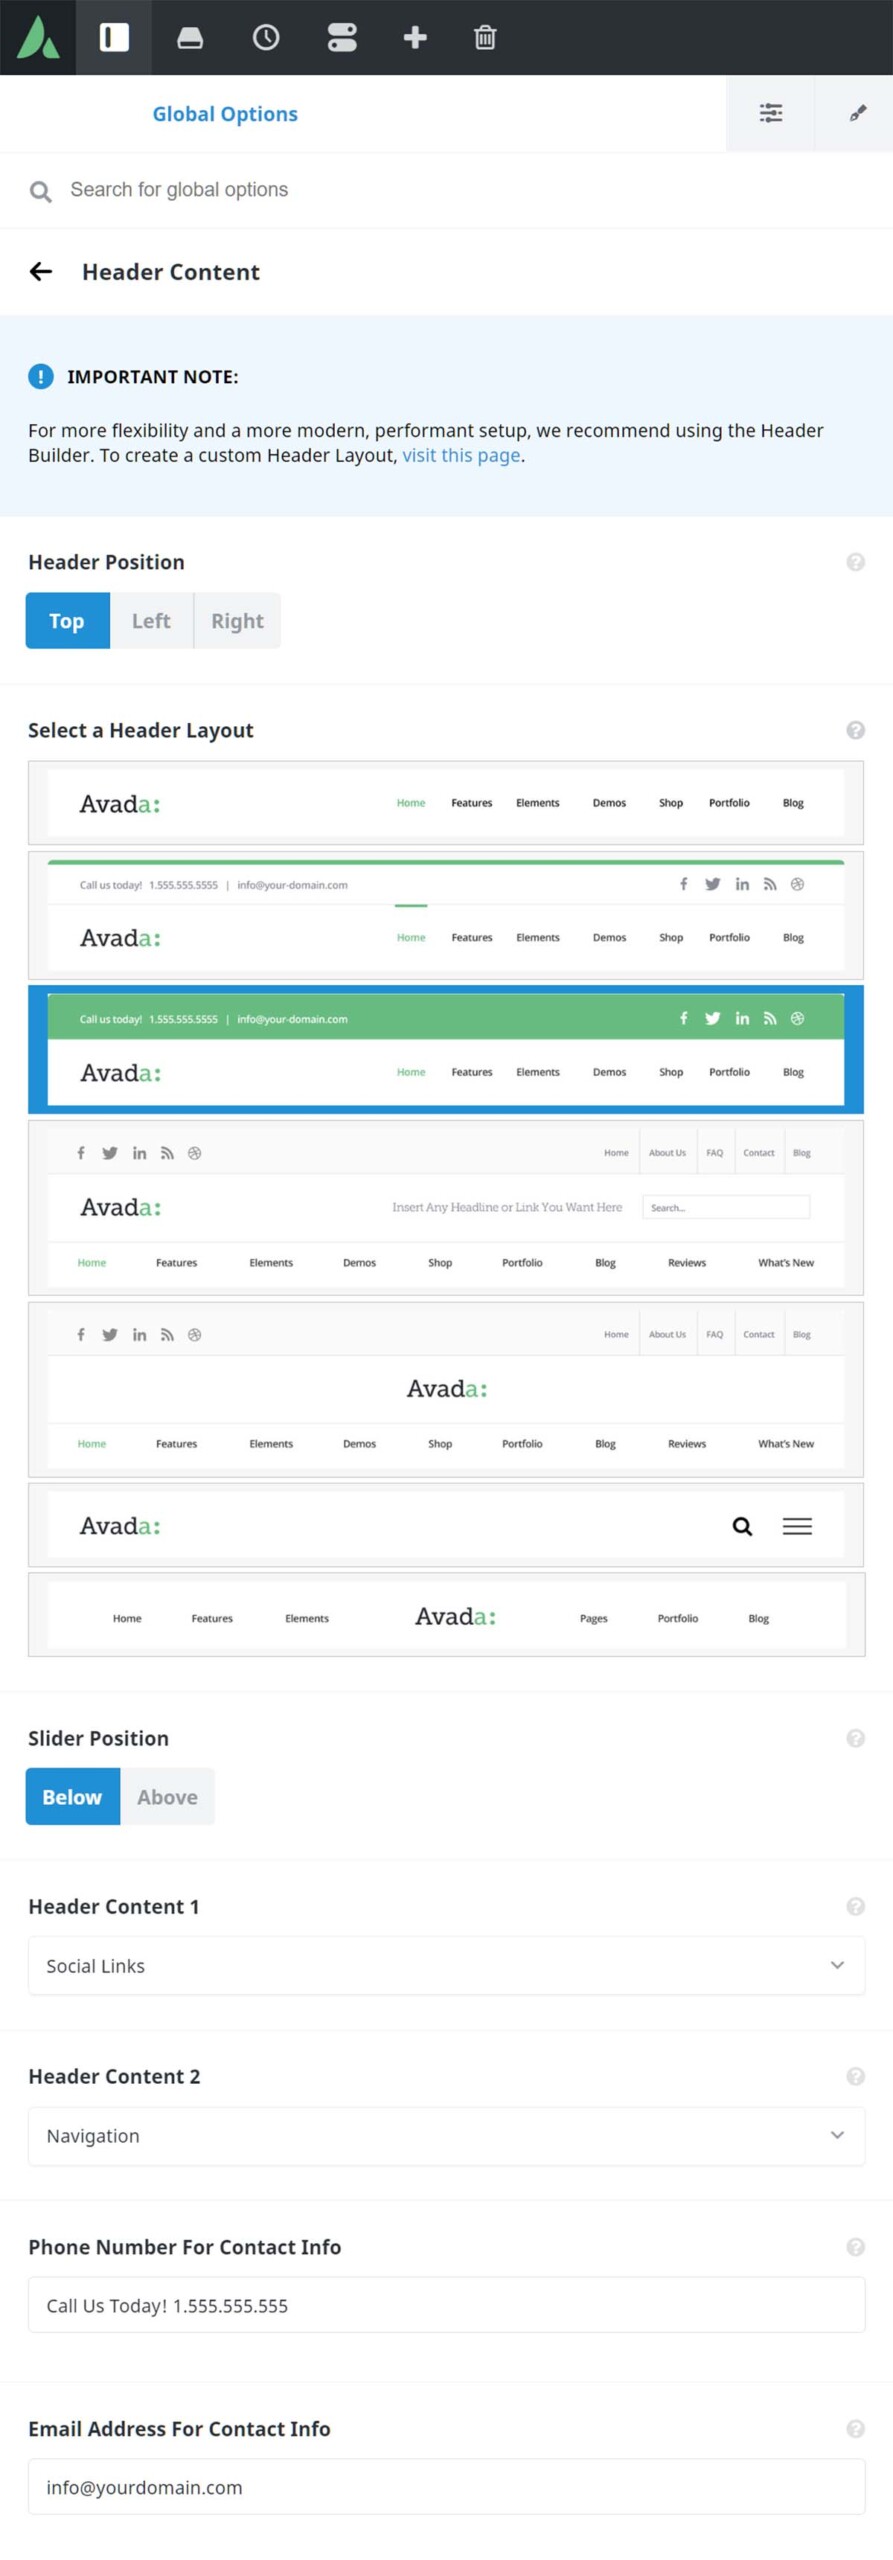
Step 1 – Navigate to Avada > Options > Header > Header Content.
Step 2 – Choose a header layout #2 – #5 (not available for header layouts 1, 6, 7).
Step 3 – Under ‘Header Content 1’ or ‘Header Content 2’ dropdowns, select the Social Links option to display social links on the header.
Step 4 – Don’t forget to save your changes by clicking the ‘Save Changes’ button.
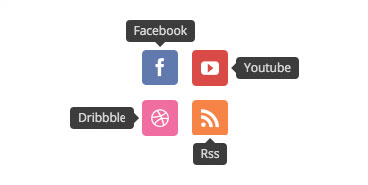
Styling Header Social Media Icons
To style your Header Social Media Icons, see the following steps.
Step 1 – Navigate to Avada > Options > Social Media > Header Social Icons Styling.
Step 2 – On this tab, you will find configuration options such as font size, tooltip position, color, and layout.
Step 3 – When you are done, click the Save Changes button.
You can also display social media icons in your Footer. They draw from the same pool of social media icons set previously, but you can style them independently to the header social media icons. Continue reading below to learn how to display social media icons on your footer and customize them.
IMPORTANT NOTE: For social media icons to appear on your footer, you must enable it and have the appropriate social media links set in the Social Media Icons tab.
How To Display Social Media Icons In Your Footer
Step 1 – Navigate to Avada > Options > Social Media > Footer Social Icons Styling.
Step 2 – Locate the ‘Display Social Icons In The Footer’ option and select On.
Step 3 – Under this tab, there are also several options that you can use to customize the appearance of the footer social media icons.
Step 4 – When finished, don’t forget to click the ‘Save Changes’ button.
The Social Sharing Box
The Social Sharing Box allows your viewers to share any blog or portfolio post using several social media networks. This feature can be enabled or disabled on any blog or portfolio single post page. On this tab, you can customize the social sharing box itself and the social media icons within it. Also in this section, we’ve included a quick guide on how to enable/disable the social sharing box on blog and portfolio posts.
How To Enable Social Sharing Box In All Single Blog Post Pages
Step 1 – Navigate to Avada > Options > Blog > Blog Single Post.
Step 2 – Locate the Social Sharing Box option, and select ‘On’ to enable the Social Sharing Box.
Step 3 – Locate the Social Sharing Box option, and select ‘On’ to enable the Social Sharing Box.
How To Enable Social Sharing Box In One Single Blog Post Page
Step 1 – Navigate to the blog post you’d like to enable the Social Sharing Box in.
Step 2 – Under Page Options > Post tab, locate the Show Social Share Box option and set it to ‘Show’.
Step 3 – Don’t forget to save your changes by clicking the Save Draft or Publish.
How To Enable Social Sharing Box In All Single Portfolio Post Pages
Step 1 – Navigate to Avada > Options > Portfolio > Portfolio Single Post.
Step 2 – Locate the Social Sharing Box option, and select ‘On’ to enable the Social Sharing Box.
Step 3 – Don’t forget to save your changes by clicking the ‘Save Changes’ button.
How To Enable Social Sharing Box In One Single Portfolio Post Page
Step 1 – Navigate to the portfolio post you’d like to enable the Social Sharing Box in.
Step 2 – Under Page Options > Portfolio tab, locate the Show Social Share Box option and set it to ‘Show’.
Step 3 – Don’t forget to save your changes by clicking the Save Draft or Publish.
How To Style Social Sharing And Icons
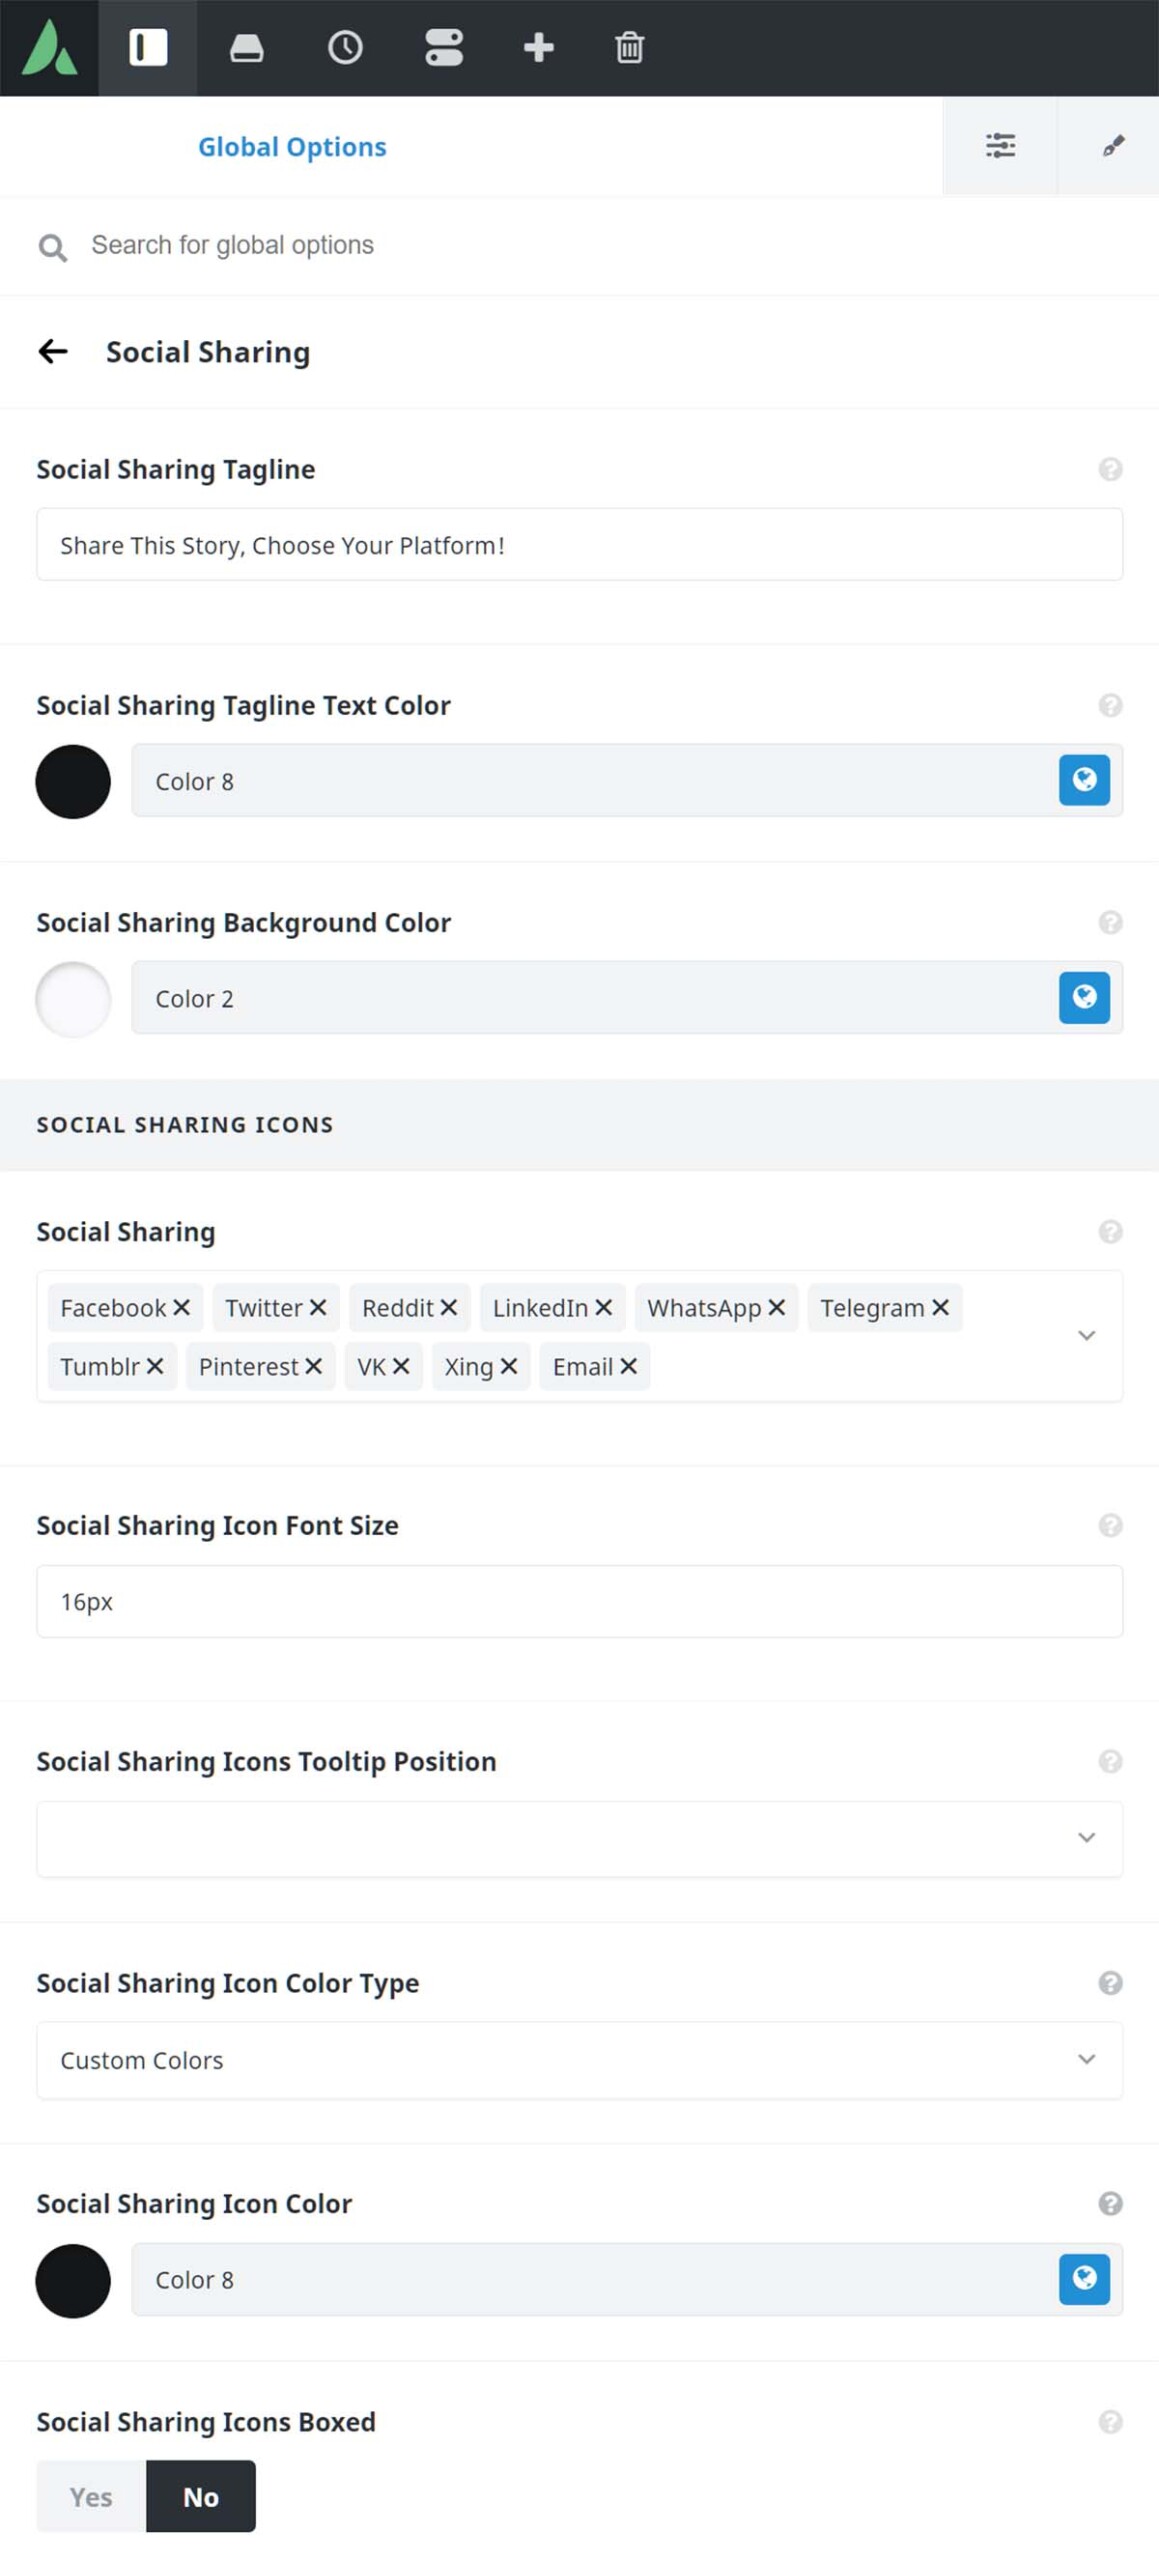
Step 1 – Navigate to Avada > Options > Social Media > Social Sharing.
Step 2 – Here you will see multiple options for social sharing such as the tagline, background color. You’ll also find options for the Social Sharing Icons such as font size, tooltip position, etc.
Step 3 – Under the Social Sharing Links section, you can select which social links to display on the Social Sharing Box. Simply choose ‘On’ for the corresponding social link option that you’d like to show. For example, if you’d like your viewers to be able to share your portfolio or blog post on Facebook, then you will need to set the Facebook option to On.
Step 4 – Don’t forget to save your changes by clicking the ‘Save Changes’ button.
How To Add The Social Sharing Element To A Page Or Post
IMPORTANT NOTE: For social links to appear on the sharing box element, you must first set them in the Avada > Options > Social Media > Social Sharing panel.
Step 1 – Navigate to the page or post where you’d like to add the Social Sharing Element.
Step 2 – Activate the Avada Builder by clicking the ‘Use Avada Builder’ button.
Step 3 – Add a new Container to the page, and select your desired column layout.
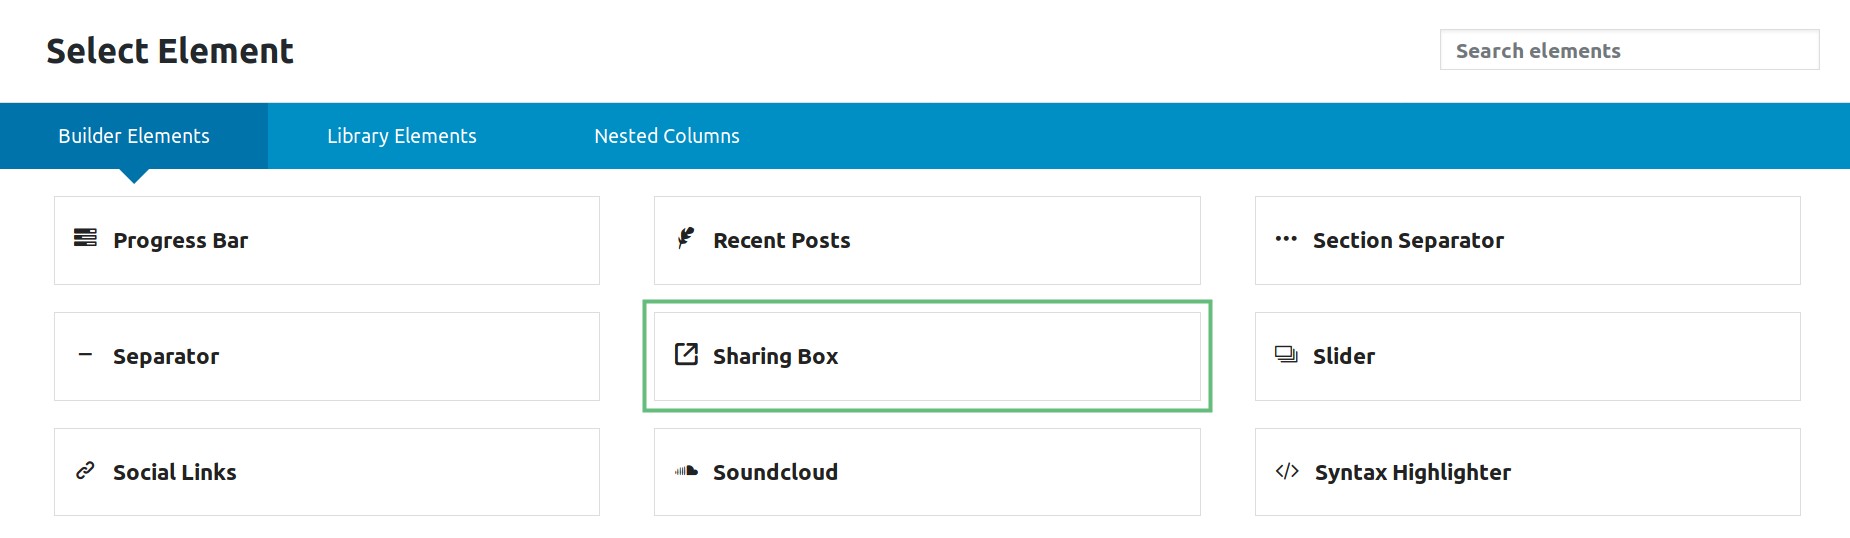
Step 4 – Click the ‘+ Element’ button to bring up the ‘Elements’ window. Find the Social Sharing Element, and then click it to add it to the page and bring up its options window.
Step 5 – Customize the Social Sharing Element to your liking.
Step 6 – Once finished, click ‘Save’.
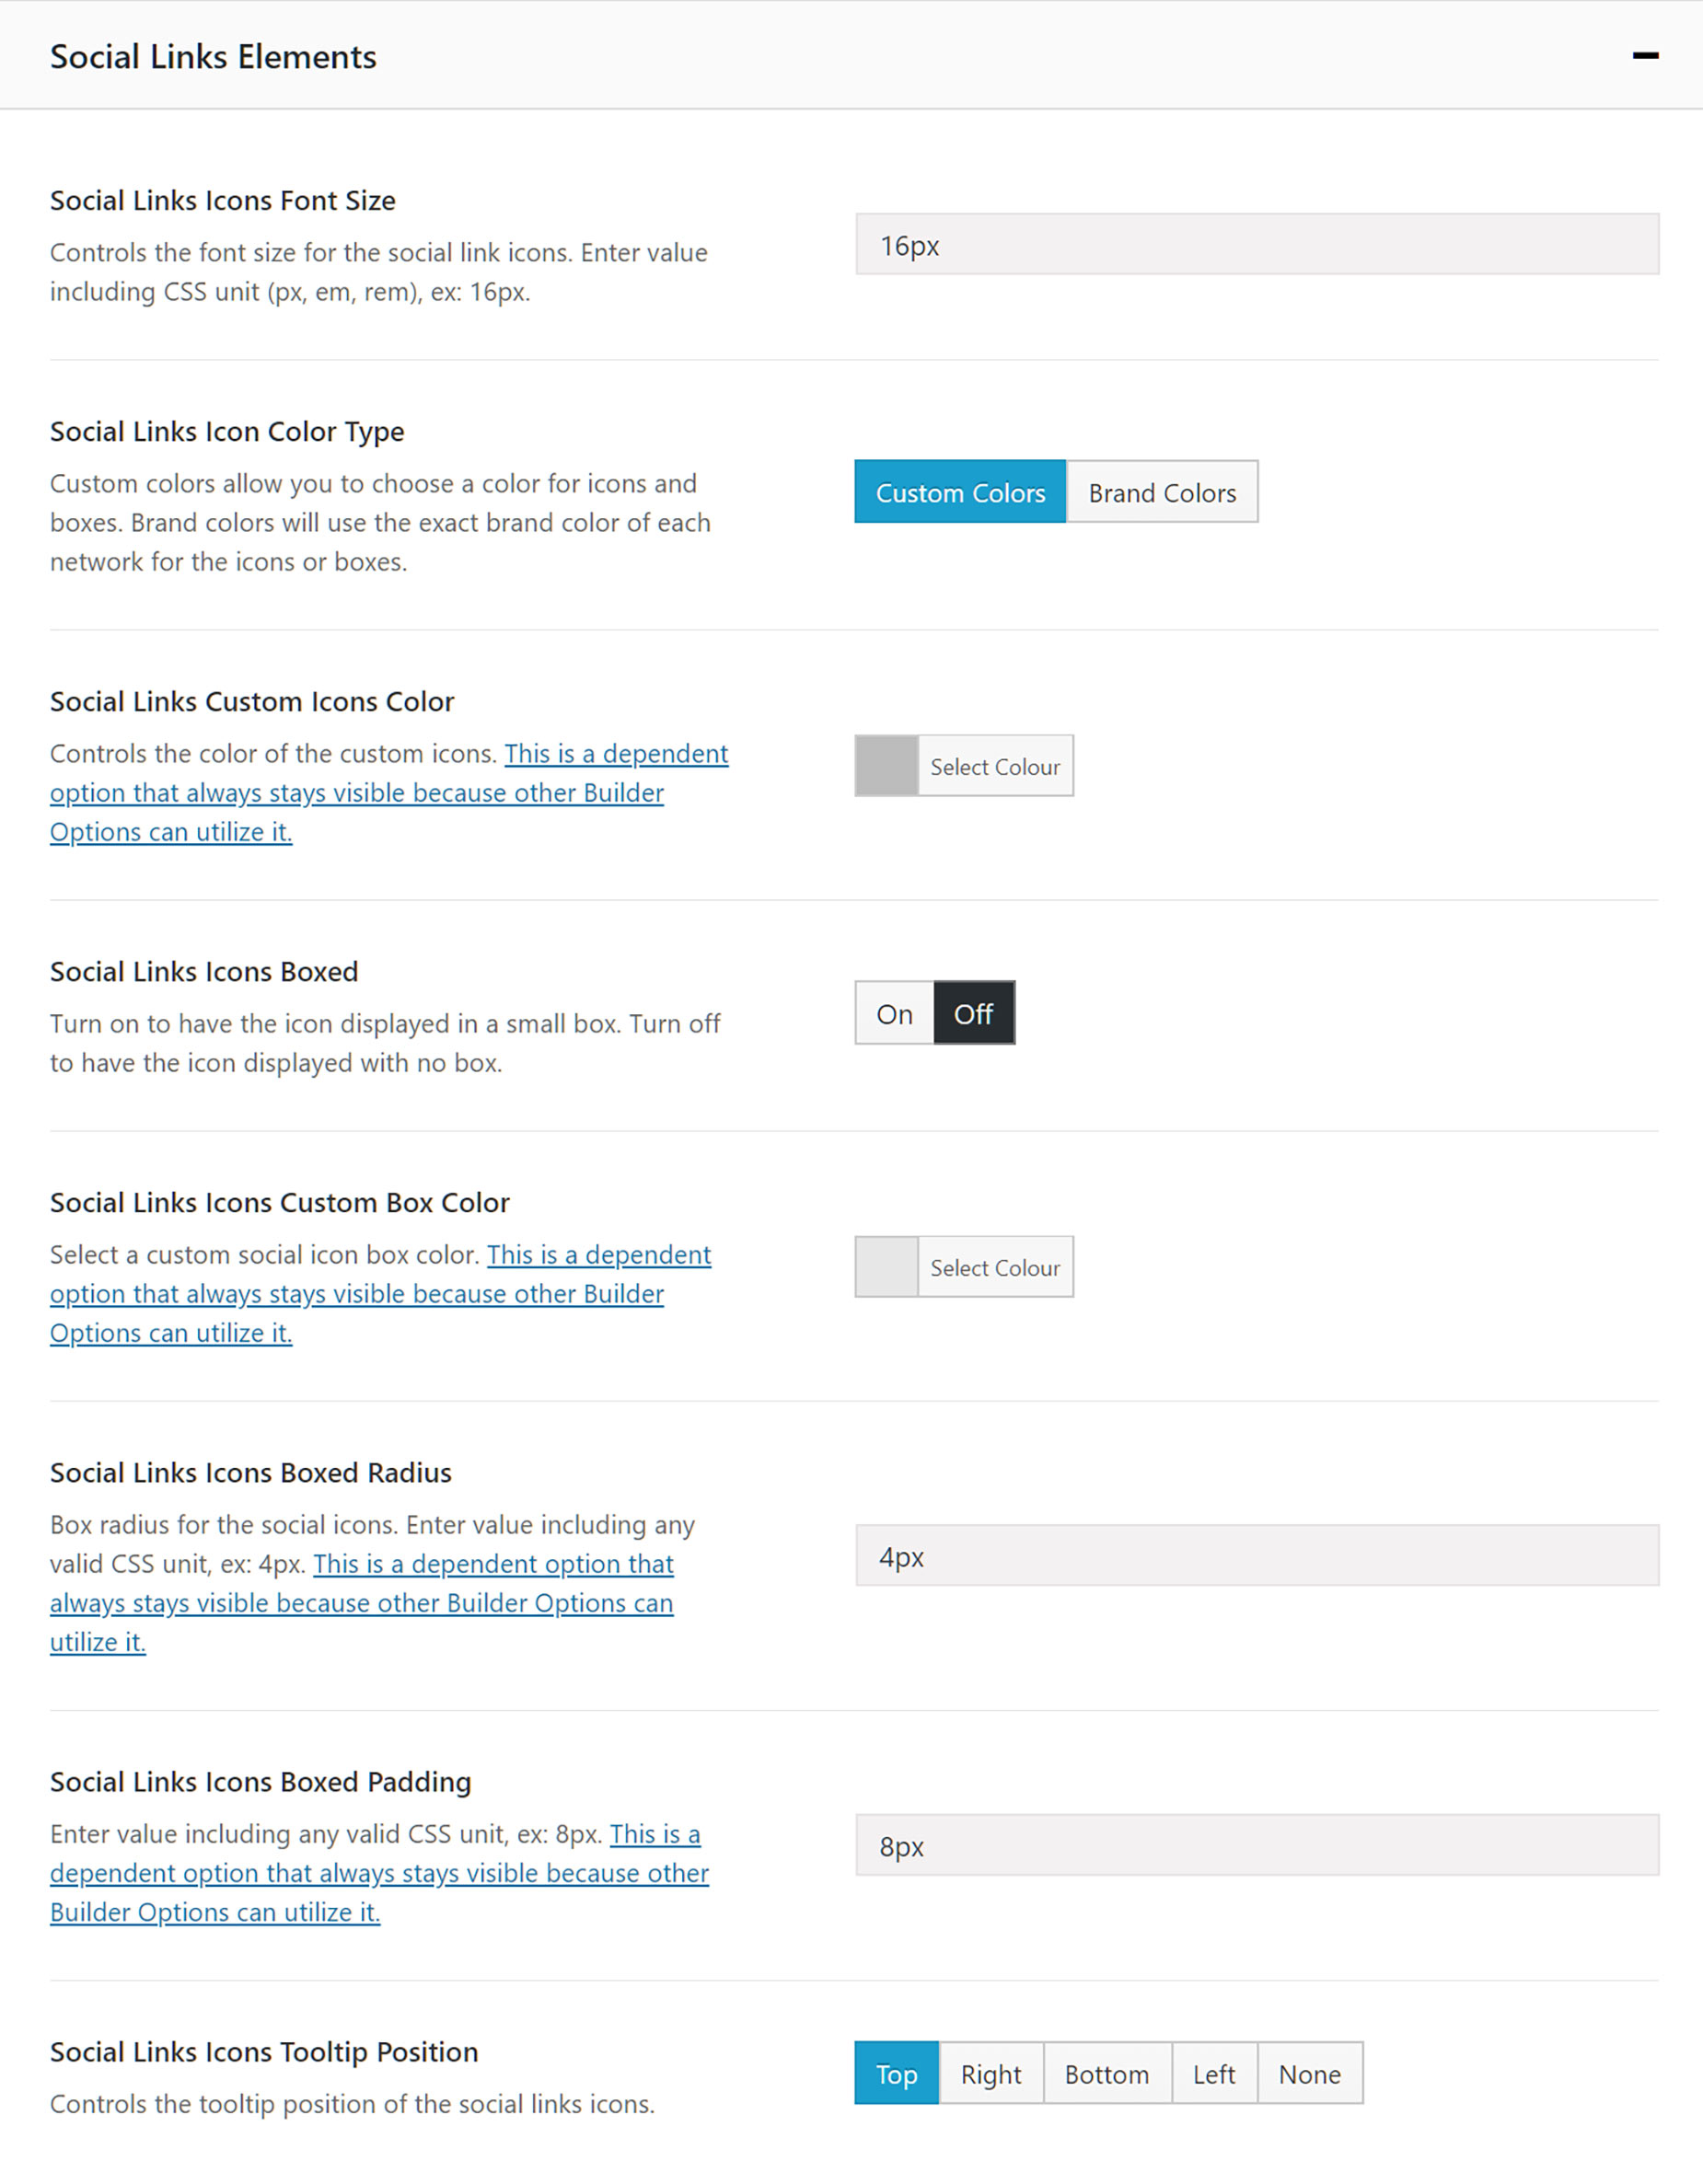
Social Links Element
The Social Links Element can be inserted in any page or post you create. To learn how to add and customize the Social Links Element, please continue reading below.
How To Add The Social Links Element To A Page Or Post
Step 1 – Navigate to the page or post you’d like to add the Social Links element.
Step 2 – Activate the Avada Builder by clicking the ‘Use Avada Builder’ button on the top of the content editor.
Step 3 – Add a new Container to the page, and select your desired column layout.
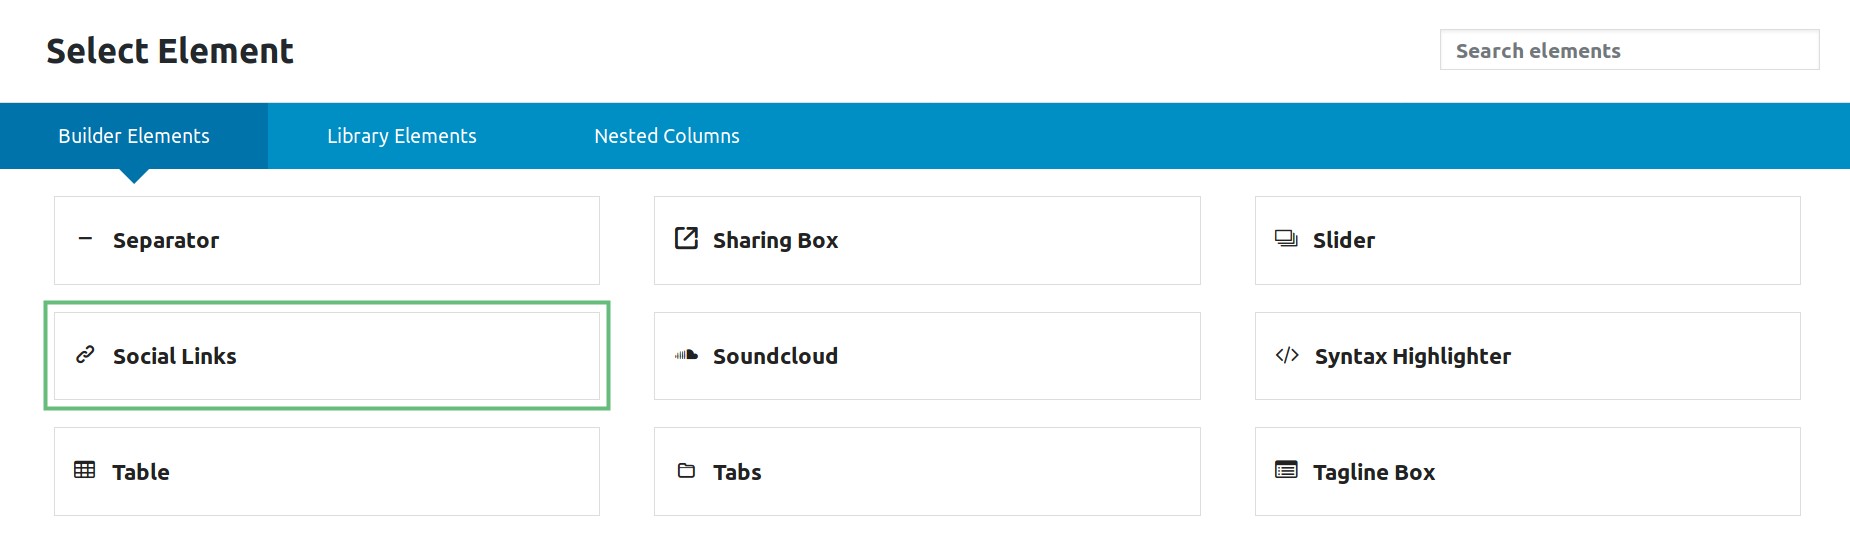
Step 4 – Click the ‘+ Element’ button to bring up the ‘Elements’ window. Find the Social Links element then click it to add it to the page and bring up it’s options window.
Step 5 – Add links to the respective social network fields you’d like to display. For example, if you’d like to display the Facebook social icon, you need to add a Facebook link to the Facebook field provided.
Step 6 – Once finished, click ‘Save’.
How To Configure Social Links Elements Globally
IMPORTANT NOTE: On the ‘Avada Builder Elements’ panel, the ‘Social Icon Elements’ tab controls the global options for both the Social Links element and the Person element.
Step 1 – Navigate to the Avada > Options > Avada Builder Elements panel.
Step 2 – On this panel, you’ll find the ‘Social Links Elements’ tab. Under this tab, you’ll find several options that allow you to customize the appearance of the Social Links elements globally. Please keep in mind that this tab also controls the global options for the Person element.
Step 3 – Once done, click the ‘Save Changes’ button.
Social Links Widget
You can use the Social Links widget to insert social links to any widget-ready areas of your site; such as the footer, sliding bars, sidebars, mega menu columns, and the like. To learn how to add a Social Links widget to widget areas, please continue reading below.
How To Add A Social Links Widget To Widget Areas
Step 1 – Navigate to the Appearance > Widgets tab on your WordPress admin sidebar.
Step 2 – You must first create a widget area. To learn more about this, please refer to our Widgets Section article.
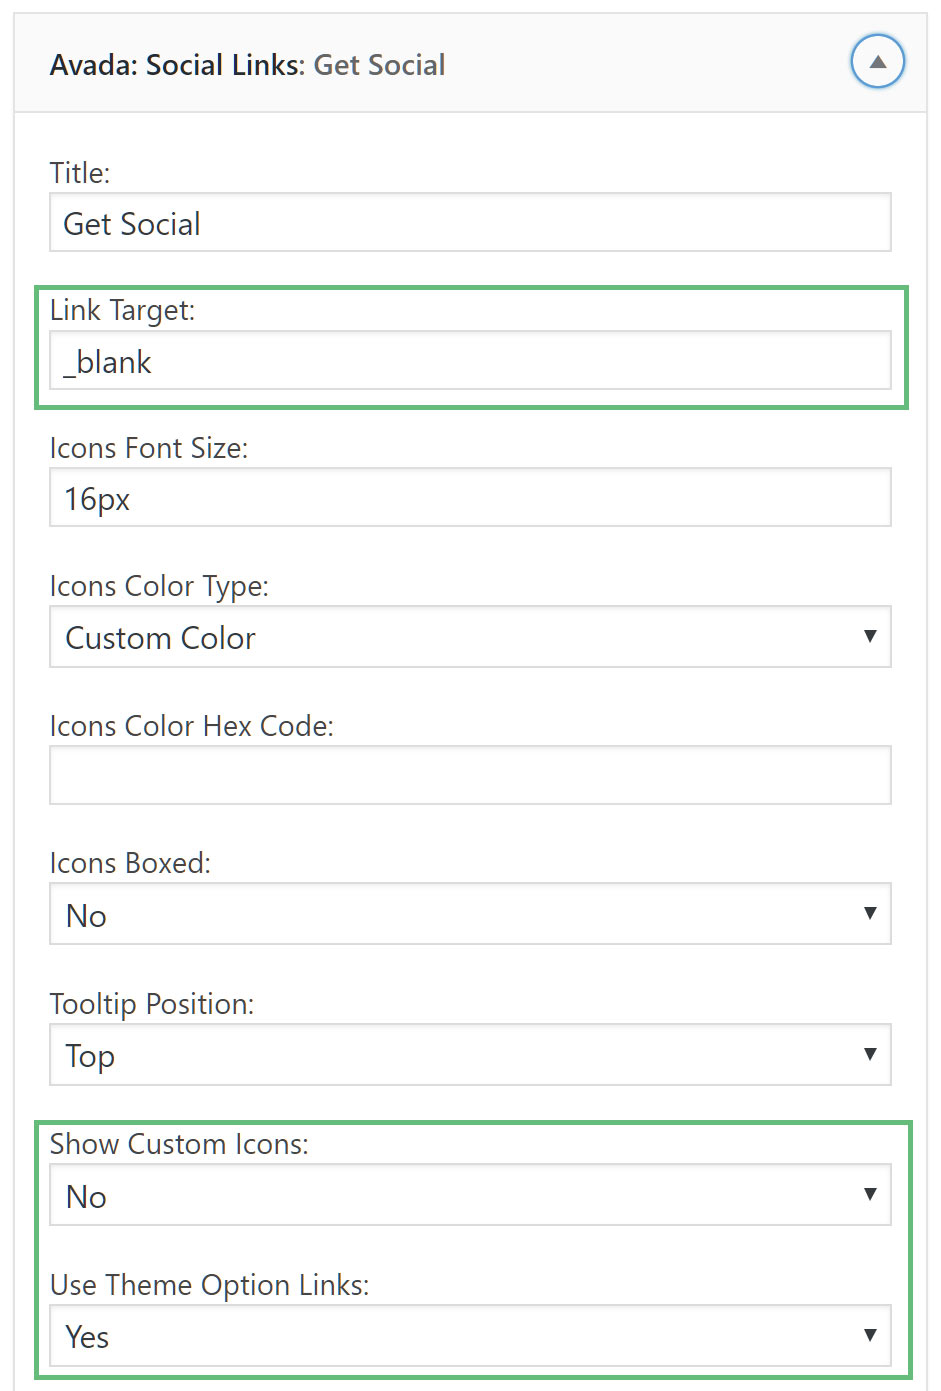
Step 3 – Under the Available Widgets section, locate the ‘Avada: Social Links’ widget. Then, drag and drop it to the widget area you’d like to add it to.
Step 4 – Once you add it to a widget area, the widget will automatically expand and display all the available customization options. Using these options, you can customize the widget and add your desired social links to their corresponding social network fields. For example, if you’d like to display a Facebook link, then enter that link under the ‘Facebook Link’ field. View screenshot here.
NB. A few options to be aware of here: If you want to ensure your Social Media Links open in a new window, make sure to add “_blank” to the Link Target option. Also, you can add your own Social Media links by adding the link in the fields provided, or you can choose to Use Theme Option Links and/or Show Custom Links. See these options here.
Step 5 – Once done, click ‘Save’.
Step 1 – Navigate to the Appearance > Widgets tab on your WordPress admin sidebar.
Step 2 – You must first create a widget area. To learn more about this, please refer to our
Widgets Section article.
Step 3 – Under the Available Widgets section, locate the ‘Avada: Social Links’ widget. Then, drag and drop it to the widget area you’d like to add it to.
Step 4 – Once you add it to a widget area, the widget will automatically expand and display all the available customization options. Using these options, you can customize the widget and add your desired social links to their corresponding social network fields. For example, if you’d like to display a Facebook link, then enter that link under the ‘Facebook Link’ field.
View screenshot here.
NB. A few options to be aware of here: If you want to ensure your Social Media Links open in a new window, make sure to add “_blank” to the Link Target option. Also, you can add your own Social Media links by adding the link in the fields provided, or you can choose to Use Theme Option Links and/or Show Custom Links. See these options here.
Step 5 – Once done, click ‘Save’.
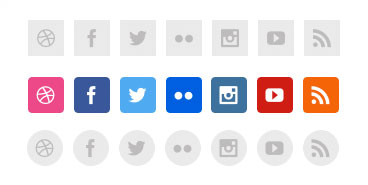
Social Media Icons Styling
There are several configurable options that makes it easy to style your social media icon’s appearance. These options are found in the respective areas where social icons can be displayed. To learn how these options affect the social icons, please continue reading below.
IMPORTANT NOTE: The options to configure a particular set of social media icons depends on the area where they’re found. For example, if you’d like to change the social media icons displayed on the header, then you will need to go to the Avada > Options > Social Media > Header Social Icons tab.


