Share
In this post, we will explore the WordPress Media Library to help you understand where your images and other media files are stored once they are added to your website. We will also look at how you can perform basic editing on your images, including changing their size with the scaling or cropping tools and rotating and flipping them. This may be especially helpful once you have gone through the Essential Pages For a New WordPress Website post.
Finally, we will cover adding image galleries to your posts and pages. This feature of WordPress makes it easy to insert a selection of images into a post and then configure how they are organized. You can also control what happens when a visitor clicks on one of the images in the gallery.
If you want to better understand how WordPress handles images and other media files, as well as what you can do with them, this guide to the WordPress Media Library will get you up to speed.
Overview
The WordPress Media Library Explained
Every WordPress website has a media library. Each time you add an image to a post, page, or elsewhere on your website, it is automatically added to the media library. This library of media files, such as images, video, audio, and files, can be found under the Media item on the sidebar menu of your WordPress website’s admin area.

Once you’ve opened the media library, you can change the view to either a list or grid layout. You can also filter the items by type or date and search the library for specific files.

Media Library Attachment Details
Clicking on an item in the media library allows you to inspect the file and learn more about it. The attachment details screen displays information about the file, including its name, type, upload date, and file size and dimensions.
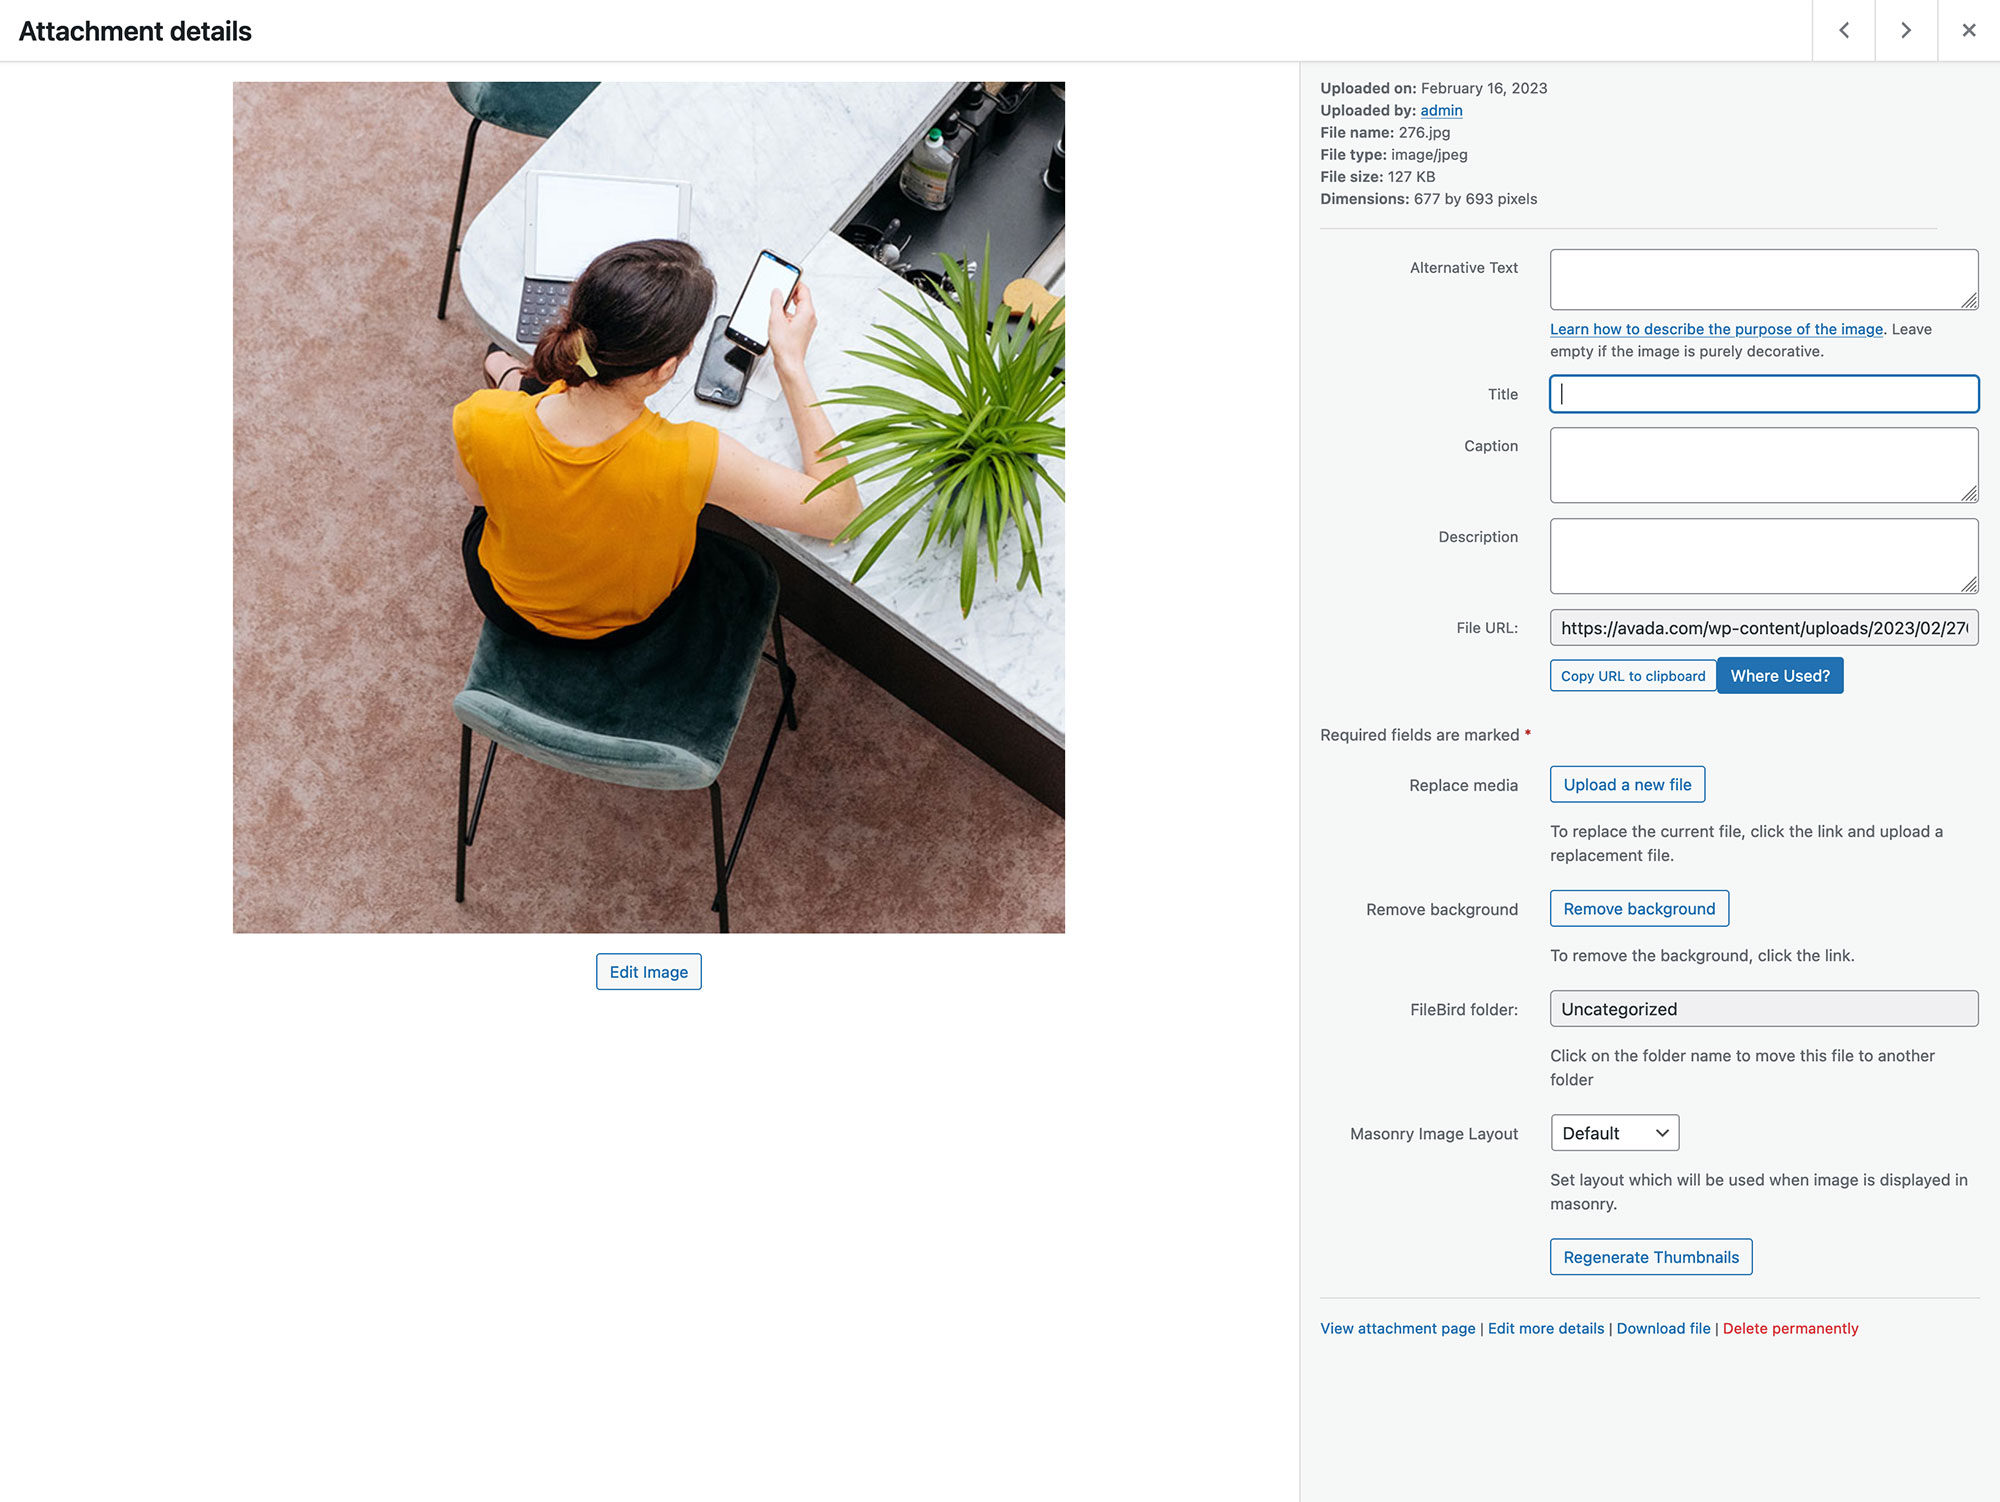
You can also see which post the image was uploaded to and where it is being used on your website. The URL field on the attachment details screen displays the direct link to the file. This can be useful if you want to manually link to the media file from one of your posts or pages or even externally from your website. Examples of this could be in an email or social media post.
By default, every image and other media file uploaded to your website has an attachment page. This is a management page that includes that file and some other basic information about the file. All changes made to the attachment details will be automatically saved in WordPress.
Below is a list of the default settings on the attachment page:
Adding Files to the Media Library
Images or other media files you insert into your posts and pages are automatically added to the media library, and you can also add them directly to the library yourself. You might want to do this if you’d like to make a number of files available to your co-authors for use in their posts or if you need to link to the files from elsewhere on your site or link to them externally without publishing them in a post.
Adding the images directly to the media library is very straightforward. You can drag and drop them into place by clicking on the Add New item under the Media sidebar menu. Alternatively, you can click the Select Files button to locate the files on your computer the old-fashioned way. You can select multiple files simultaneously to save time with whichever option you choose.

Once the files are in the library, they can be edited and inserted into your posts and pages by clicking the Add Media button on the post editor screen.
Editing Images in WordPress
When viewing the attachment details page for an image, you will notice, at the bottom, an “Edit More Details” link. Clicking this button takes you to an “Edit” option. If you click “Edit,” you will be presented with options allowing you to make some basic changes to the image. The editing features include crop, scale, image rotation, and flipping images.

However, you can also proportionately scale an image to reduce its dimensions, while still maintaining its aspect ratio. Furthermore, you can also crop an image by dragging the cursor over it to make a selection. This allows you to select the area to be kept, with the rest of the image being discarded.
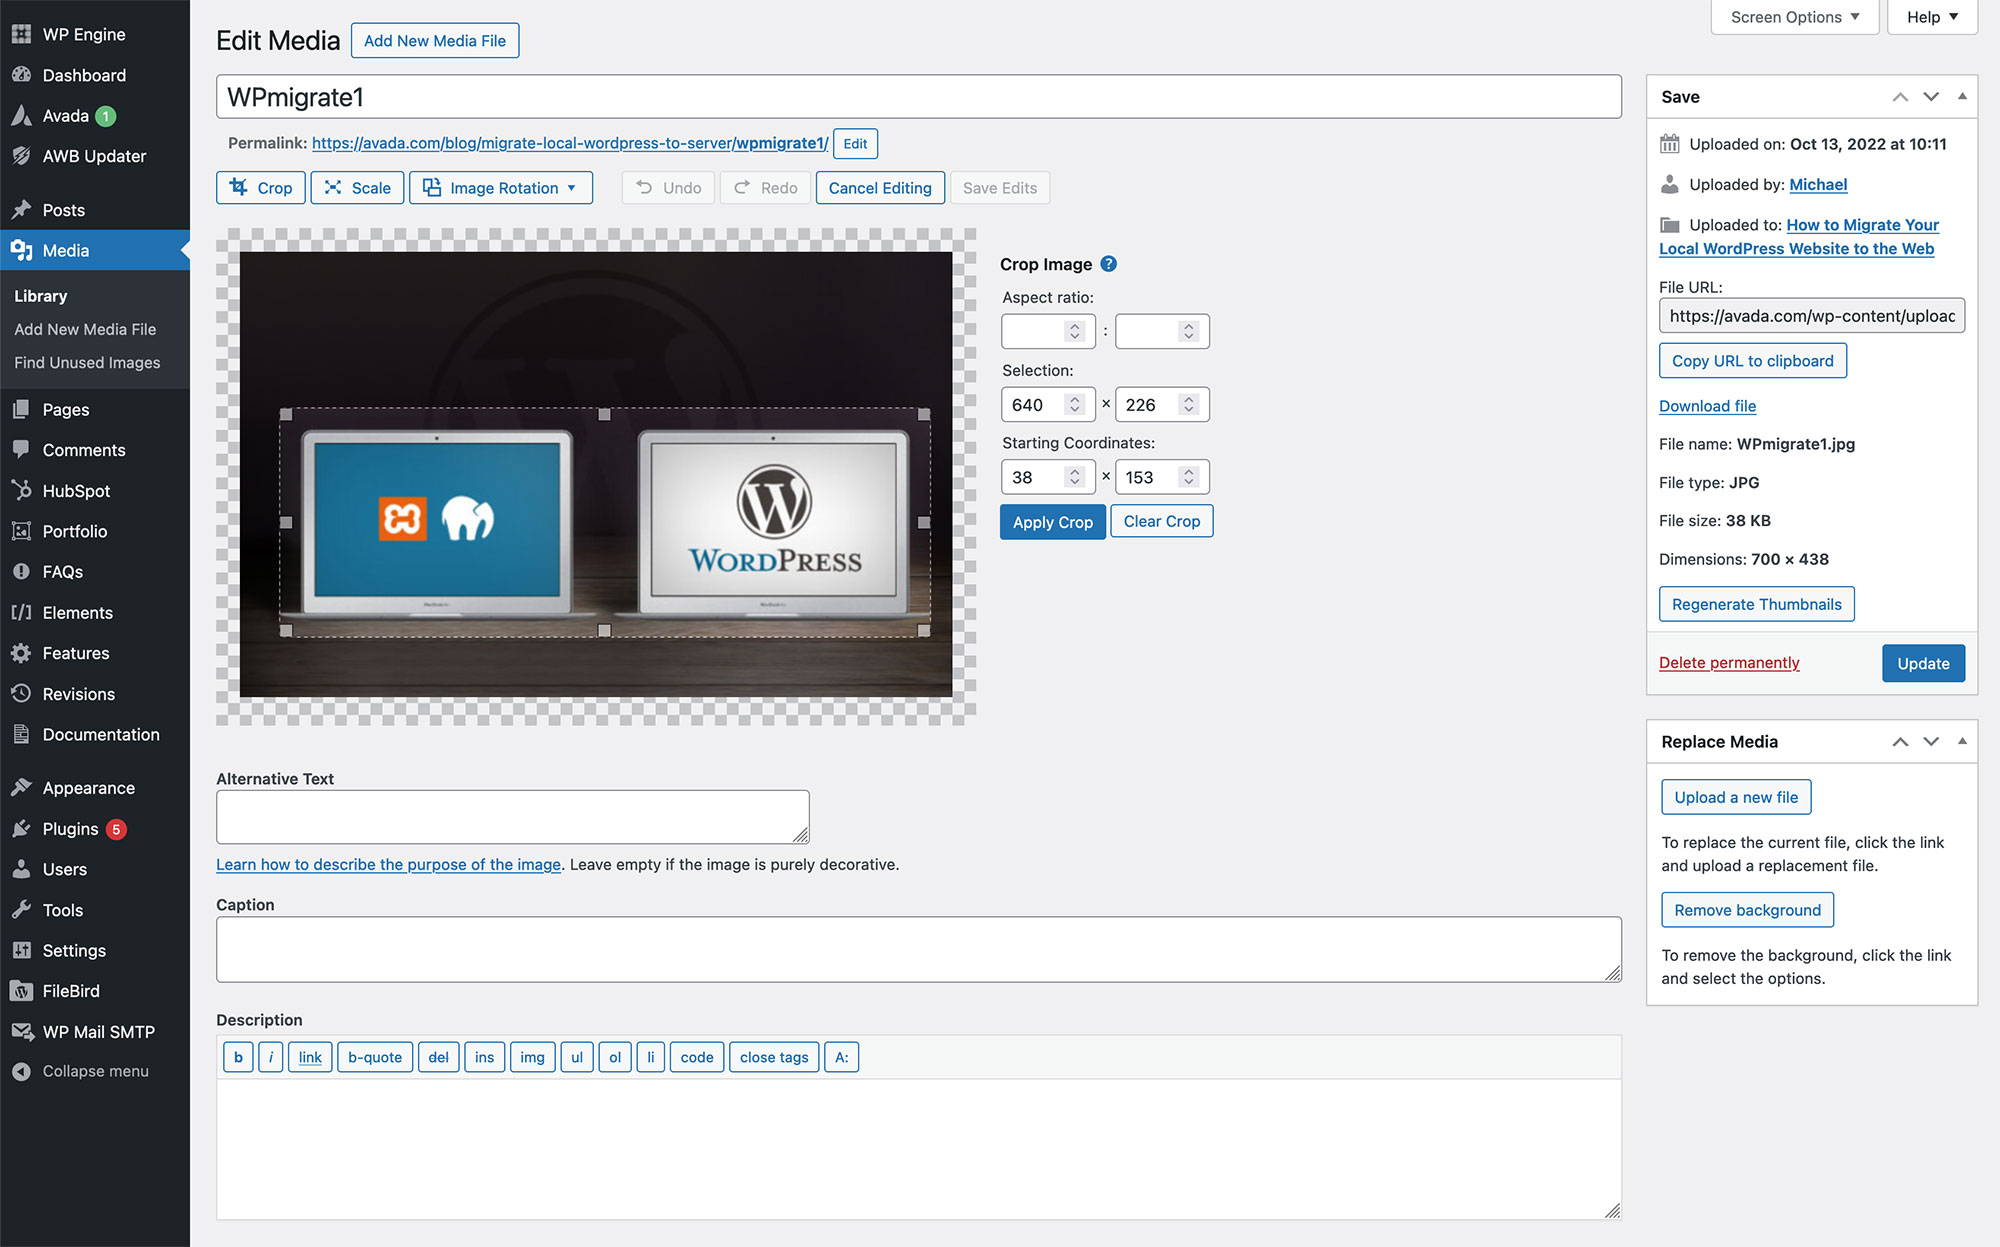
After you’ve made any changes, remember to save the image before returning it to the media library. Now, you can insert the new version of the file into your posts and pages. Any previous instances of the image used on your website will remain as they did before.
WordPress Media Library Settings
Whenever you upload a new image to your website, WordPress creates three more versions of that file: thumbnail, media, and large. Each of these three versions has different dimensions or physical size. You can change these three default sizes through the Media Settings screen if necessary.

Through the media library settings, you can also set how the files are organized on your server as you upload them. Managing one or multiple Avada websites will mean that you will be managing hundreds, if not thousands of media files such as images, videos, audios, documents, etc., and this is why WordPress media organization is vital. This is where FileBird comes in.
Cleaning Up the Media Library
As each image you add to your WordPress website is automatically added to the media library, the size of the library can quickly grow. While you won’t want to delete any images used in your posts, you may want to delete the ones in the library that haven’t been used on your site.
WordPress makes it easy to filter the images or other media files that haven’t been inserted into (attached to) a page or post. You can view all the unattached files by selecting “Unattached” from the filter drop-down list.

These are the files that were either uploaded directly into the media library rather than being inserted into a post first, or they were added to a post but have since been deleted. If you are sure you no longer need these files, they can be deleted in one fell swoop by clicking on the Delete Selected button.
Summary
Hopefully, you now understand how WordPress stores and manages the images and other media files you’ve added to your website.
WordPress image galleries can also be a handy way to work with images more effectively on your website. Working with image thumbnails, which automatically link to larger versions of your photographs and other images, can help your pages load faster and allow your visitors to see more of your media content on one page.