Share
File permissions control who or what can access your WordPress installation’s files and folders. Hence, understanding permissions are vitally crucial to the security of your website. Quite frankly, tinkering with file permissions, if you don’t understand them, can be a disaster waiting to happen.
While you may feel you need to be a member of an MIT cryptology team to look at file permission settings, they’re straightforward to decipher. However, securing your website can require extensive effort; After reading this article, you’ll be able to secure your WordPress file system, confident that you aren’t creating problems for yourself further down the line.
In this post, we’ll go deep on web server file permissions. First, we’ll look at what the numbers mean; then, we’ll cover recommended permissions for your Avada WordPress installation and how to set them.
Overview
Understanding Server File Permissions
Before we get into the permission codes, we need to define the elements that permissions govern: users and the actions they are allowed to take. There are three types of users that interact with your website’s file and folders:
There are three different actions that users may need to take when interacting with your site’s file and folders:
Combinations of actions are represented by numbers:
File permission codes are three-digit numbers that describe the combination of actions that each type of user may take when interacting with a specific folder or file:
While there are numerous file permission codes, for the most part, you’ll see the same combinations cropping up again and again. You may also see file permissions represented as strings, such as _rw_rw_rw. These strings mean the same thing as the three-digit permissions but are presented in a text-based format. While you may not encounter them often, it’s worth reading up on them, just in case you have to use them in the future. Now let’s take a look at the recommended file permissions to use with WordPress.
How to Determine What File Permissions to Use
First, it’s worth pointing out that under normal circumstances file permissions will not require manual adjustment. However, they could get modified for a multitude of reasons such as hosting updates, changes made by a plugin or theme, or your website being hacked.
When you have a serious website error, one of the first things to verify is that your WordPress installation’s file permissions are correct. The WordPress Codex recommends the following:
While this guideline covers most files and folders, your wp-config.php file warrants special attention because it contains settings vital to WordPress operation.
For this file, permissions can be set to 660 (read and write access to both you and the group of users) or even 600 (read and write access to you only) although you may have to manually edit the file from time to time if you do not give read and write access to the group. If you’d like to make the file extra secure, you could even move the wp-config.php file up a directory and set it to 400, which gives read-only access solely to you. However, some hosts won’t allow this, so you may have to compromise when setting file permissions.
Finally, setting any file with the permission of 777 is not recommended – if you’ve been following along, you’ll realize that this gives anybody with an internet connection complete access to that particular file or folder. Now that you understand what file permission codes mean, let’s move onto our final step: changing file permissions.
How to Use FTP to Change WordPress File Permissions
File permissions can be changed in a couple of ways. While using the cPanel File Manager is a perfectly acceptable option, for this walkthrough we’re going to use a File Transfer Protocol (FTP) client. It’s important to point out that before you begin tinkering with your WordPress installation, you should create a full backup in case something goes wrong.
To get started, you’ll need the credentials for your server – which you can get from your hosting provider – and an FTP client. We’re using FileZilla, but there are plenty of alternatives available. Once you’ve learned the basics, they all work similarly.
Open your FTP client, type your server credentials into the fields at the top, and click Quickconnect:
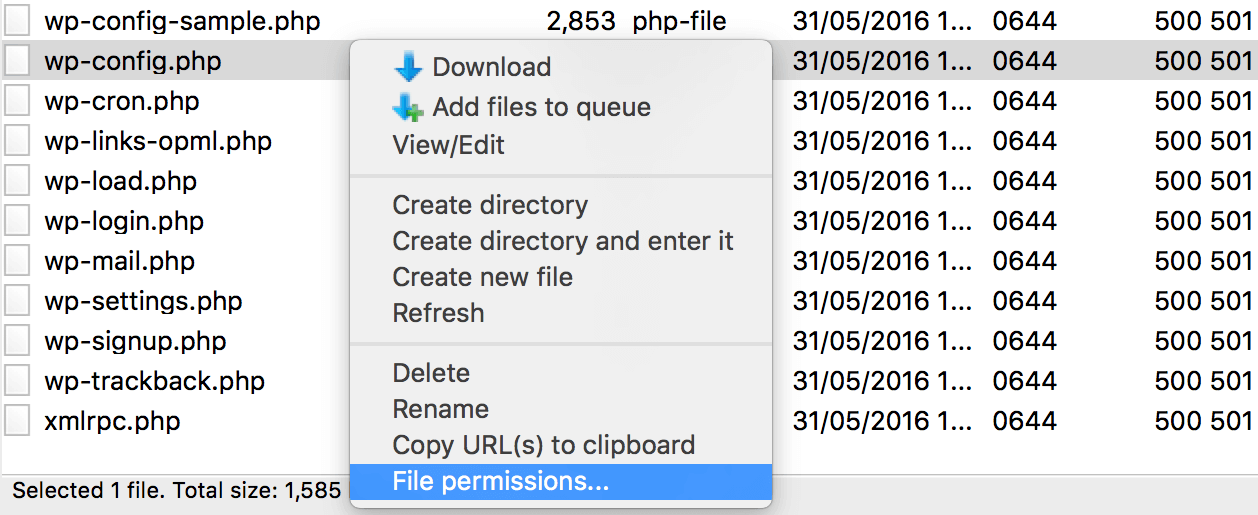
Once connected, you’ll see your computer’s files on the left-hand side, and your server’s files on the right. On your server, navigate to your ‘home’ folder (likely called public_html or www), and find the file or folder you’d like to amend the permissions for. In our example, we’re checking out the wp-config.php file. Right-click the file and select File permissions… from the menu:
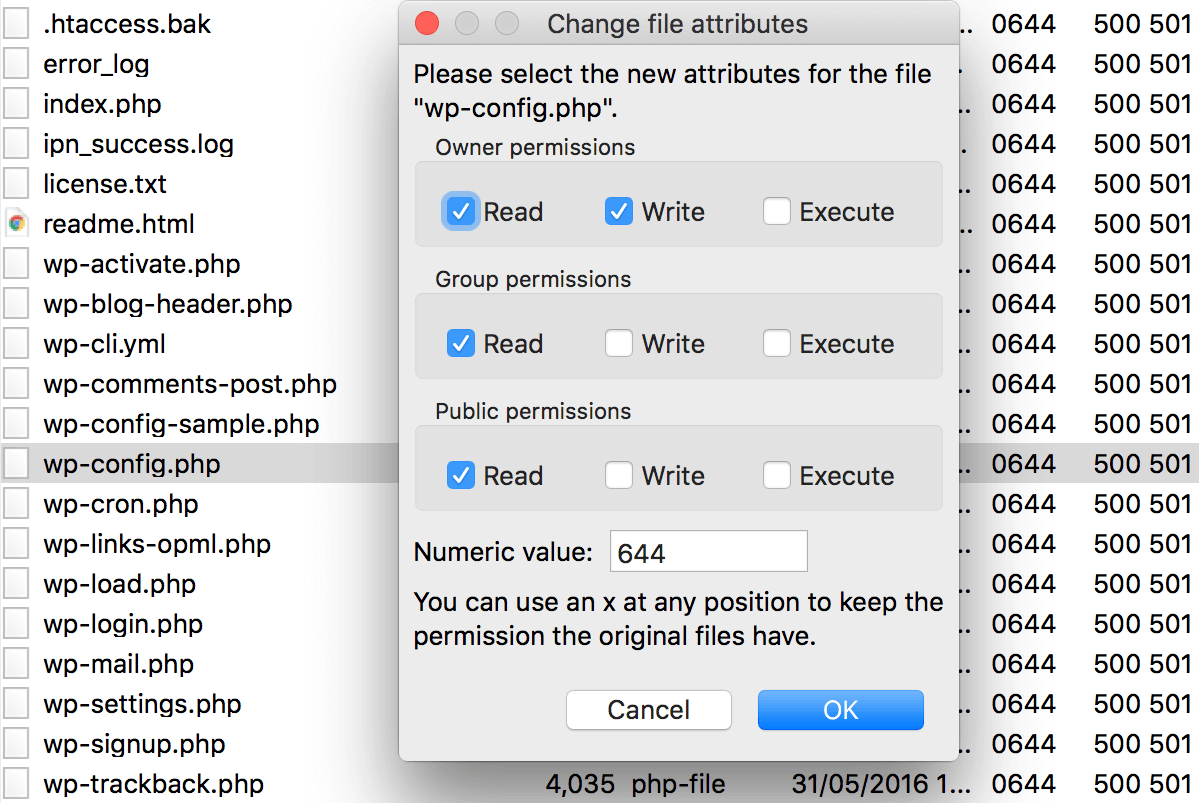
You’ll see a dialog box appear outlining the permissions set for the file:
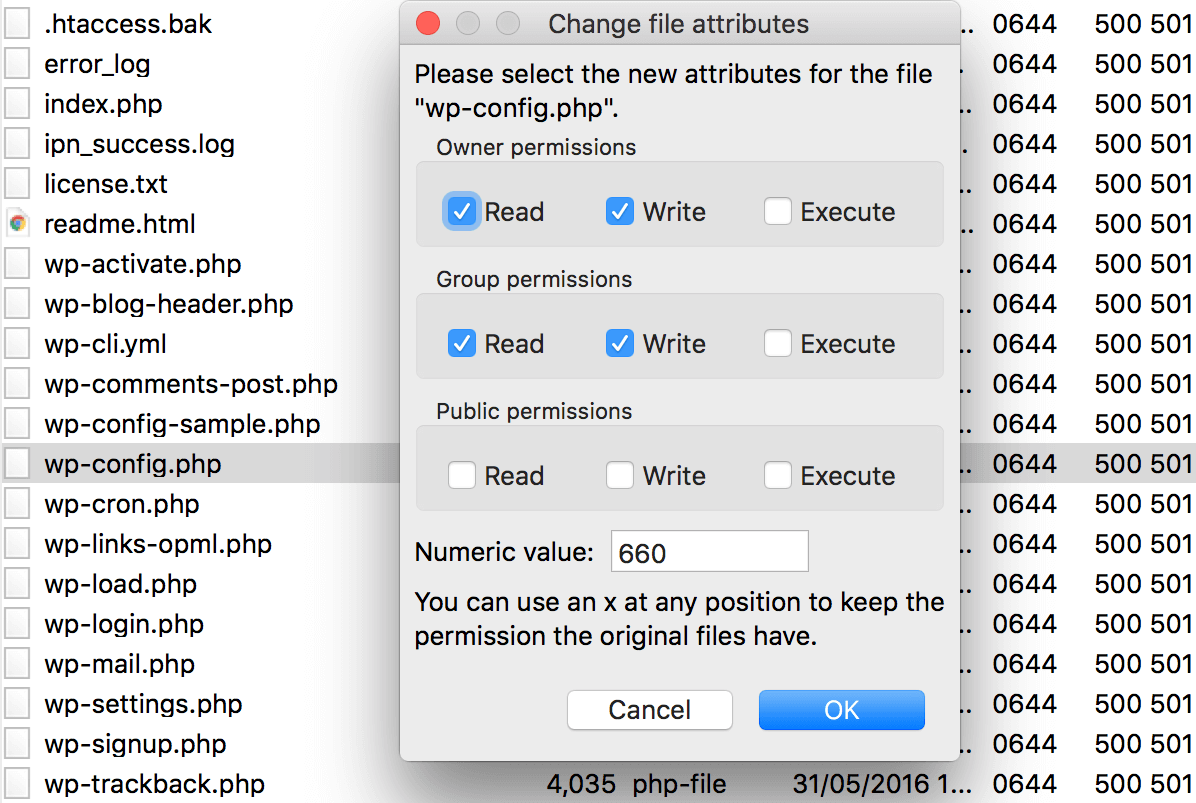
FileZilla handily enables you to change permissions by selecting checkboxes, rather than having to remember a multitude of numbers. For this file, we’re going to allow read and write access by the user and group, with no access to anyone else (660). As you begin selecting boxes, you’ll see the three-digit number change, reflecting the new permissions. Once finished, you should see something like this:
Next, click OK, and you’ll notice a confirmation appear in the message log at the top of FileZilla. At this point, your file permissions have successfully been changed!
Summary
Setting the correct file permissions for your WordPress installation will go a long way toward helping keep your website safe from malicious attacks. Learning what the numbers represent can also help you troubleshoot common WordPress errors such as the White Screen of Death and the 500 Internal Server Error. In this post, we’ve gone deep on file permissions. Let’s break down what we’ve covered:
Have you ever attempted to modify file permissions, and if so, how did it go? Share your stories in the comments section below!

