Share
If you’re researching this topic for the first time, we recommend starting with our initial article – A Beginner’s Guide. Due to the sheer number of potential server setups out there in the wild, out of necessity, we will be sticking to an overview of some of these advanced options as we dive a little deeper rather than getting into detailed configurations.
In this second part of our overview of the W3 Total Cache (W3TC) plugin, we’re touching on some of the more advanced options available.
Overview
A Summary of The Beginner’s Guide
Let’s begin with a brief recap of what was covered in the beginner’s article.

The beginner’s article is an introductory overview of using the W3 Total Cache (W3TC) plugin to enhance website performance. We explain the importance of caching for improving page load speeds and overall user experience, detail the initial setup and installation requirements, and highlight the plugin’s key features. The guide is intended to help new users effectively implement W3TC to optimize their WordPress sites
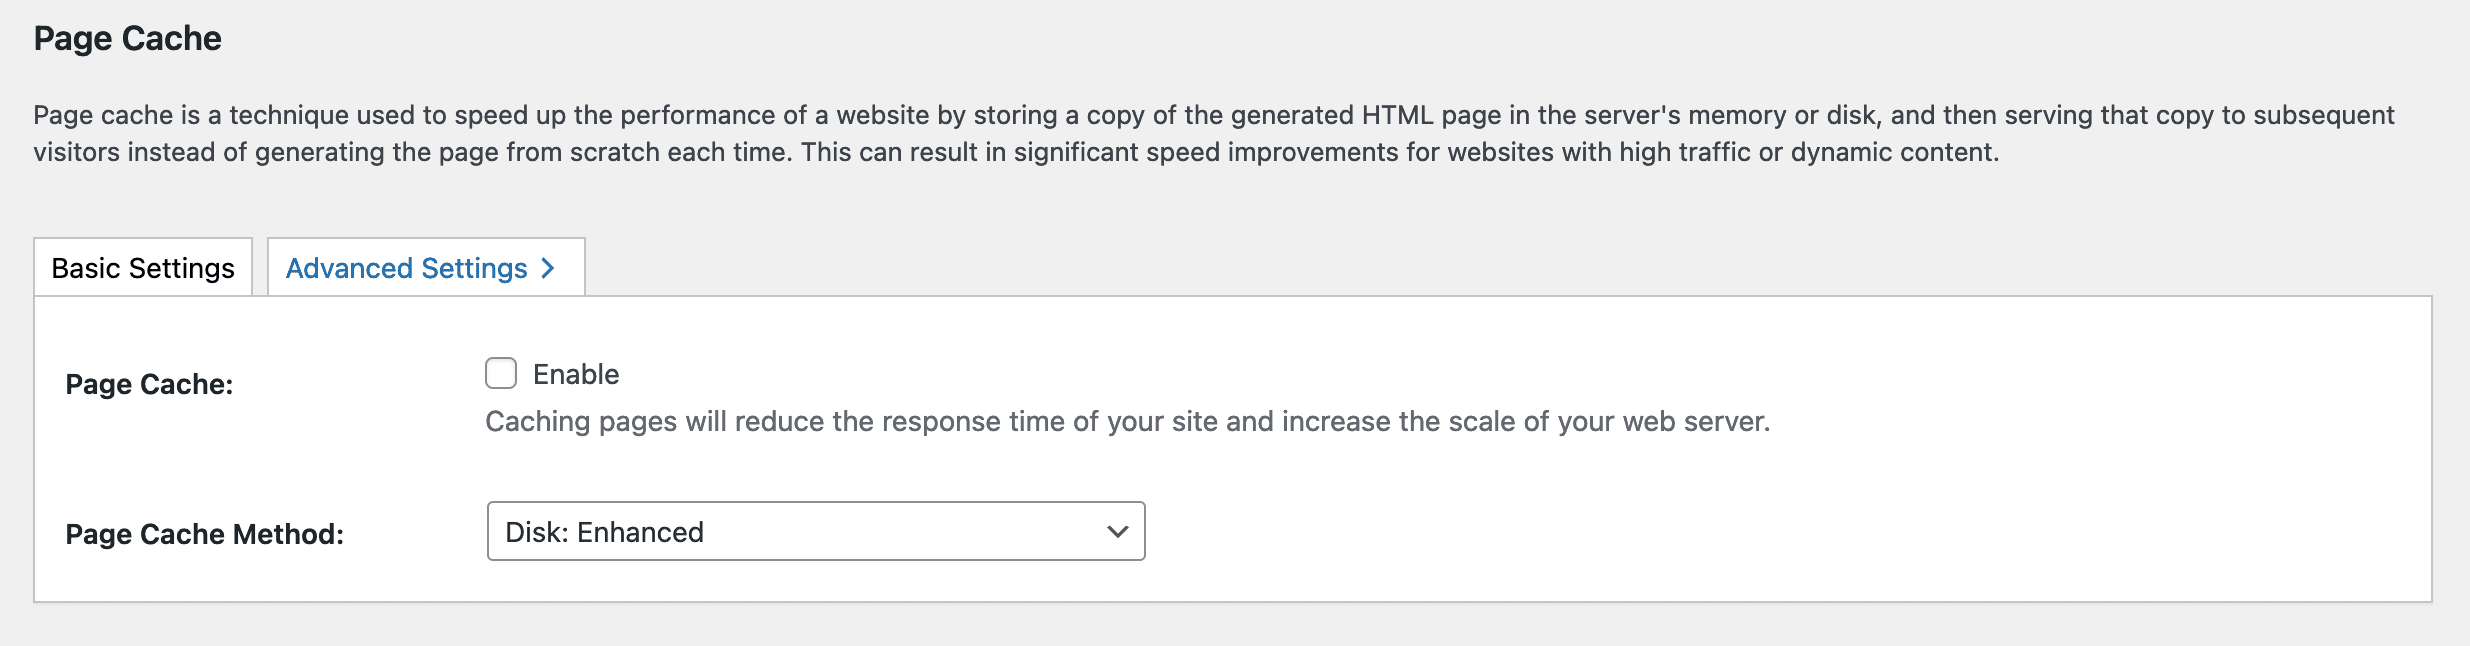
Page Cache
The Page Cache feature creates static cache files for each page and posts on your website, storing them in the server’s memory or disk (depending on the settings). When a page is requested, the server delivers the pre-generated HTML file instead of processing the heavier WordPress PHP scripts each time. This significantly reduces server load, decreases response times, and can significantly improve speed for websites with high traffic or dynamic content.
Page Cache is highly effective for websites with dynamic or primarily static content, like eCommerce stores, discussion forums, blogs, or news sites, where changes to existing content are only occasionally made.
Basic Settings
Utilizing page cache can significantly enhance your website’s speed, especially when evaluating Time to First Byte (TTFB). TTFB represents the duration between a user accessing your website and your server delivering its initial response.
Here, you enable page caching and choose the page cache method depending on whether you are using a shared server, dedicated/virtual server, or multiple servers.
Advanced Settings
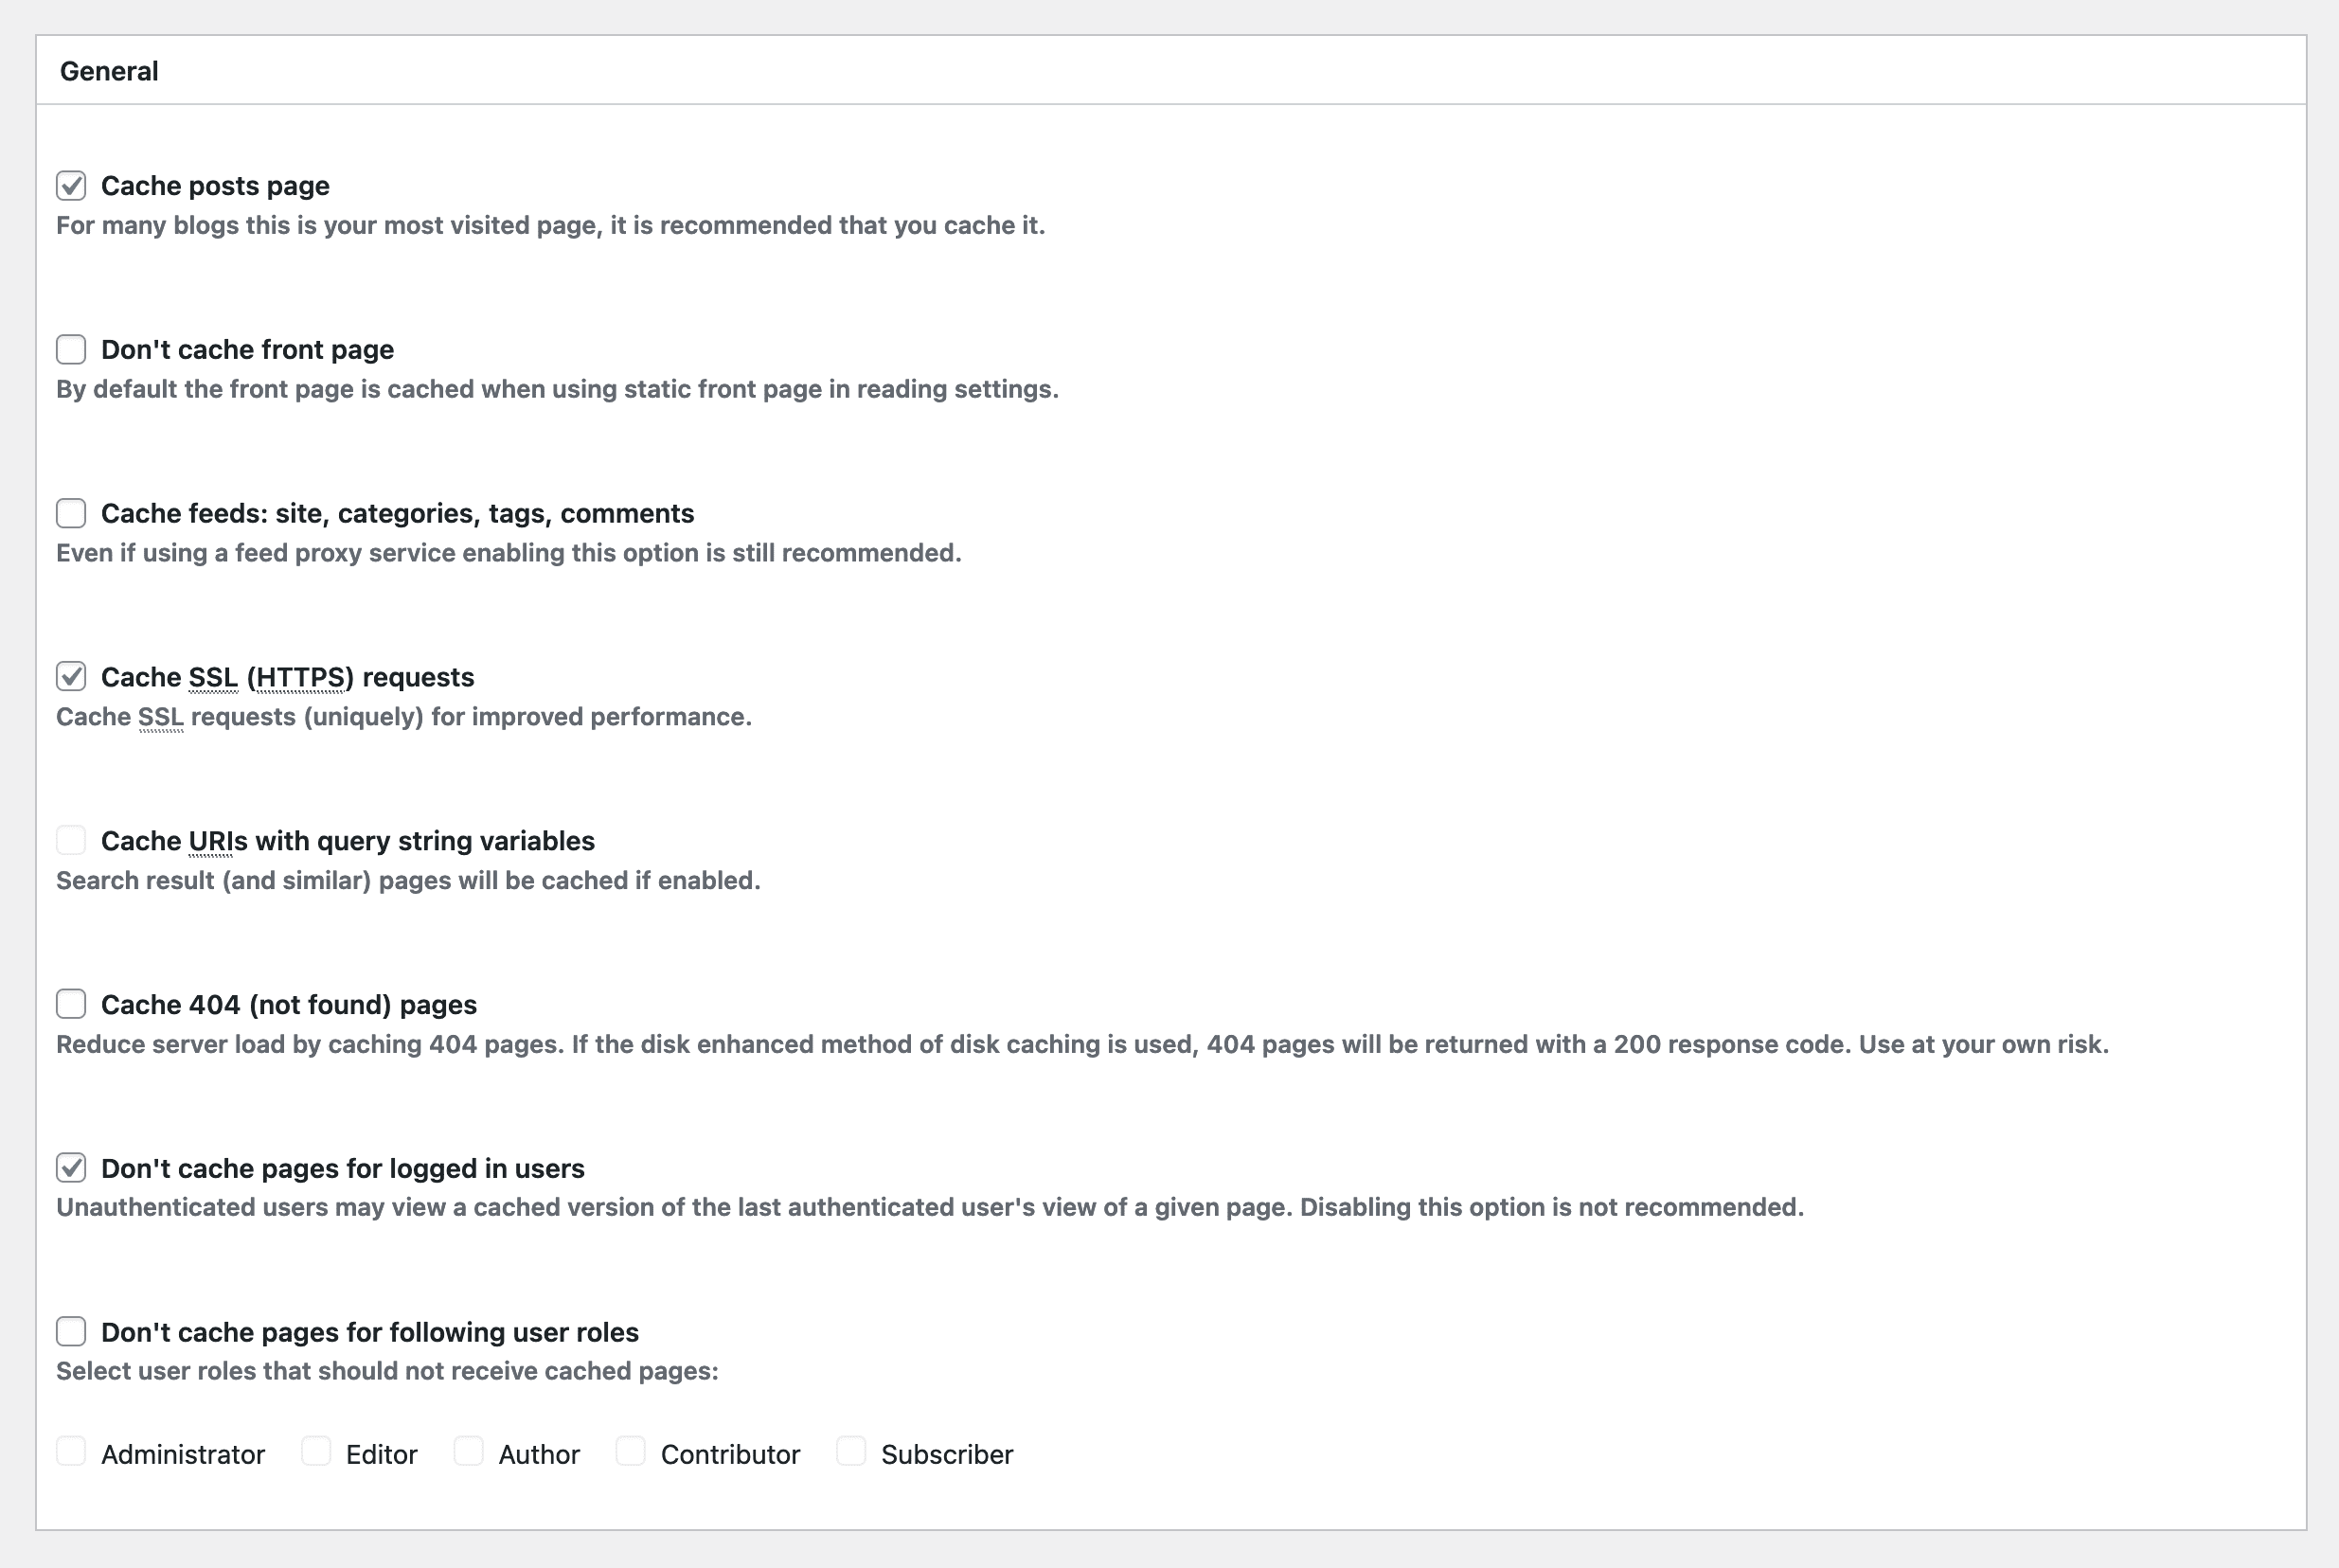
1: General
The options listed on the General Settings page are related to your website’s homepage display settings. Your homepage display settings are managed in the WordPress Dashboard > Settings > Reading section.
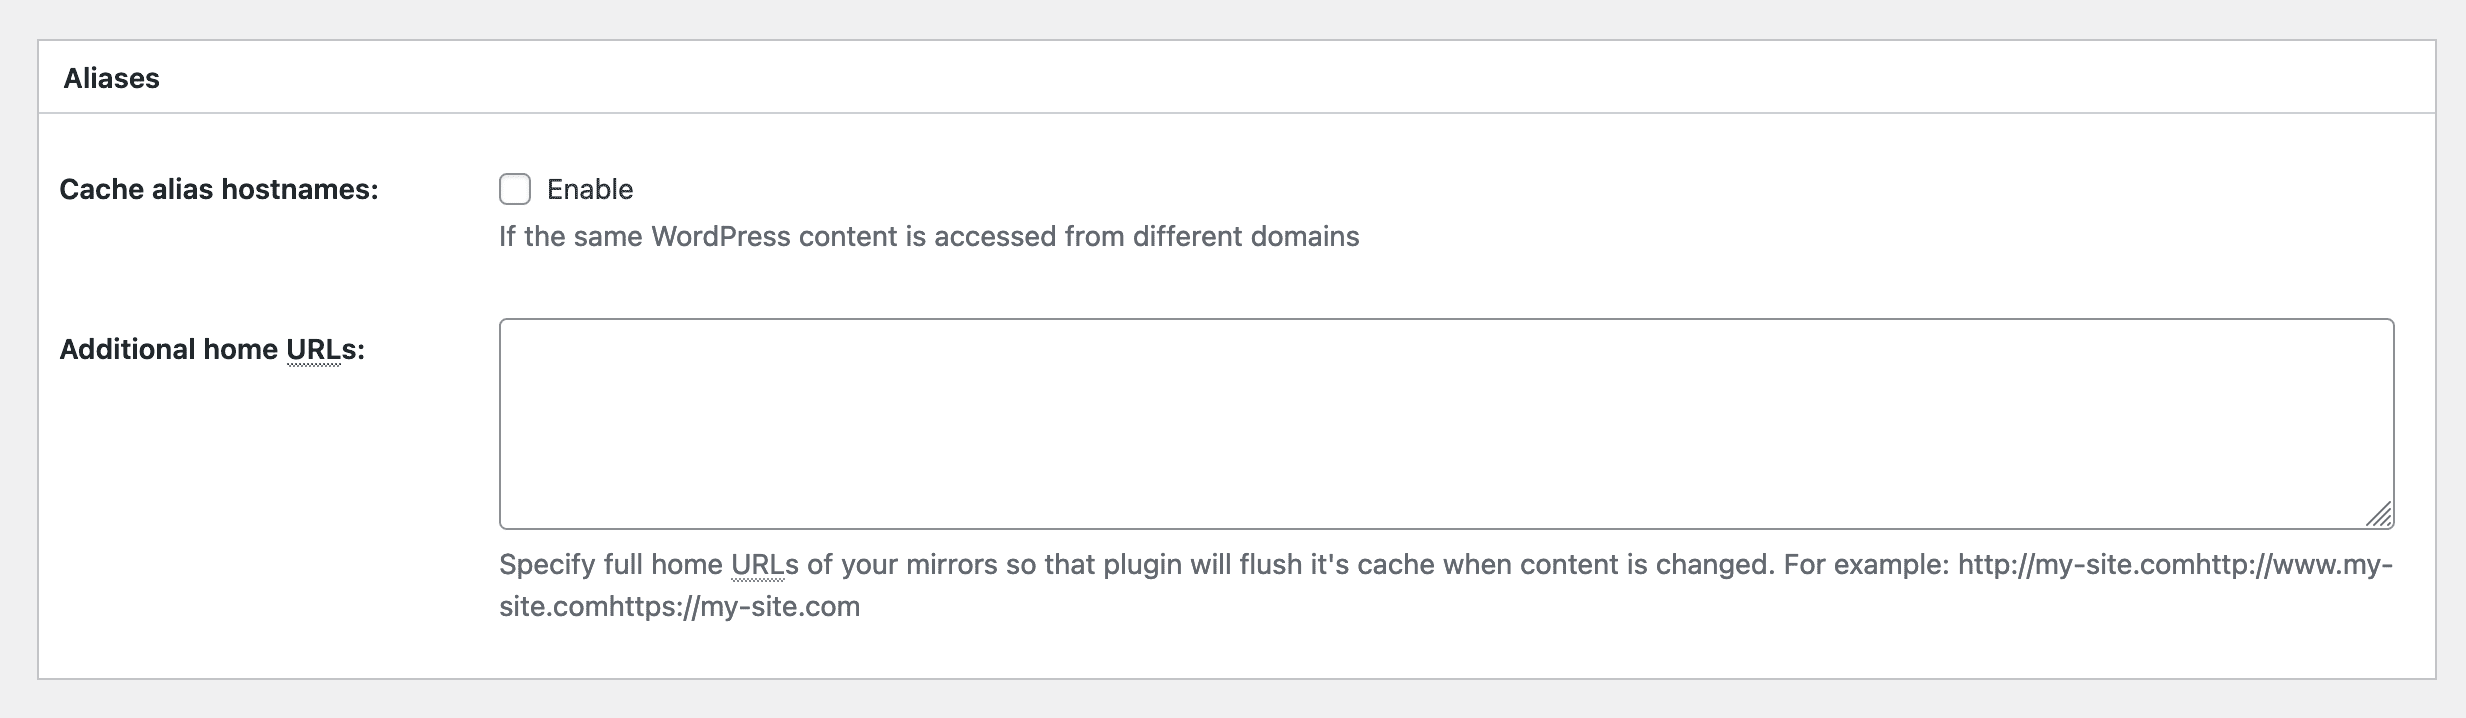
2: Aliases
The plugin optimizes cache utilization by recognizing alias hostnames, improving website performance and user experience across various domains or subdomains. This is particularly useful when identical WordPress content is accessible from multiple domains, and the cache engine will treat them as equivalent for caching purposes.
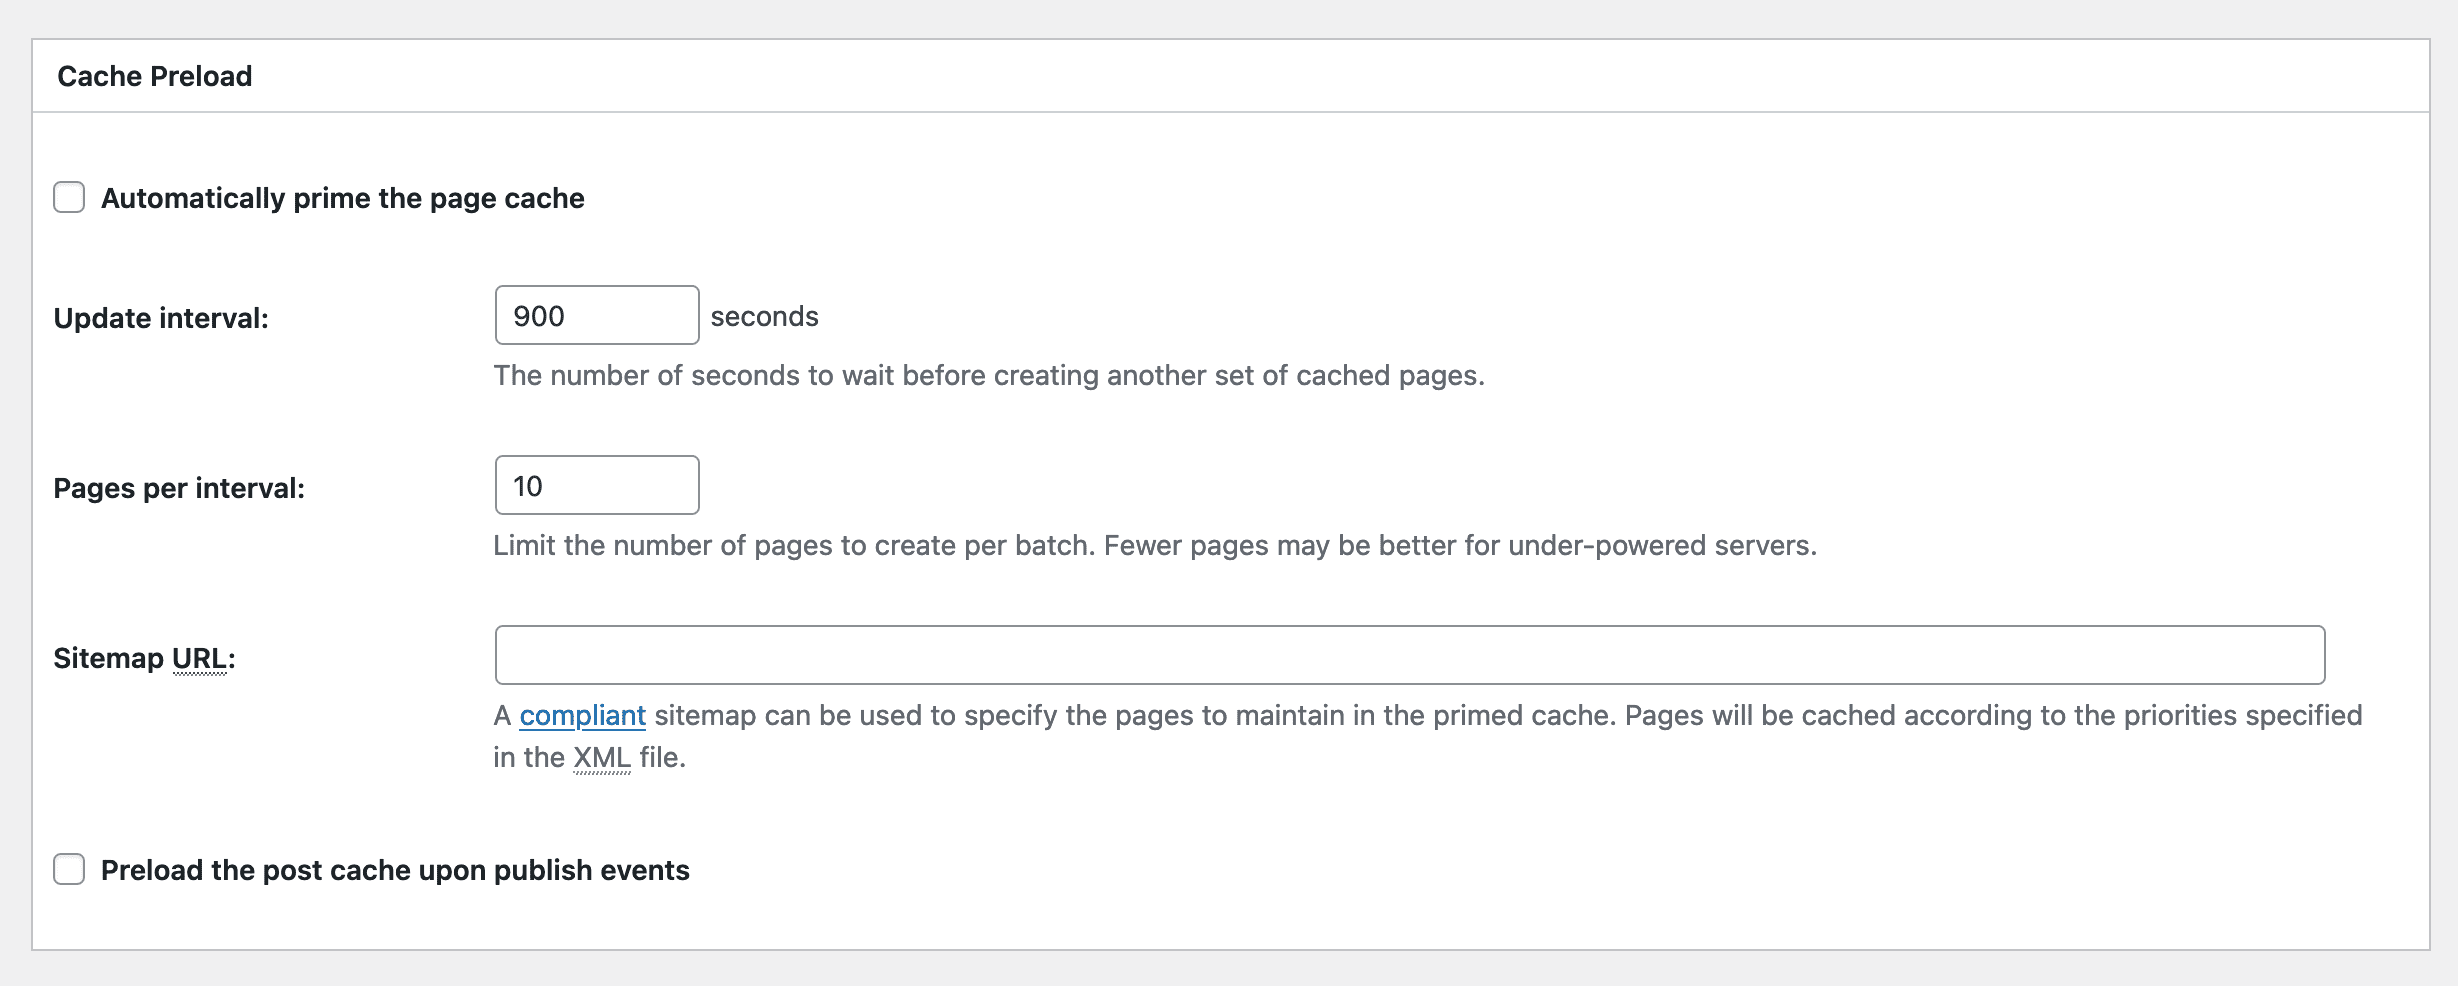
3: Cache Preload
The option allows for automatically priming the page cache by generating and storing cached versions of web pages without waiting for user requests. Users can set the update interval by determining how frequently a new set of cached pages is generated.
You can limit the number of pages created per batch based on server capabilities. Users can also specify a Sitemap URL to guide the primed cache creation, with pages cached according to XML file priorities.
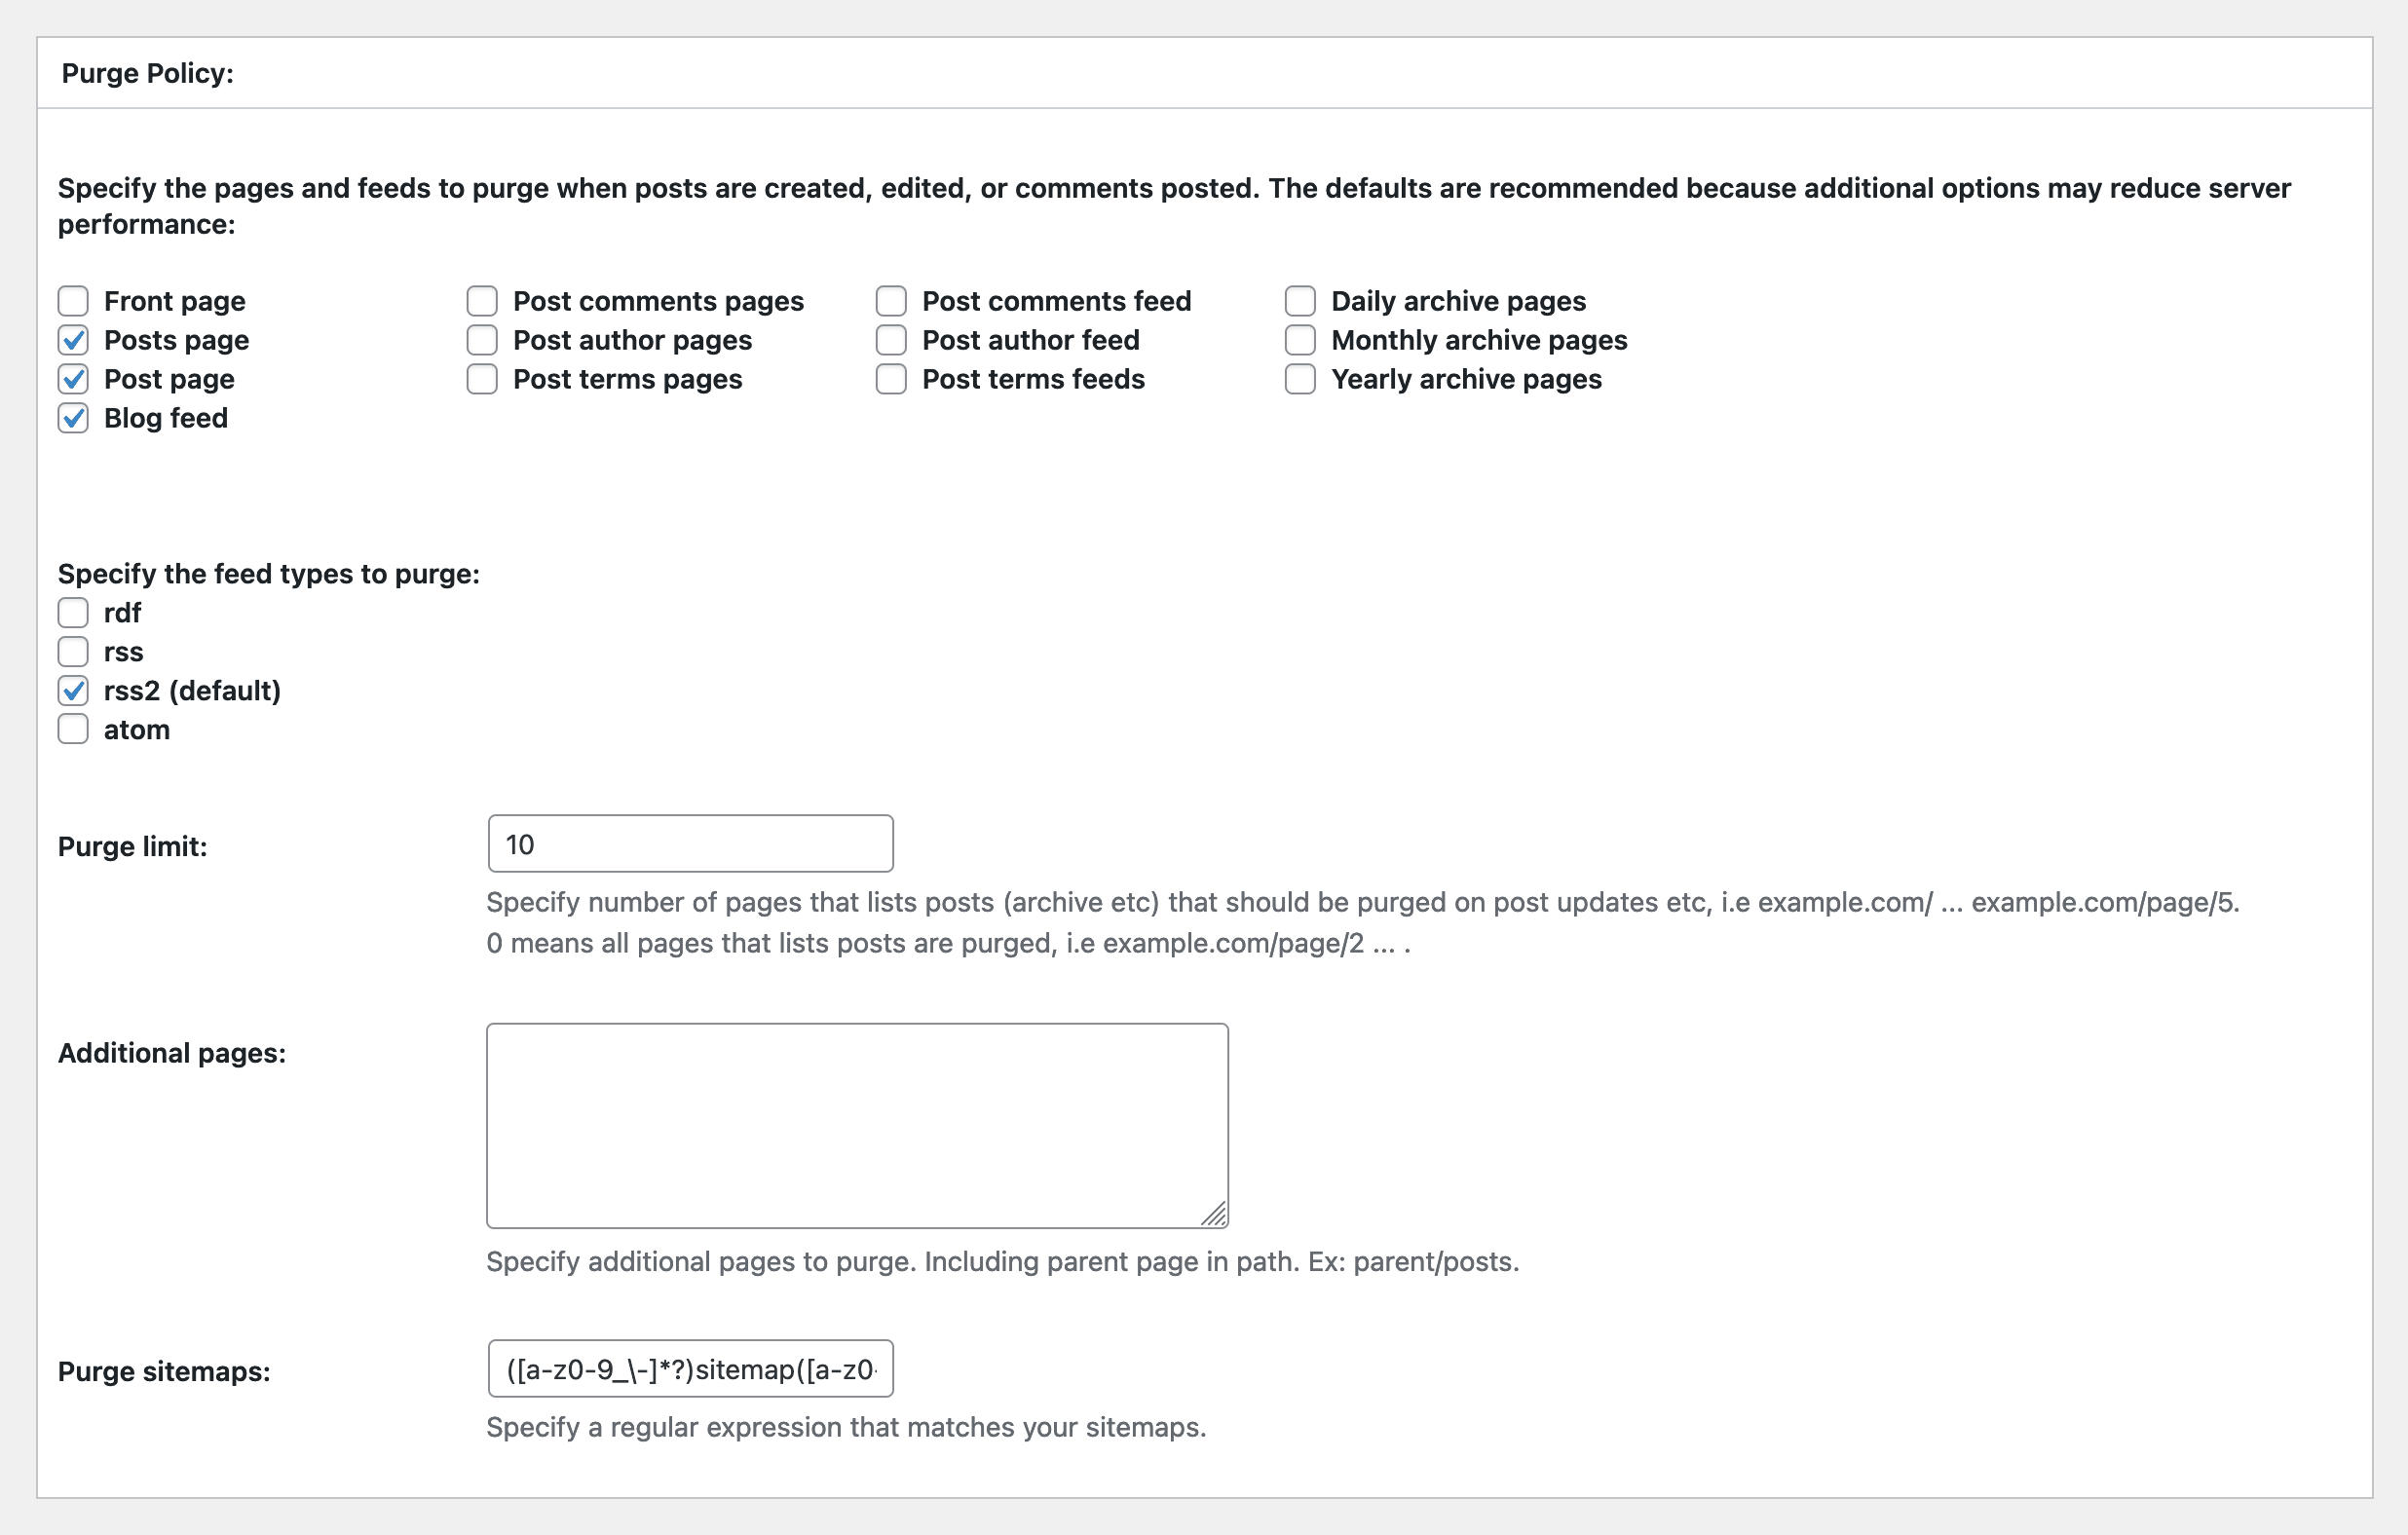
4: Purge Policy
This option allows users to specify the pages and feeds to purge when new posts are published, edited, or when comments are submitted to posts on your site. The Purge limit setting allows users to control the number of pages purged on post updates.
5: Rest API
This option allows you to turn on/off, utilizing the WordPress API to enhance performance and scalability. Turning off the WordPress REST API provides an extra layer of security for users who may not require this functionality.
Enabling caching is recommended, especially when using WordPress as a backend for integrations. It significantly improves response times and reduces resource consumption for repeat API requests, which is particularly beneficial for scaling performance.

Minify
Minification in web development involves removing unnecessary characters from source code without changing its functionality. This process includes stripping out spaces, line breaks, comments, and block delimiters, which reduces the file size and improves web page load times. Minification optimizes the code to be more efficient for delivery and faster execution on web browsers. This process is commonly applied to CSS, HTML, and JavaScript files, contributing significantly to better performance and faster page rendering.

Additionally, smaller file sizes mean less bandwidth usage, which can be particularly beneficial for users on slower connections or mobile data. By optimizing a website’s performance, minification also contributes positively to search engine rankings, as search engines favor faster websites.
Basic Settings
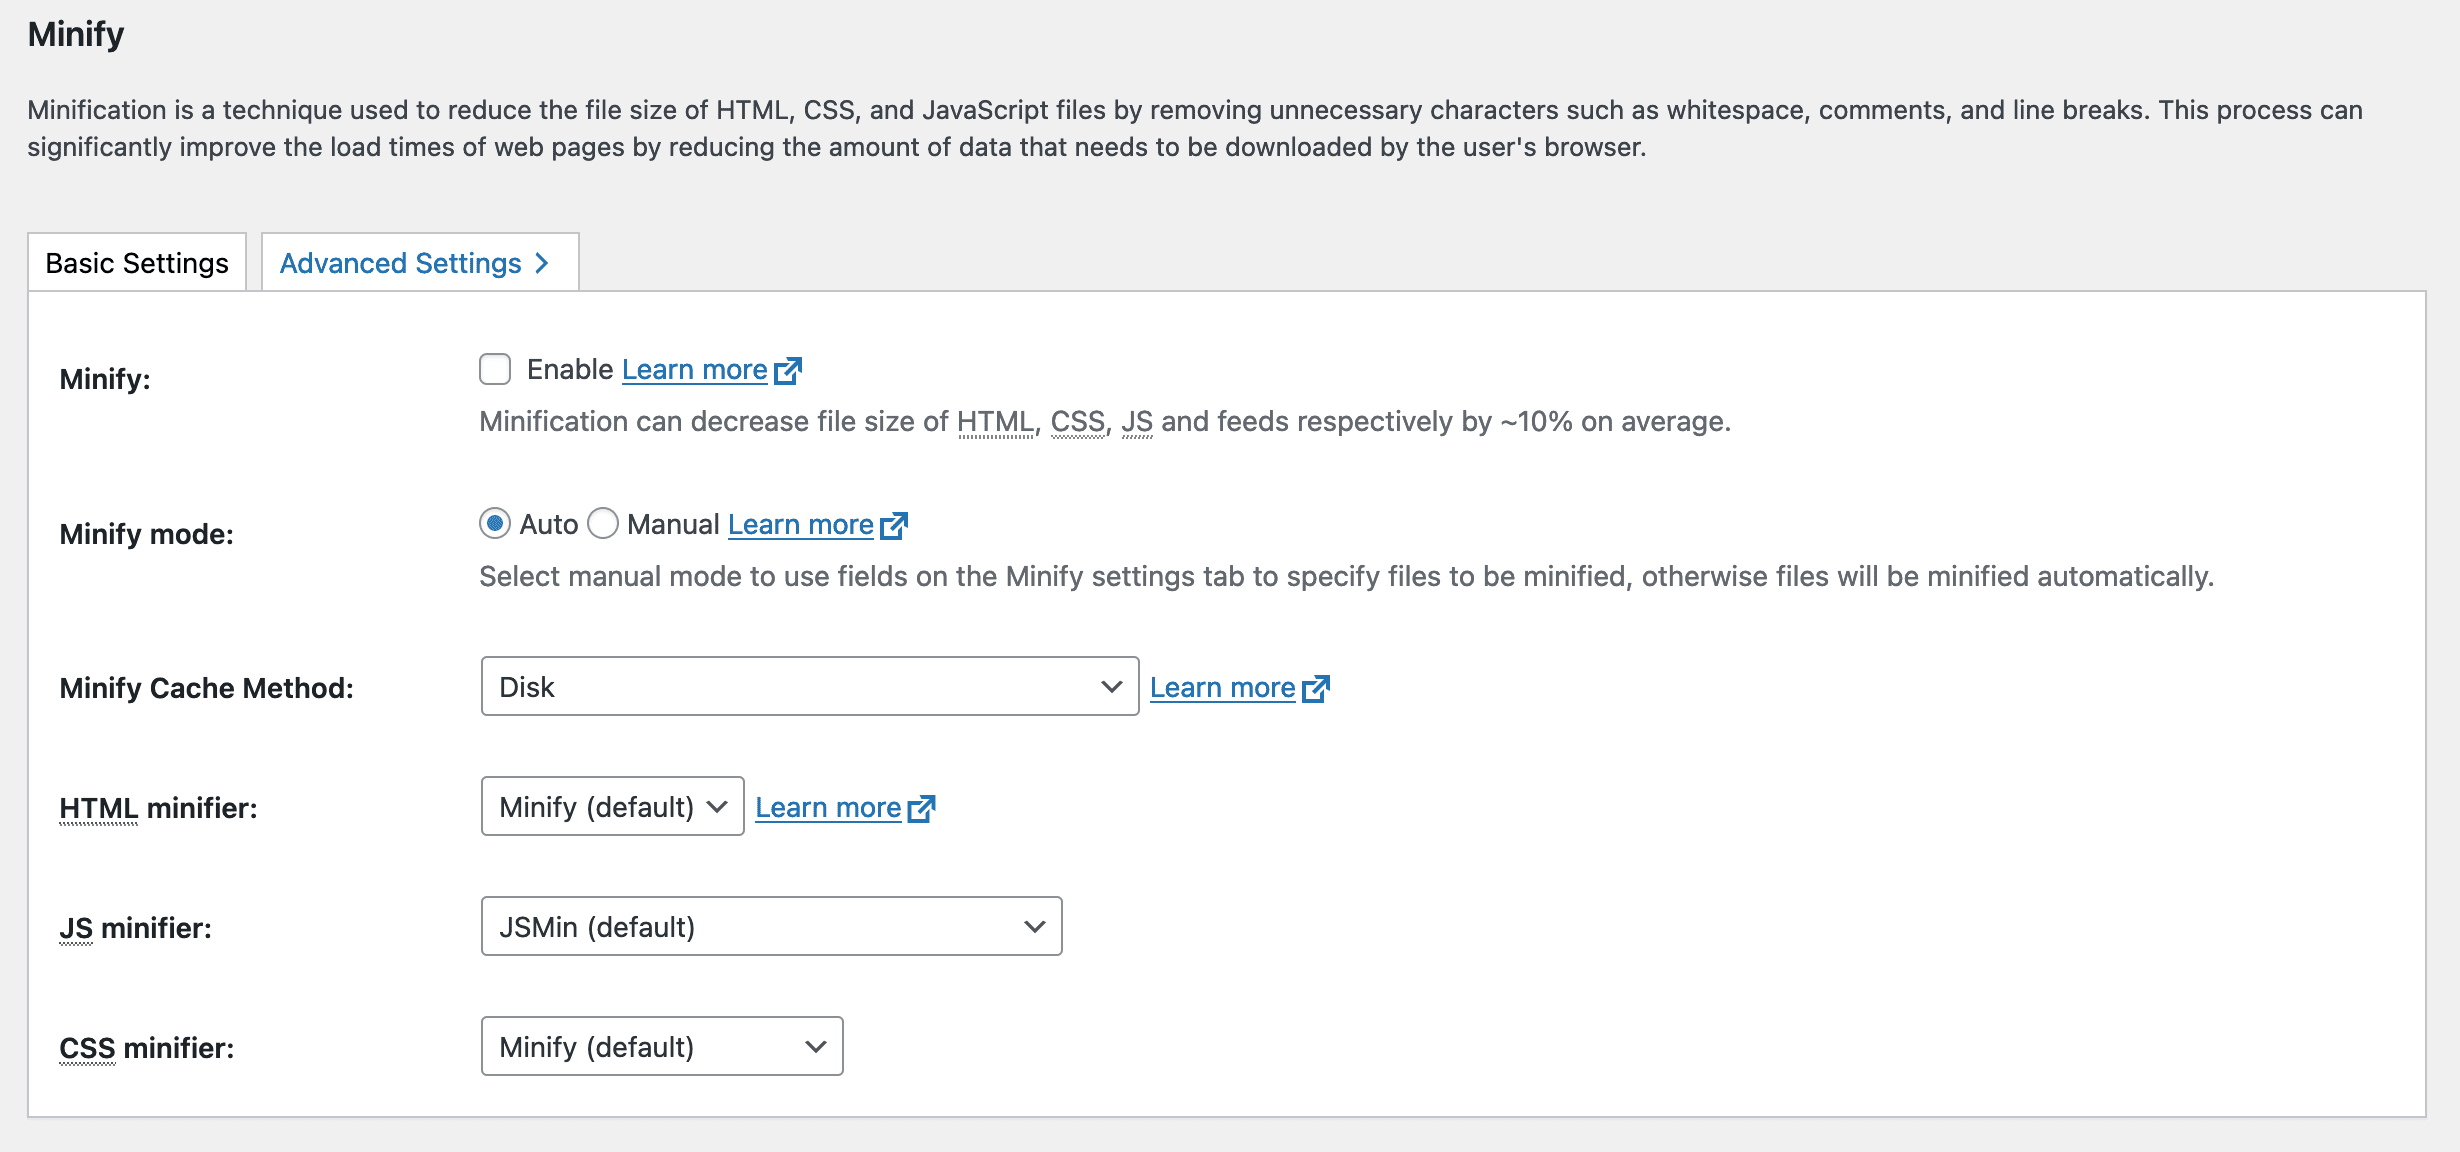
The W3 Total Cache Minify option is designed to improve website performance by reducing the size of your website’s CSS, JavaScript (JS), and HTML files. This process can significantly improve web page load times by reducing the amount of data that needs to be downloaded by the user’s browser.
Here, you enable the minify option, select the minify mode, and select the minify cache method depending on whether you use a shared server, dedicated/virtual server, or multiple servers, and the HTML, JS, and CSS minify engine.
Advanced Settings
1: General
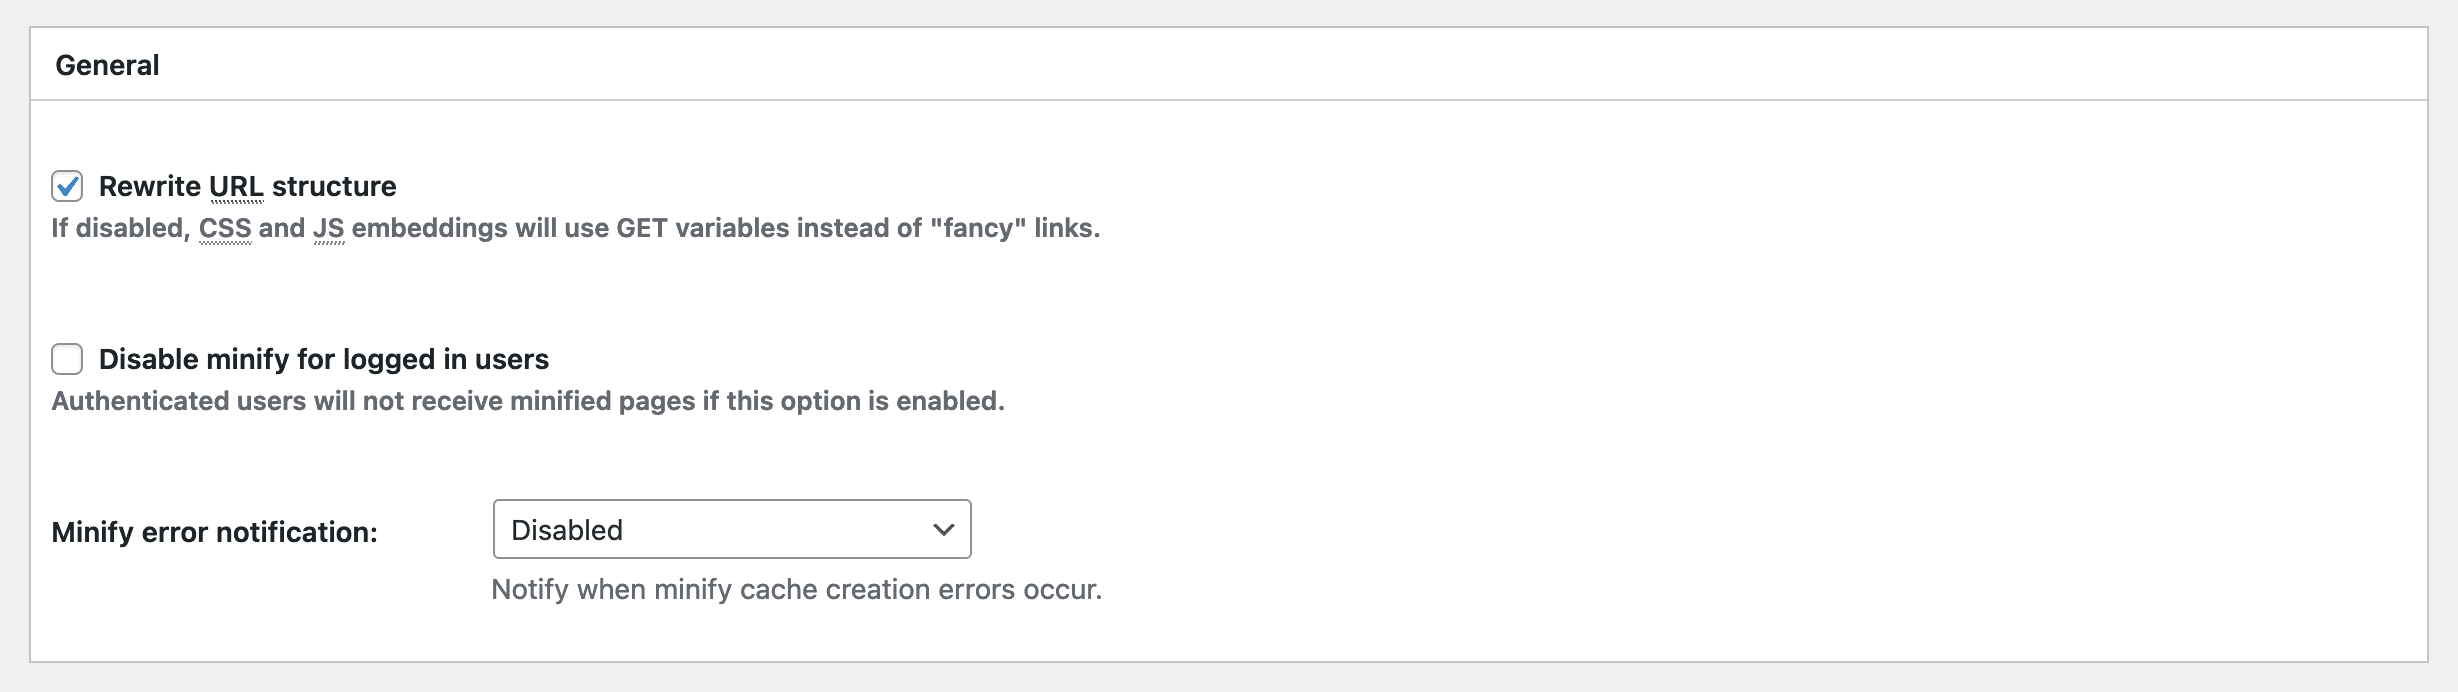
The Rewrite URL Structure option controls how the URLs for CSS and JavaScript (JS) files are structured when embedded in your web pages. When turned on, this setting uses a sophisticated and user-friendly URL structure. However, when turned off, the plugin uses GET variables instead.
The Disable Minify for Logged-in Users option lets you control whether minification should be applied to pages for users logged into the WordPress site. You can also turn on minification error notifications directly to the website Admin and via email.
2: HTML & XML
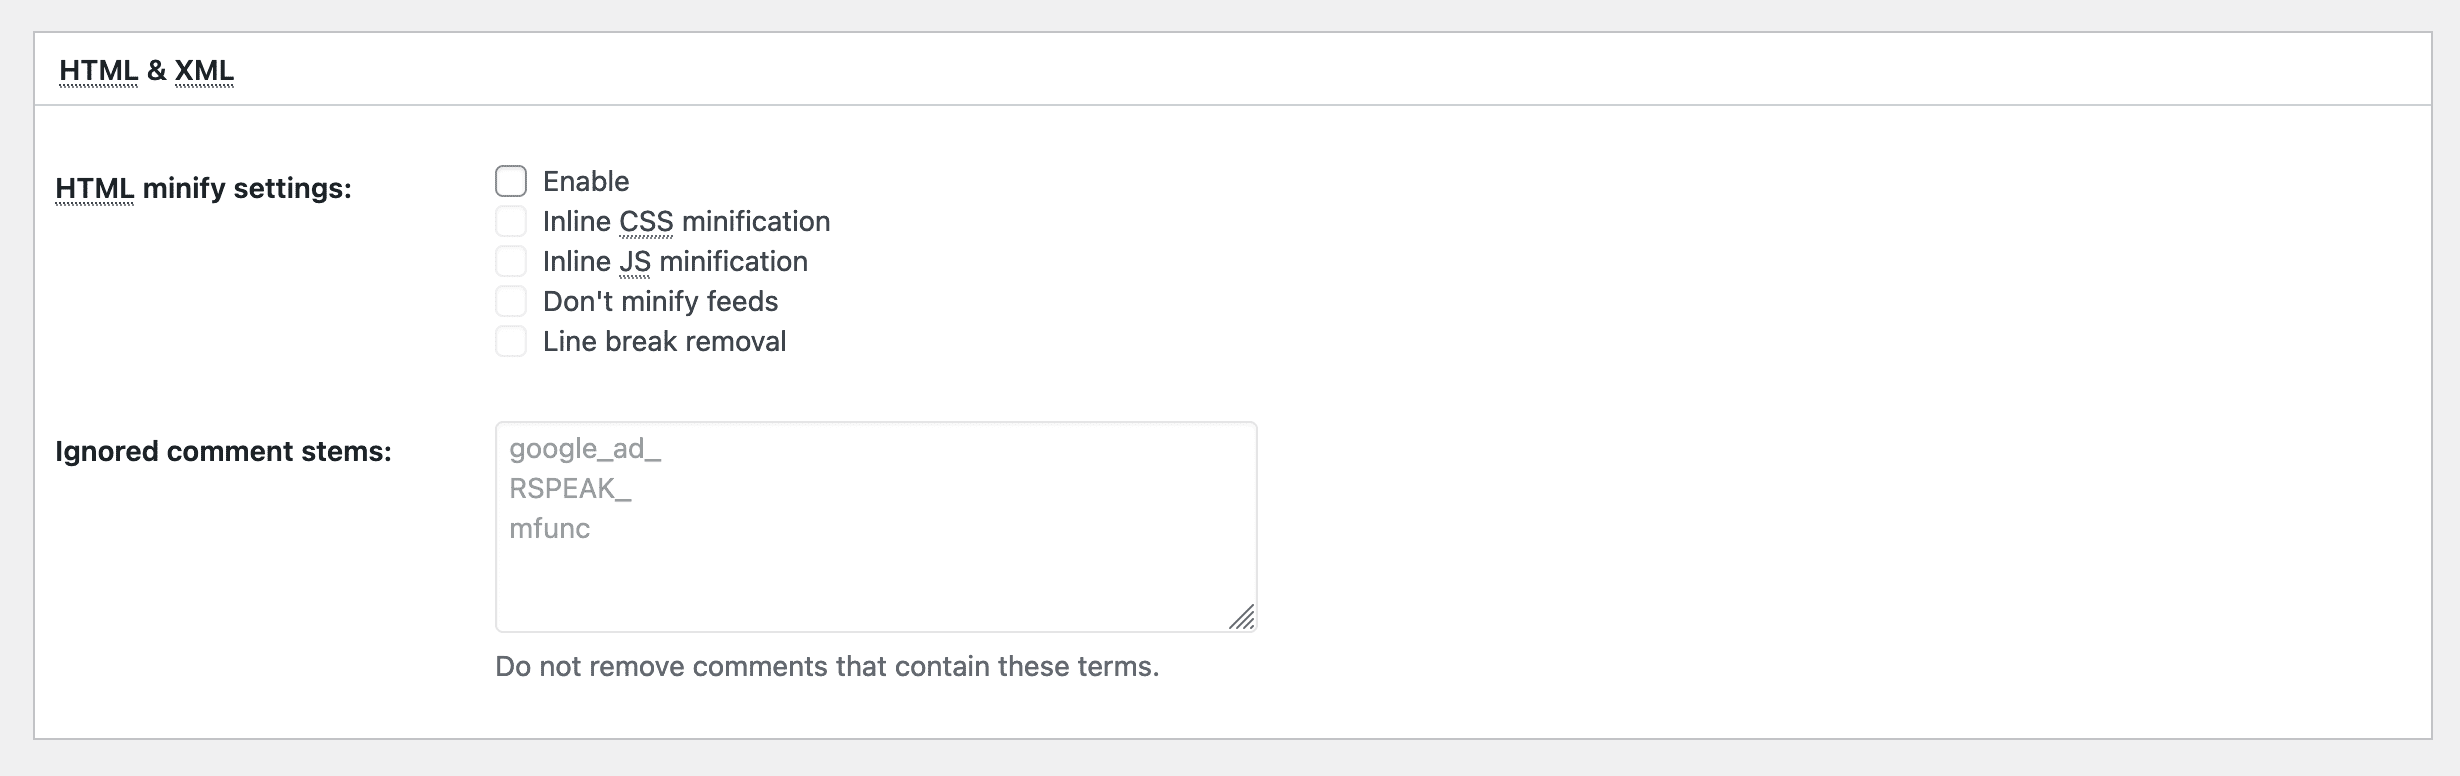
The HTML Minify Settings are intended to reduce the size of HTML files by removing unnecessary characters, whitespace, and comments, ultimately leading to faster page load times.
The Ignored Comment Stems option allows you to selectively preserve specified comments in the HTML, CSS, or JavaScript files during the minification. This option will not remove comments configured by Google Adwords and screen readers by default. In addition, you can add comments to the HTML to remain visible on a new line.
3: JS
The JS Minify Settings are designed to optimize the loading speed of JavaScript (JS) files on your WordPress website, resulting in faster page load times.
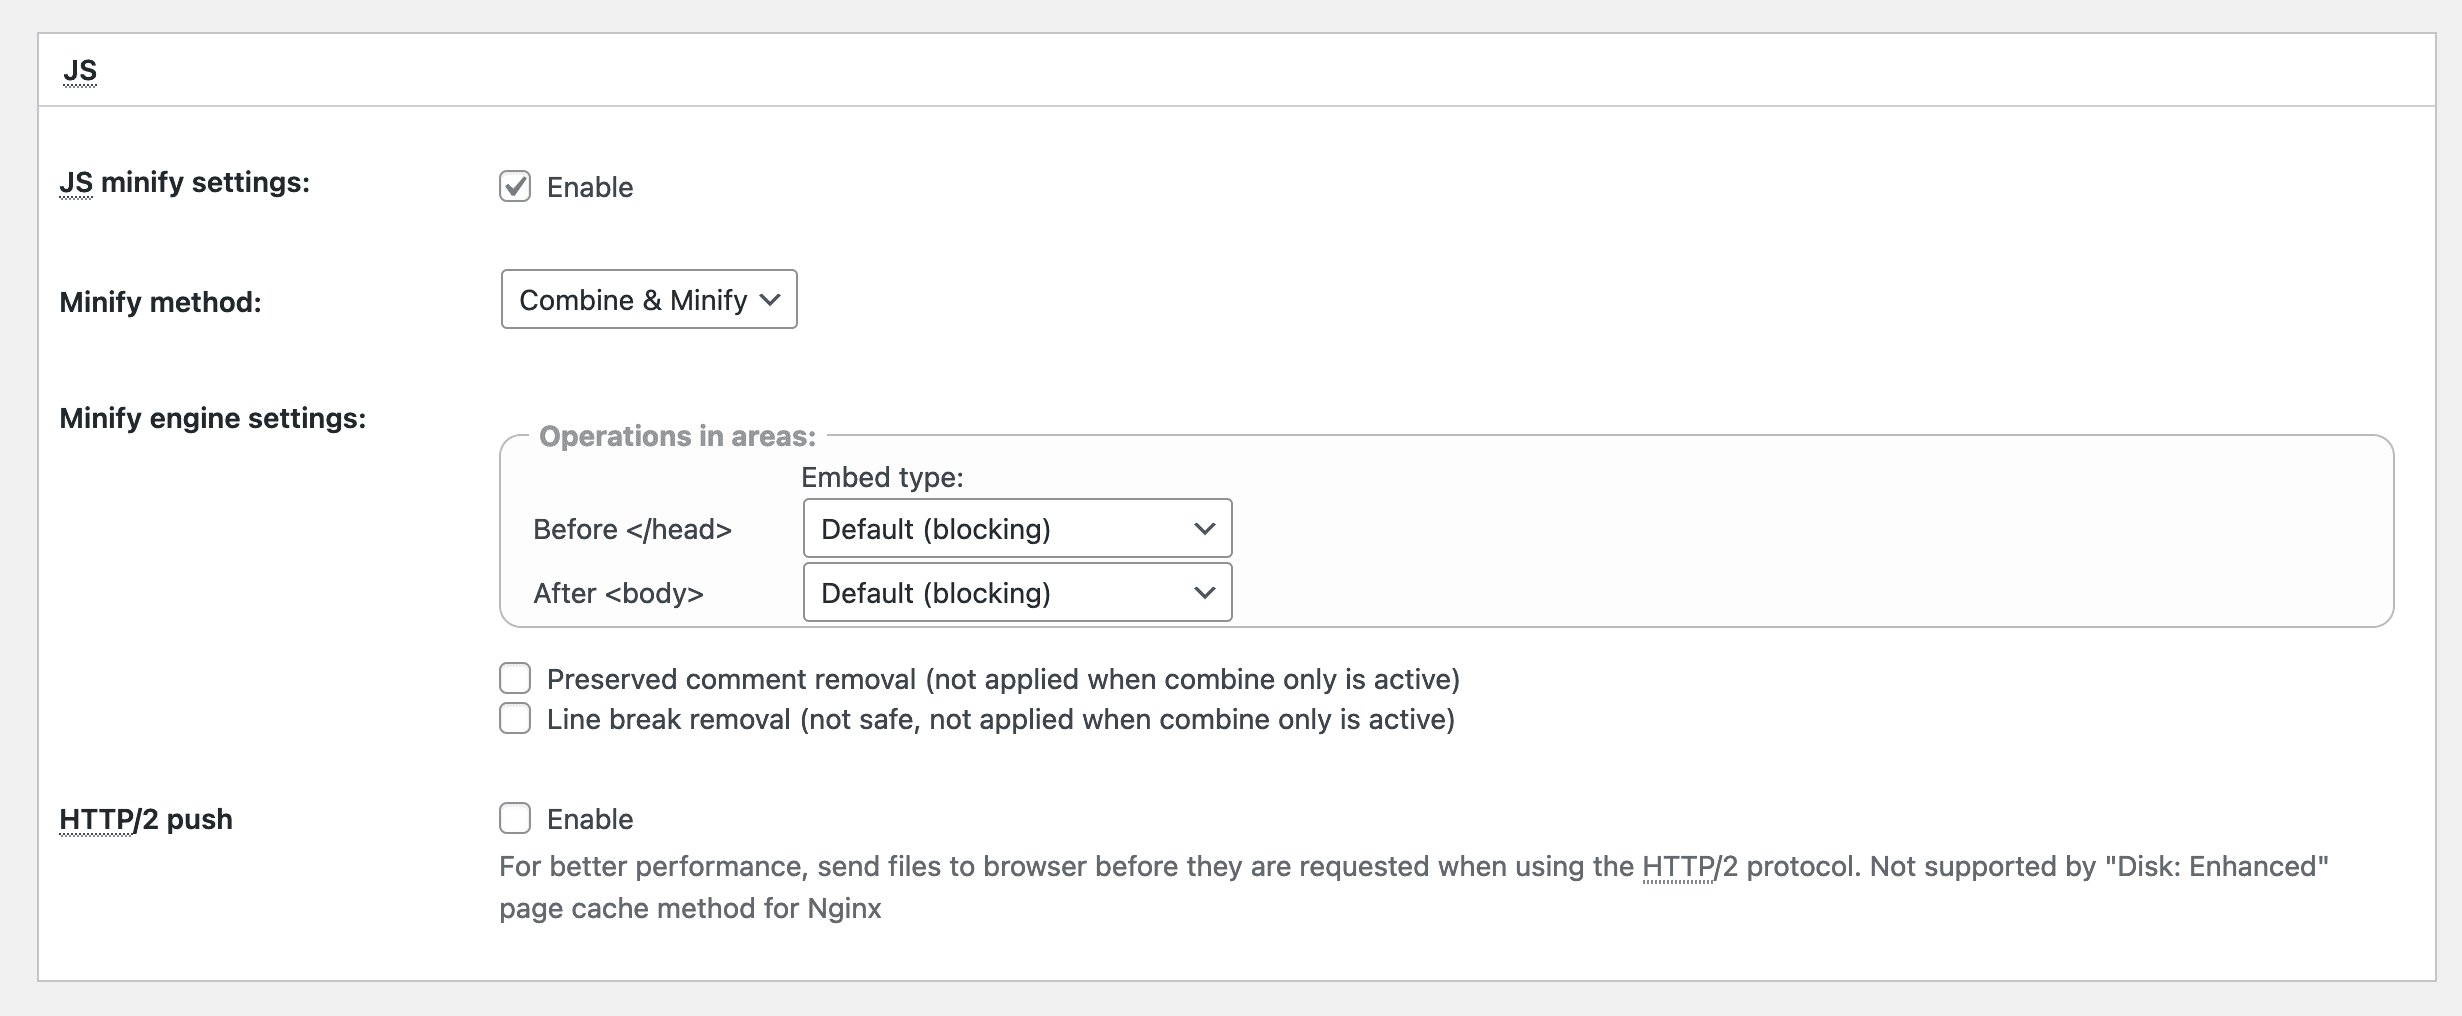
The JS Minify Method option lets you choose how the JavaScript (JS) files should be minified. The minify method you select will impact the organization and delivery of your JS files.
- Combine & Minify – This method combines multiple JS files into a single file and then minifies the combined file, reducing its overall size and enhancing performance.
- Minify Only – This method minifies individual JS files without combining them, allowing for more granular control over the optimization process.
- Combine Only – This method combines multiple JS files into a single file without minifying the combined file, preserving the original formatting and comments in the code. Combining the files reduces the number of HTTP requests made by the browser.
The Minify Engine Settings options are intended to embed minified JavaScript (JS) files within the HTML document. This option controls where the minified JS files should be placed in the HTML—either before the closing tag or after the opening tag. Additionally, it allows you to specify how the scripts are embedded, influencing their loading behavior. The choice of embed type can impact how fast your page loads and renders, depending on the requirements of the scripts.
- Preserved comment removal (not applied when combine only is active)
- Line break removal (not safe, not applied when combine only is active)
The HTTP/2 Push option will improve your website’s performance by proactively sending specific resources to the browser before the browser requests them. The primary goal is to expedite the loading of JavaScript files. This is particularly beneficial for critical resources needed for the initial rendering of a page.
4: CSS
The CSS Minify Settings optimizes the loading speed of CSS (Cascading Style Sheets) files by removing unnecessary characters, such as whitespace, comments, and line breaks, leading to faster page load times.
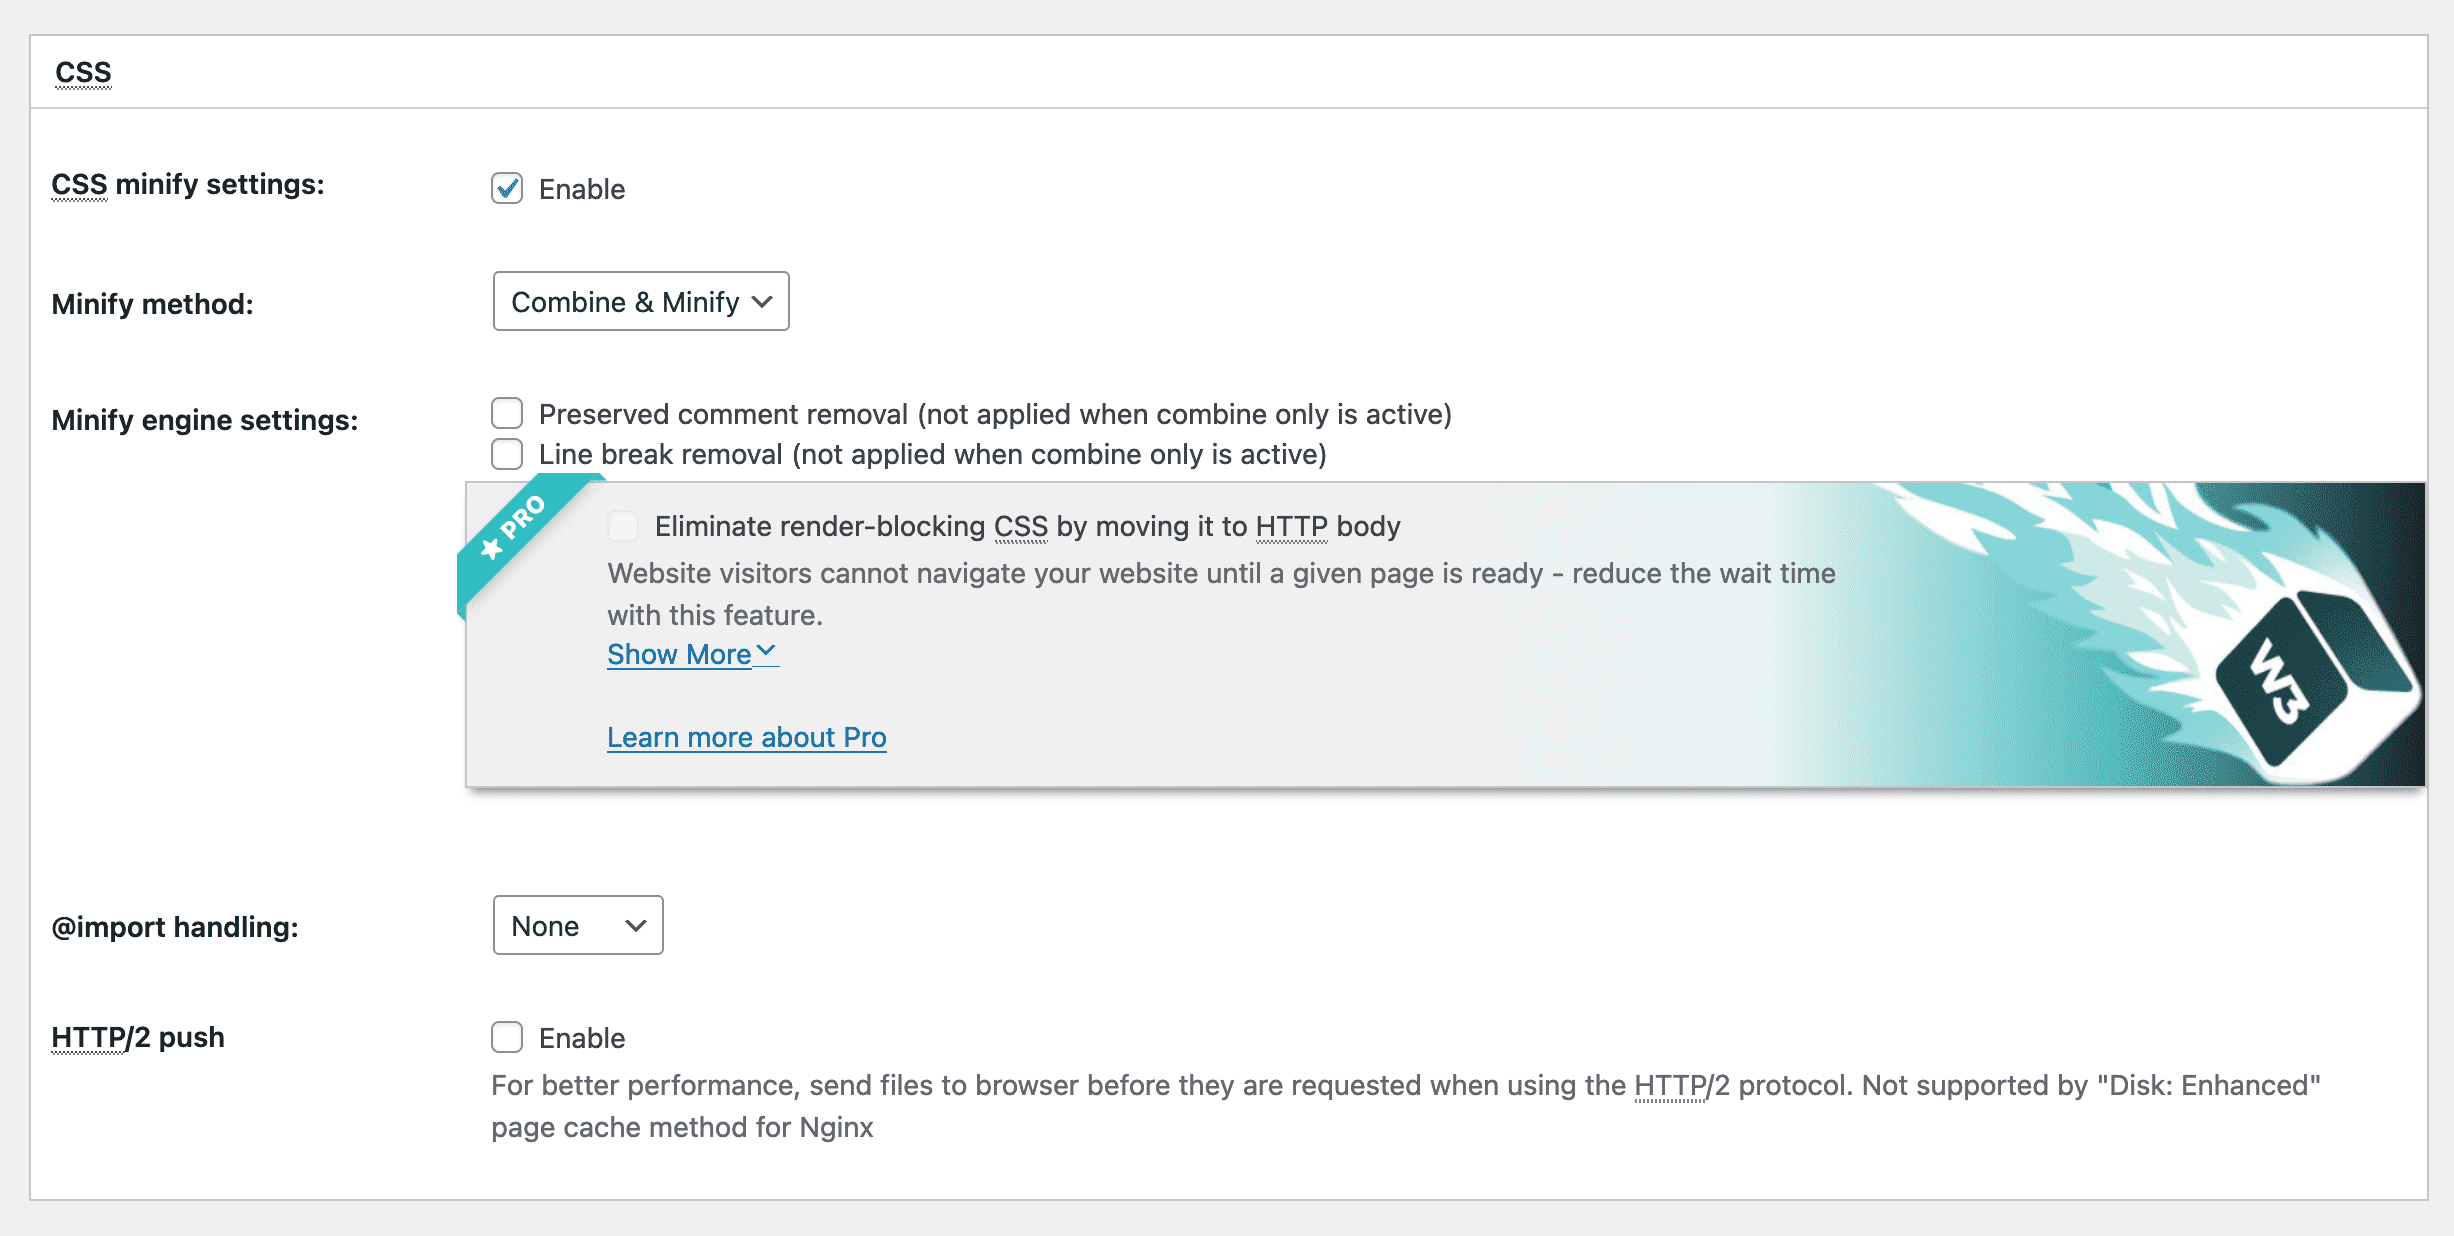
The CSS Minify Method option lets you choose how the CSS files should be minified without altering the functionality of the styles. The options are:
- Combine & Minify – This method combines multiple CSS files into a single file and then minifies the combined file, reducing its overall size and enhancing performance.
- Minify Only – This method minifies individual CSS files without combining them, allowing for more granular control over the optimization process.
- Combine Only – This method combines multiple CSS files into a single file without minifying the combined file, preserving the original formatting and comments in the code. Combining the files reduces the number of HTTP requests made by the browser.
The Minify Engine Settings control how the minification process is applied to your HTML, CSS, and JavaScript files and is crucial in optimizing the loading speed of your WordPress website.
- Preserved comment removal (not applied when combine only is active)
- Line break removal (not applied when combine only is active)
The @import Handling option determines how the code manages imported CSS files using the @import rule in your stylesheets. The @import rule allows you to include external CSS files within a primary CSS file.
The HTTP/2 Push option leverages the capabilities of the HTTP/2 protocol to optimize the delivery of resources on your website by sending specific files to the browser before the browser requests them and reducing latency. HTTP/2 is a modern protocol that improves the efficiency of data transfer between the server and the browser.
Opcode Cache
Opcode cache is a powerful W3TC feature that enhances the performance of a WordPress website by caching compiled PHP code. The use of Opcode in the PHP execution process facilitates a more efficient and scalable approach to script execution, reduces server load, improves response times, and ultimately enhances the overall speed and responsiveness of your WordPress site.

By storing pre-compiled code in memory, Opcode cache eliminates the need for repetitive interpretation and compilation of PHP files.
Database Cache
WordPress Database Caching, or Object Caching, is a method used to improve website performance by storing the results of database queries in the cache to reduce latency and increase throughput for read-heavy applications like WordPress. When a web page is requested, WordPress queries its database to retrieve the data, which can be time-consuming, mainly when complex queries or high traffic are used.
Database caching helps reduce the load on the database by saving the results of these queries. When the same data is requested again, it can be fetched from the cache instead of the database, leading to faster page load times and reduced server load. W3 Total Cache’s installation guidelines indicate that enabling this option on shared hosting setups may actually be counterproductive. We suggest testing your setup in isolation to judge its effectiveness.
The types of performance gains on offer will depend on the complexities of your setup. The main distinction is whether the information is stored on disk or in memory with a solution such as APC or Memcached. The common consensus is that in-memory solutions provide the best results for the database cache.
Basic Settings
This option is turned on by default, mimicking the default WordPress behavior. It excludes logged-in users from the cache, and user activity requests bypass the database cache. Logged-in users might change information, such as post authors publishing updates on a post or a site member updating their profile.

Advanced Settings
In the context of software or online platforms like WordPress plugins, Expert Advanced Settings refer to configurable options intended for users with advanced knowledge or specific technical expertise. These settings allow for granular control over the W3TC plugin functions, allowing you to fine-tune performance, security, and behavior better than basic settings. You can manipulate caching behaviors, database interactions, and fine-tuning performance metrics, among other technical aspects.
Object Cache
WordPress ships with several Object Caching options built-in for developers to access and use. Object Caching in the context of web performance, particularly with WordPress, refers to storing frequently accessed query results or computational data in memory to reduce the time required for these items to be computed or fetched from the database. This type of caching can significantly improve performance by decreasing the load on the database and speeding up the page-loading process, as the data is readily available in the cache rather than being recalculated or retrieved on each page request.
Basic Settings
Enabling Object Cache is particularly beneficial for websites with heavy database usage or high traffic volumes, as it helps alleviate the strain on the server by efficiently serving cached data.

Advanced Settings
These advanced settings allow for granular control over the W3TC plugin functions, allowing you to fine-tune cache performance and overall website behavior. You can manipulate caching and database interactions and refine cache performance metrics.
Browser Cache
Browser cache is a storage mechanism in web browsers that saves copies of web resources (HTML files, images, CSS, and JavaScript). When a user revisits a website, the browser retrieves these cached files instead of downloading them again, significantly reducing page load times and server requests.
This results in a faster user experience and reduced bandwidth consumption, especially for static resources that don’t change frequently. Cached files have an expiration time to ensure users see up-to-date content.
Basic Settings
This W3TC plugin option turns on browser caching and will instruct visitors’ web browsers to store static files (HTML files, images, CSS, and JavaScript) from your WordPress website locally on their computer or mobile device. This results in faster page loading times and a smoother browsing experience for your visitors, ultimately improving your website’s overall speed and performance.

Advanced Settings
These advanced options allow for granular control over the W3TC plugin functions, allowing you to fine-tune cache performance and overall website behavior.
The Set Last-Modified header option lets you decide whether or not your server must include a unique Last-Modified timestamp about the last time the content was changed when delivering web content.
The Set Expires Header option allows the plugin to instruct browsers and proxies to hold a cached version of the web content before rechecking the server. Instead of relying on the Last-Modified timestamp, an expiration date is set for each resource.
The Set Cache-Control Header option allows you to control the server’s caching directives and web content responses. This option instructs the server to include a Cache-Control header in its responses, specifying directives that govern how the content should be cached, stored, and re-validated by browsers and proxies.
The Set Entity Tag (ETag) option determines whether the server includes a unique ETag in its responses when delivering web content. When this option is activated, the server appends an ETag to its responses, serving as a mechanism for identifying changes in content. Web browsers and proxies leverage the ETag information to determine whether their cached version of the content is still valid or if they need to retrieve a fresh copy.
The Set W3 Total Cache header option sets an optional HTTP X-Powered-By header that websites can include in responses to assist in identifying requests and files optimized by the W3 Total Cache plugin. Some caching systems and CDNs might use the X-Powered-By header as part of their cache validation process. They might check for changes in the header’s value to determine if a cached resource version is still valid or needs to be refreshed. If the header changes, it could signal a change in the underlying software, potentially affecting cached content.
The Enable HTTP (gzip) compression option notifies the web server to compress HTML, CSS, and JavaScript files before sending them to the user’s browser. Gzip compression is crucial in enhancing both caching and website performance, reducing the file size by up to 70% and resulting in significantly smaller data transfers.
The Enable HTTP (Brotli) compression option (developed by Google) offers even more impressive compression capabilities than gzip compression. JavaScript files compressed with Brotli are roughly 15% smaller, HTML files are around 20% smaller, and CSS files are around 16% smaller. While Brotli compression is more powerful than gzip, the Brotli compression process is slower, making gzip preferable if you host a large amount of dynamic content that cannot be cached. SiteGround hosting has an instructive comparison between Brotli and Gzip compression.
The Prevent caching of objects after settings change option ensures that changes to your caching settings take immediate effect. When this option is turned on, any time you adjust your caching setup, a new query string is generated and added to your website’s objects. This new query string signals servers and browsers that the content has been modified, prompting them to fetch the updated version rather than relying on cached copies. When this feature is enabled, an Update media query string button will appear on your Browser Cache settings page to reset the query string.
The Remove query strings from static resources option will improve website performance and caching efficiency by removing query strings from static resources like images, CSS, and JavaScript files.
Example: website.com/image.jpg?v=123 → website.com/image.jpg.
Browsers and proxy servers consider URLs with query strings as unique resources, even if the content is identical. This can lead to unnecessary re-downloads, slowing down page loads.
The Prevent caching exception list option provides granular control over caching behavior by allowing you to specify URLs or URL patterns that the cache mechanism should bypass. It safeguards and ensures that certain sensitive or dynamic content is always served fresh from the server. When a visitor requests a URL matching an entry on the exception list, the server will handle the request directly, generating a fresh response each time. Common use cases:
- Sensitive Data: To protect user privacy and security, prevent URLs containing personal information, login pages, shopping carts, or other sensitive content from being cached.
- Dynamic Content: Exclude URLs that display frequently changing content (e.g., live feeds, real-time
dashboards, chat widgets) to ensure users always see the latest information. - Custom Functionality: Bypass caching for URLs that rely on specific user interactions or browser states to function correctly, preventing caching-related issues.
- Troubleshooting: Temporarily add URLs to the list for testing or troubleshooting purposes.
The Don’t set cookies for static files option lets you optimize website performance and reduce unnecessary data transfers by preventing cookies from being attached to static files like images, CSS, and JavaScript. Additionally, browsers and CDNs can cache static files more effectively without considering cookie-based variations, reducing server load and enhancing performance.
The Do not process 404 errors for static objects with WordPress option bypasses WordPress for 404 errors related to static objects, allowing the server to handle them directly. Server-level 404 handling is often faster than WordPress-level processing, leading to speedier error responses and improving the overall user experience.
The 404 error exception option allows you to specify URLs or URL patterns that should not trigger a 404 error message, even if those resources don’t exist on your website. When a visitor requests a URL that matches an entry in the exception list, the server won’t generate a standard 404 error page, preventing errors for non-existent files and resources.
The Rewrite URL structure of objects option dynamically alters protected file URLs by appending unique query strings or identifiers, ensuring that each URL is distinct to the browser, even if the underlying file remains the same.
The Set Last-Modified header option lets you decide whether or not your server must include a unique Last-Modified timestamp about the last time the content was changed when delivering web content.
When the Set Expires header option is turned on, the browser requests a CSS or JS file from the server, establishing an expiration date based on the defined lifetime. The browser stores the file in its cache and reuses it for subsequent visits to the same website or pages. Upon expiration, the browser requests a fresh copy of the file from the server.
The Expires header lifetime option instructs web browsers to cache CSS and JS files for a defined amount of time. You can specify a duration for the cache lifetime measured in seconds.
The Set Cache-Control header option instructs the webserver to include a Cache-Control header in its responses. It establishes directives that control how CSS and JS resources must be cached, stored, and revalidated by browsers and proxies. The global option offers a broad approach, while this option provides granular control for these crucial performance-affecting resources.
Using both settings is common, with the global setting defining a base framework and the CSS/JS setting tailoring behavior for specific file types.
The Cache-Control policy option provides different pre-defined configurations, simplifying the process of applying appropriate caching strategies for your JS and CSS files. Below are pre-defined policy examples:
- Default: It sets a max-age=31536000 | public directive caching files for one year and allows sharing in public caches. It is suitable for static files that rarely change.
- Aggresive: It sets a max-age=7200 | public directive and caches files for 2 hours. It aims for faster updates at the expense of a higher server load.
- Lomg Expiry: It sets a max-age=2592000000 | public directive and caches files for 30 years, making it ideal for rarely updated files on low-traffic websites.
- No Cache: Uses a no-cache | no-store | must-revalidate directive, forcing browsers to always revalidate with the server before using the file. Best for dynamically changing files where freshness is paramount.
The Set entity tag (eTag) option instructs the server to append an ETag to its responses to identify changes in CSS and JS files, significantly improving performance by reducing requests and file sizes. When files remain unchanged, browsers reuse cached versions based on matching ETags, which is particularly beneficial for static elements like layout styles and core JS libraries.
When a browser requests a resource that was previously requested, it sends the current ETag in the request header. The server compares the received ETag with the current resource’s ETag, and if they match, the server sends a 304 Not Modified response, informing the browser that the cached version is still valid.
The Set W3 Total Cache header option sets an optional HTTP X-Powered-By header that websites can include in responses to assist in identifying requests and files optimized by the W3 Total Cache plugin. Some caching systems and CDNs might use the X-Powered-By header as part of their cache validation process.
The Enable HTTP (gzip) compression option notifies the web server to compress HTML, CSS, and JavaScript files before sending them to the user’s browser. Gzip compression is crucial in enhancing both caching and website performance, reducing the file size by up to 70% and resulting in significantly smaller data transfers.
The Enable HTTP (Brotli) compression option (developed by Google) offers even more impressive compression capabilities than gzip compression. JavaScript files compressed with Brotli are roughly 15% smaller, HTML files are around 20% smaller, and CSS files are around 16% smaller. While Brotli compression is more powerful than gzip, the Brotli compression process is slower, making gzip preferable if you host a large amount of dynamic content that cannot be cached. SiteGround hosting has an instructive comparison between Brotli and Gzip compression.
The Prevent caching of objects after settings change option ensures that changes to your caching settings take immediate effect. When this option is turned on, any time you adjust your caching setup, a new query string is generated and added to your website’s objects. This new query string signals servers and browsers that the content has been modified, prompting them to fetch the updated version rather than relying on cached copies. When this feature is enabled, an Update media query string button will appear on your Browser Cache settings page to reset the query string.
The Remove query strings from static resources option will improve website performance and caching efficiency by removing query strings from static resources like images, CSS, and JavaScript files.
Example: website.com/image.jpg?v=123 → website.com/image.jpg.
Browsers and proxy servers consider URLs with query strings as unique resources, even if the content is identical. This can lead to unnecessary re-downloads, slowing down page loads.
The Disable cookies for static files option optimizes website performance. It reduces unnecessary data transfers by preventing cookies from being attached to static files like images, CSS, and JS files. Each request that doesn’t carry cookies means less data is sent between the browser and server, leading to faster page loads and less bandwidth usage. Additionally, browsers and CDNs can cache static files more effectively without considering cookie-based variations
The Set Last-Modified header option lets you decide whether or not your server must include a unique Last-Modified timestamp about the last time the content was changed when delivering web content.
The Set Expires Header option allows the plugin to instruct browsers and proxies to hold a cached version of the web content before rechecking the server. Instead of relying on the Last-Modified timestamp, an expiration date is set for each resource.
The Expires header lifetime option instructs web browsers to cache HTML and XML files for a defined amount of time. You can specify a duration for the cache lifetime measured in seconds.
The Set Cache-Control header option instructs the webserver to include a Cache-Control header in its responses. It establishes directives that control how HTML and XML resources must be cached, stored, and revalidated by browsers and proxies. The global option offers a broad approach, while this option provides granular control for these crucial performance-affecting resources.
The Cache-Control policy option provides different pre-defined configurations, simplifying the process of applying appropriate caching strategies for your HTML and XML files.
The Set Entity Tag (ETag) option determines whether the server includes a unique ETag in its responses when delivering web content. When this option is activated, the server appends an ETag to its responses, serving as a mechanism for identifying changes in content. Web browsers and proxies leverage the ETag information to determine whether their cached version of the content is still valid or if they need to retrieve a fresh copy.
The Set W3 Total Cache header option sets an optional HTTP X-Powered-By header that websites can include in responses to assist in identifying requests and files optimized by the W3 Total Cache plugin. Some caching systems and CDNs might use the X-Powered-By header as part of their cache validation process. They might check for changes in the header’s value to determine if a cached resource version is still valid or needs to be refreshed. If the header changes, it could signal a change in the underlying software, potentially affecting cached content.
The Enable HTTP (gzip) compression option notifies the web server to compress HTML, CSS, and JavaScript files before sending them to the user’s browser. Gzip compression is crucial in enhancing both caching and website performance, reducing the file size by up to 70% and resulting in significantly smaller data transfers.
The Enable HTTP (Brotli) compression option (developed by Google) offers even more impressive compression capabilities than gzip compression. JavaScript files compressed with Brotli are roughly 15% smaller, HTML files are around 20% smaller, and CSS files are around 16% smaller. While Brotli compression is more powerful than gzip, the Brotli compression process is slower, making gzip preferable if you host a large amount of dynamic content that cannot be cached. SiteGround hosting has an instructive comparison between Brotli and Gzip compression.
The Set Last-Modified header option lets you decide whether or not your server must include a unique Last-Modified timestamp about the last time the content was changed when delivering web content.
The Set Expires Header option allows the plugin to instruct browsers and proxies to hold a cached version of the web content before rechecking the server. Instead of relying on the Last-Modified timestamp, an expiration date is set for each resource.
The Expires header lifetime option instructs web browsers to cache media files for a defined amount of time. You can specify a duration for the cache lifetime measured in seconds.
The Set Cache-Control header option instructs the webserver to include a Cache-Control header in its responses. It establishes directives that control how media resources must be cached, stored, and revalidated by browsers and proxies. The global option offers a broad approach, while this option provides granular control for these crucial performance-affecting resources.
The Cache-Control policy option provides different pre-defined configurations, simplifying the process of applying appropriate caching strategies for your media files.
The Set Entity Tag (ETag) option determines whether the server includes a unique ETag in its responses when delivering web content. When this option is activated, the server appends an ETag to its responses, serving as a mechanism for identifying changes in content. Web browsers and proxies leverage the ETag information to determine whether their cached version of the content is still valid or if they need to retrieve a fresh copy.
The Set W3 Total Cache header option sets an optional HTTP X-Powered-By header that websites can include in responses to assist in identifying requests and files optimized by the W3 Total Cache plugin. Some caching systems and CDNs might use the X-Powered-By header as part of their cache validation process. They might check for changes in the header’s value to determine if a cached resource version is still valid or needs to be refreshed. If the header changes, it could signal a change in the underlying software, potentially affecting cached content.
The Enable HTTP (gzip) compression option notifies the web server to compress HTML, CSS, and JavaScript files before sending them to the user’s browser. Gzip compression is crucial in enhancing both caching and website performance, reducing the file size by up to 70% and resulting in significantly smaller data transfers.
The Enable HTTP (Brotli) compression option (developed by Google) offers even more impressive compression capabilities than gzip compression. JavaScript files compressed with Brotli are roughly 15% smaller, HTML files are around 20% smaller, and CSS files are around 16% smaller. While Brotli compression is more powerful than gzip, the Brotli compression process is slower, making gzip preferable if you host a large amount of dynamic content that cannot be cached. SiteGround hosting has an instructive comparison between Brotli and Gzip compression.
The Prevent caching of objects after settings change option ensures that changes to your caching settings take immediate effect. When this option is turned on, any time you adjust your caching setup, a new query string is generated and added to your website’s objects. This new query string signals servers and browsers that the content has been modified, prompting them to fetch the updated version rather than relying on cached copies. When this feature is enabled, an Update media query string button will appear on your Browser Cache settings page to reset the query string.
The Remove query strings from static resources option will improve website performance and caching efficiency by removing query strings from static resources like images, CSS, and JavaScript files.
The Disable cookies for static files option optimizes website performance. It reduces unnecessary data transfers by preventing cookies from being attached to static files like images, CSS, and JS files. Each request that doesn’t carry cookies means less data is sent between the browser and server, leading to faster page loads and less bandwidth usage. Additionally, browsers and CDNs can cache static files more effectively without considering cookie-based variations.
5: Security Headers
Security headers are HTTP headers that add an extra layer of security to web applications by controlling how browsers handle the site’s resources. They protect against common web vulnerabilities such as cross-site scripting (XSS), clickjacking, and content sniffing. The vast array of options in the W3 Total Cache plugin offers granular control.

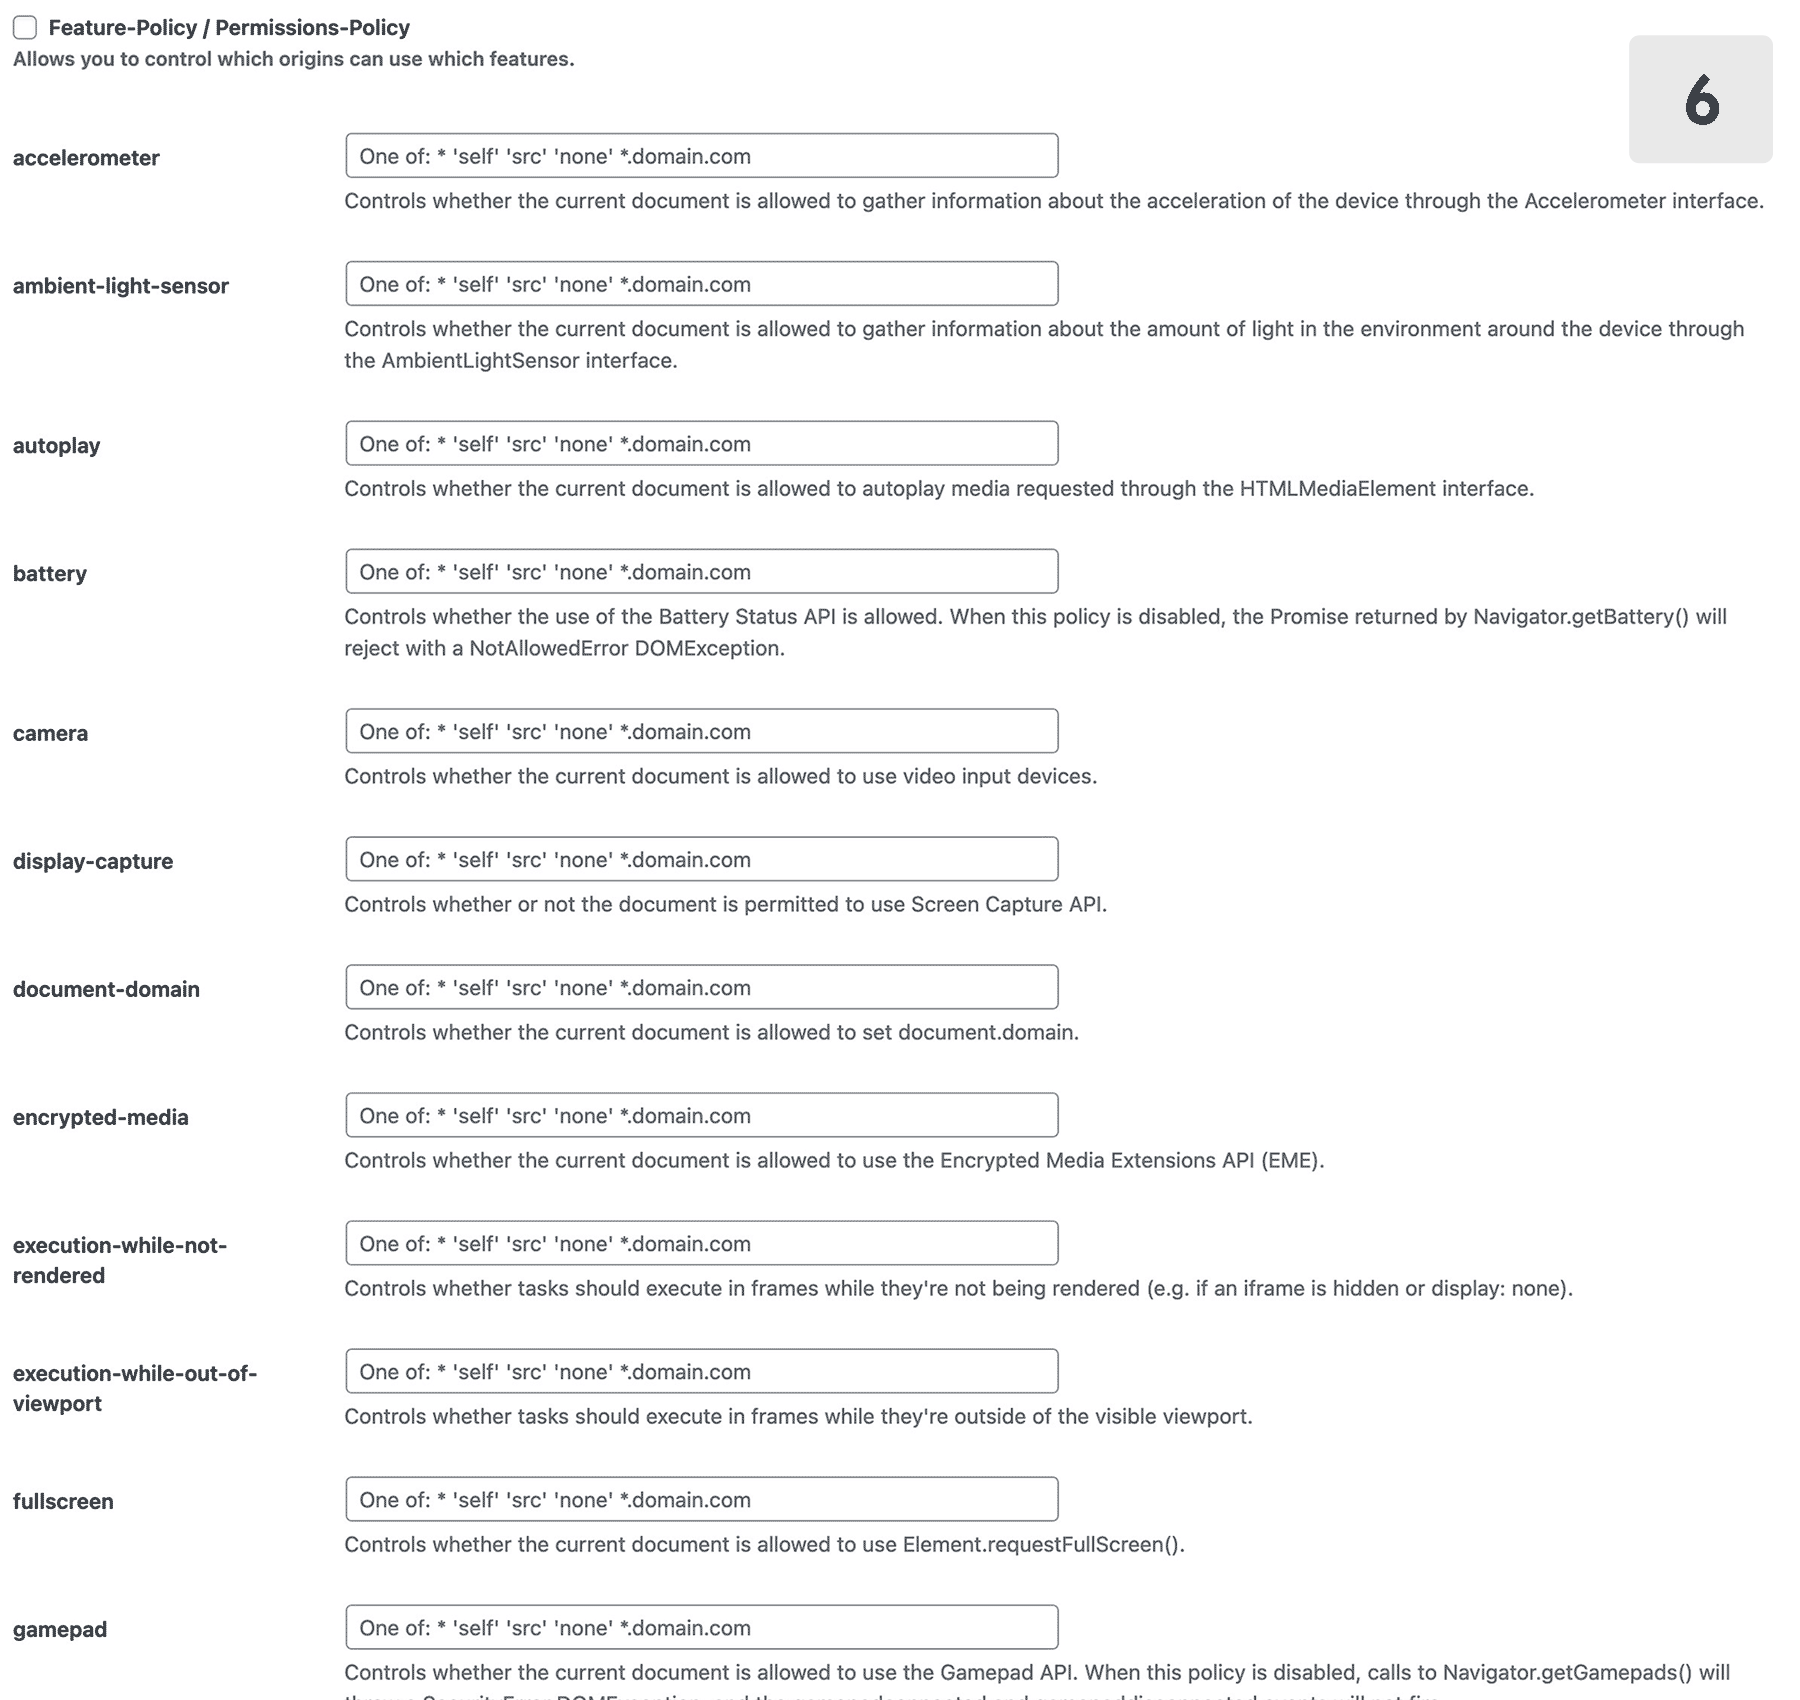
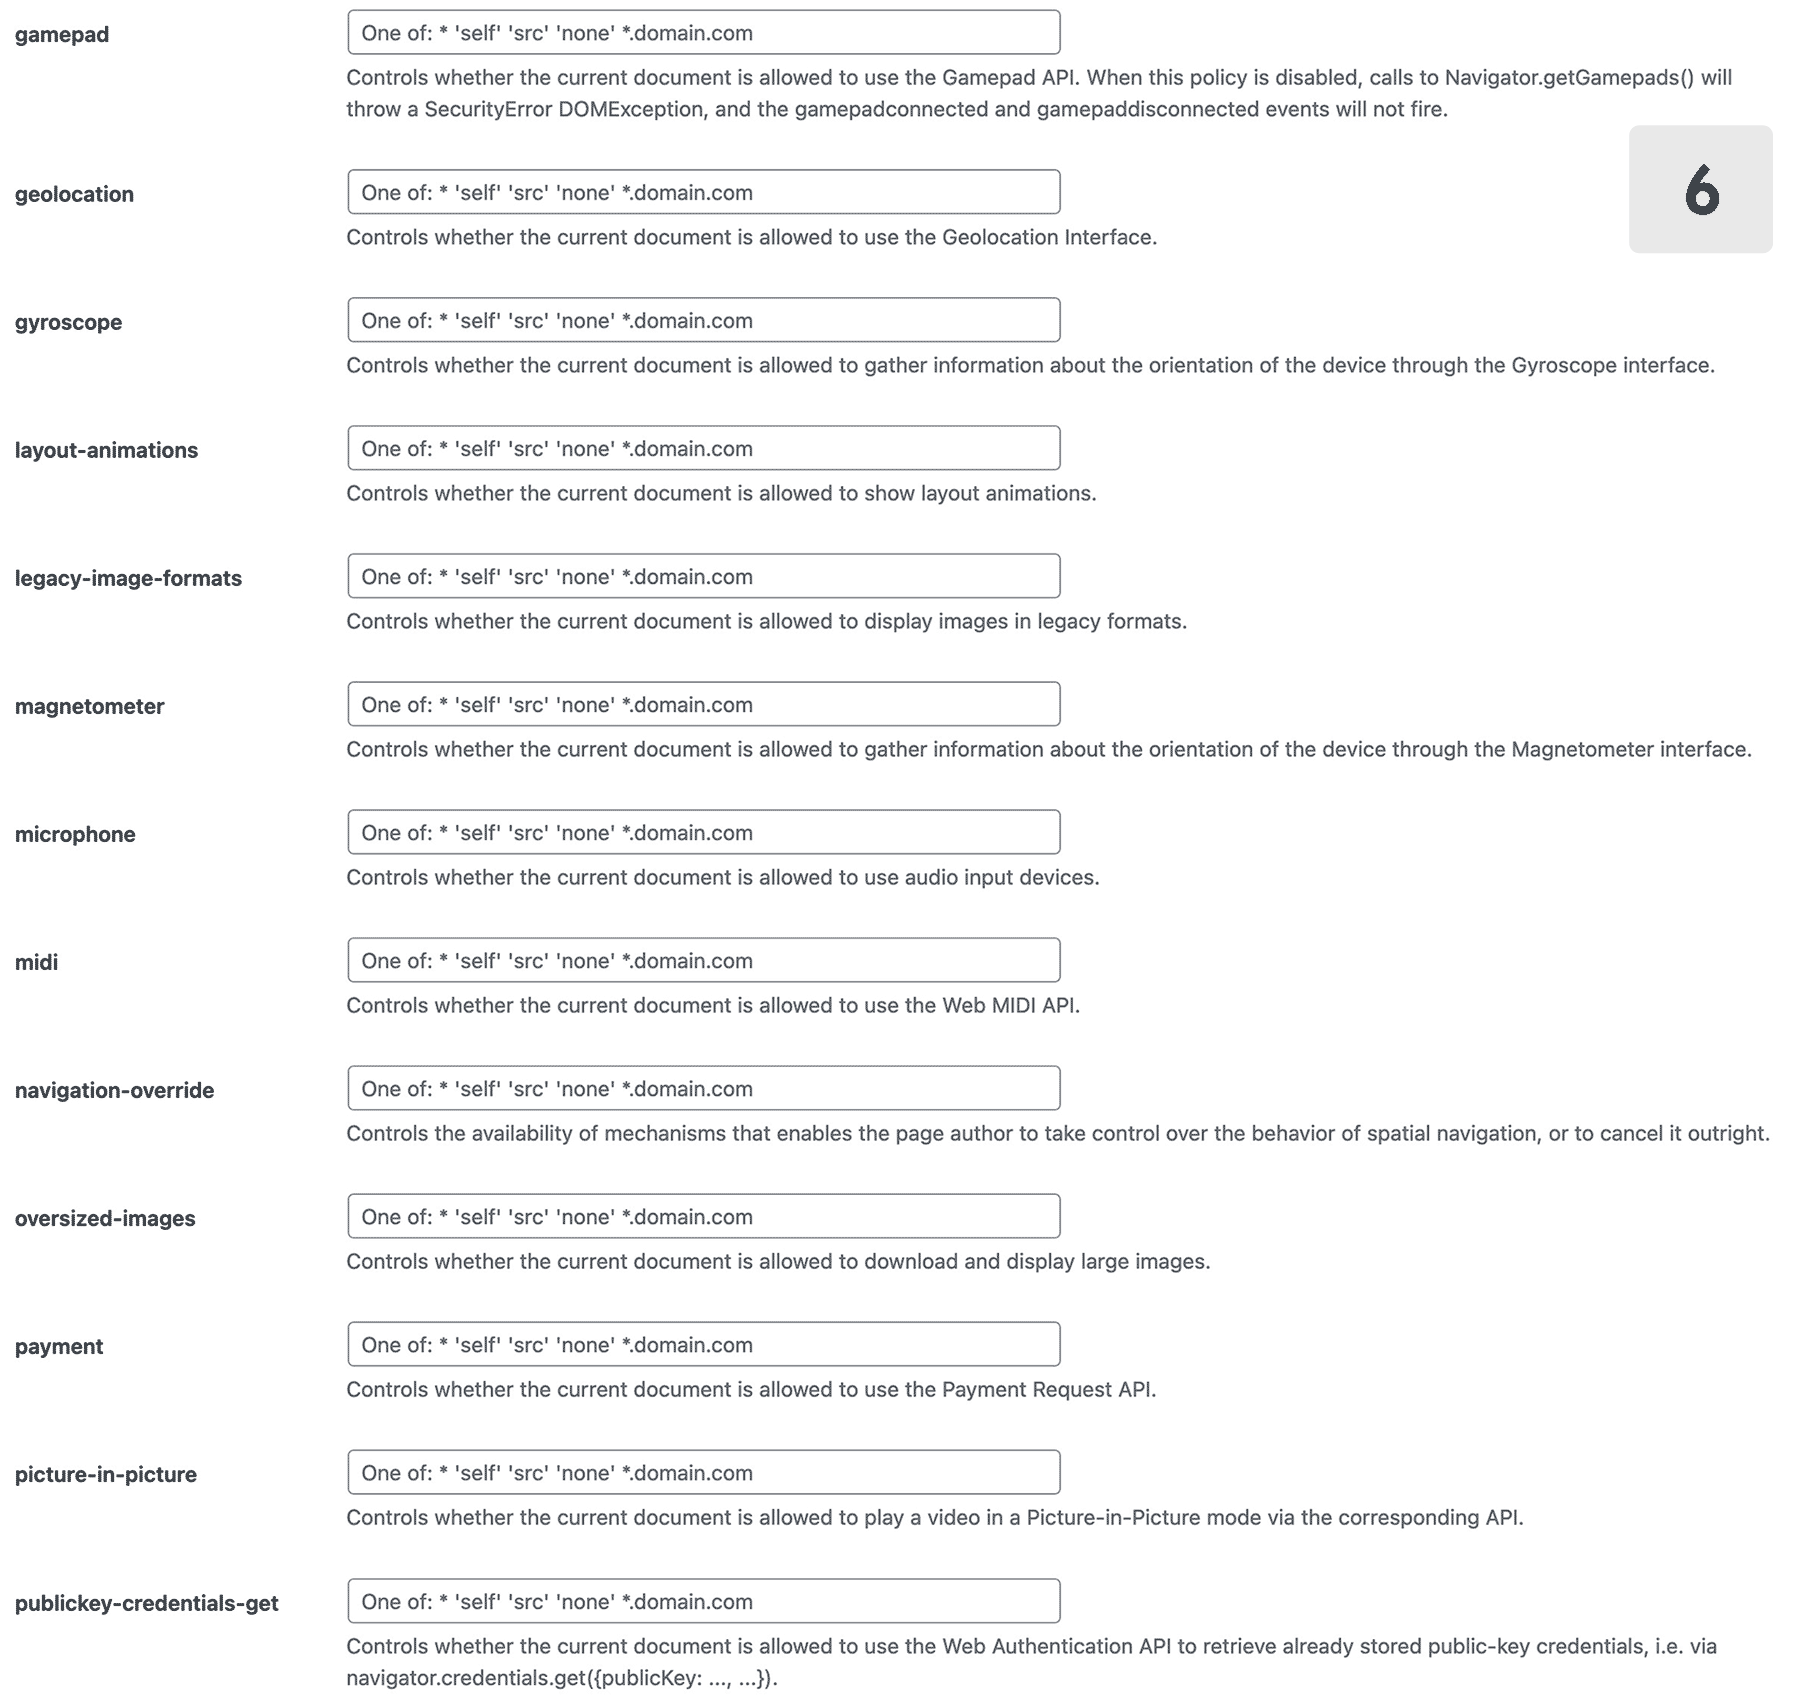
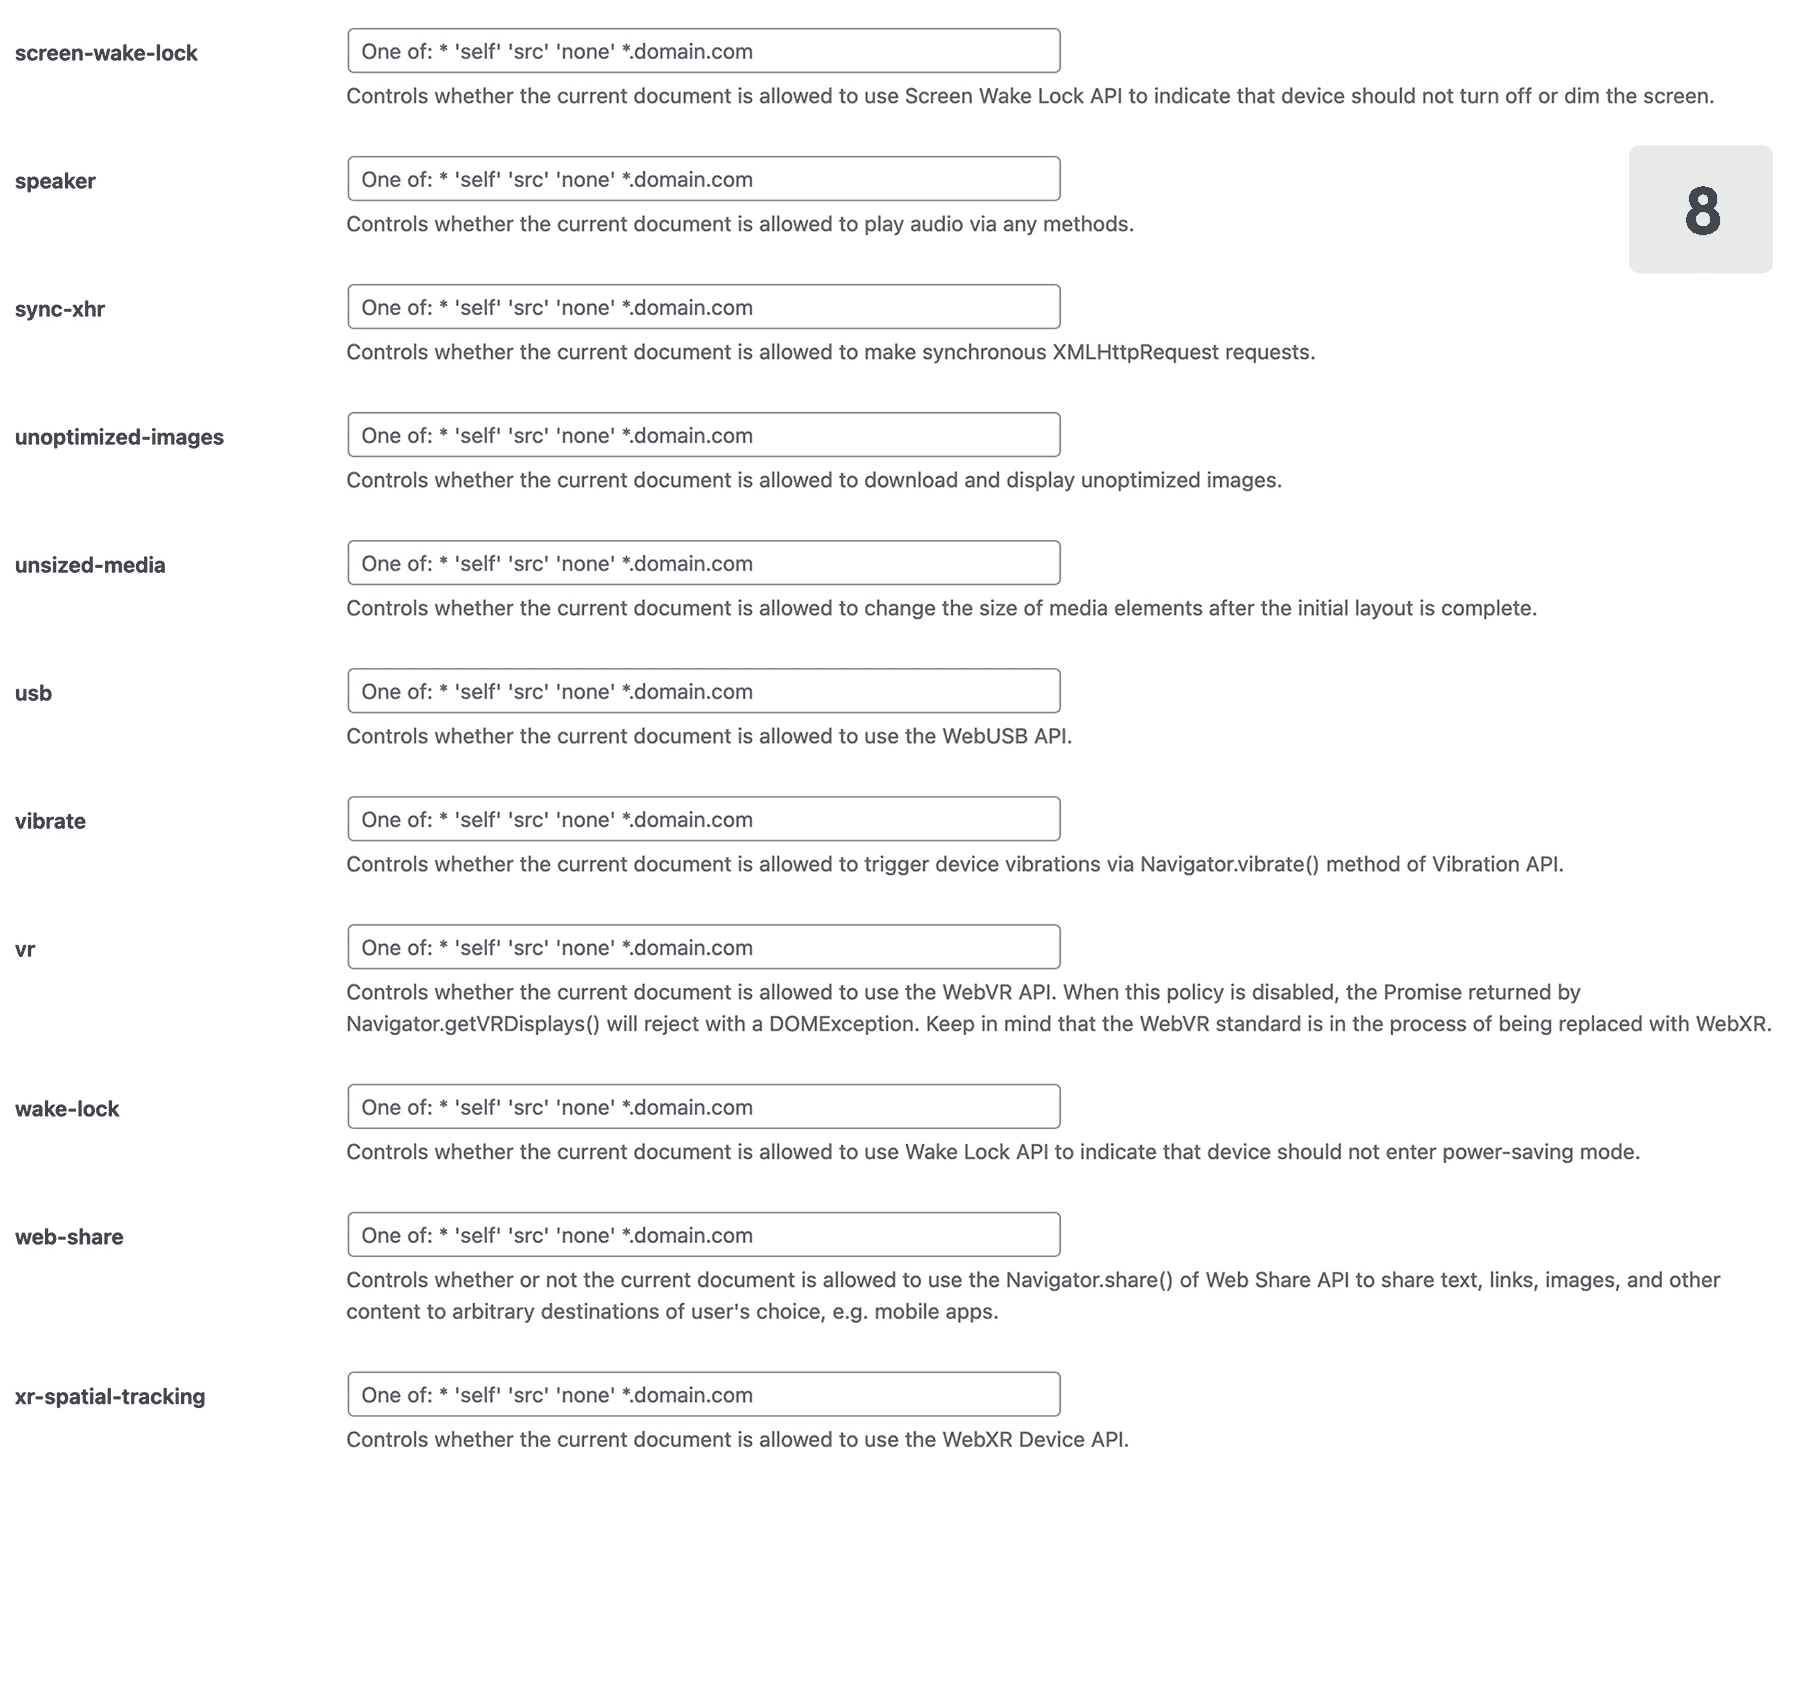
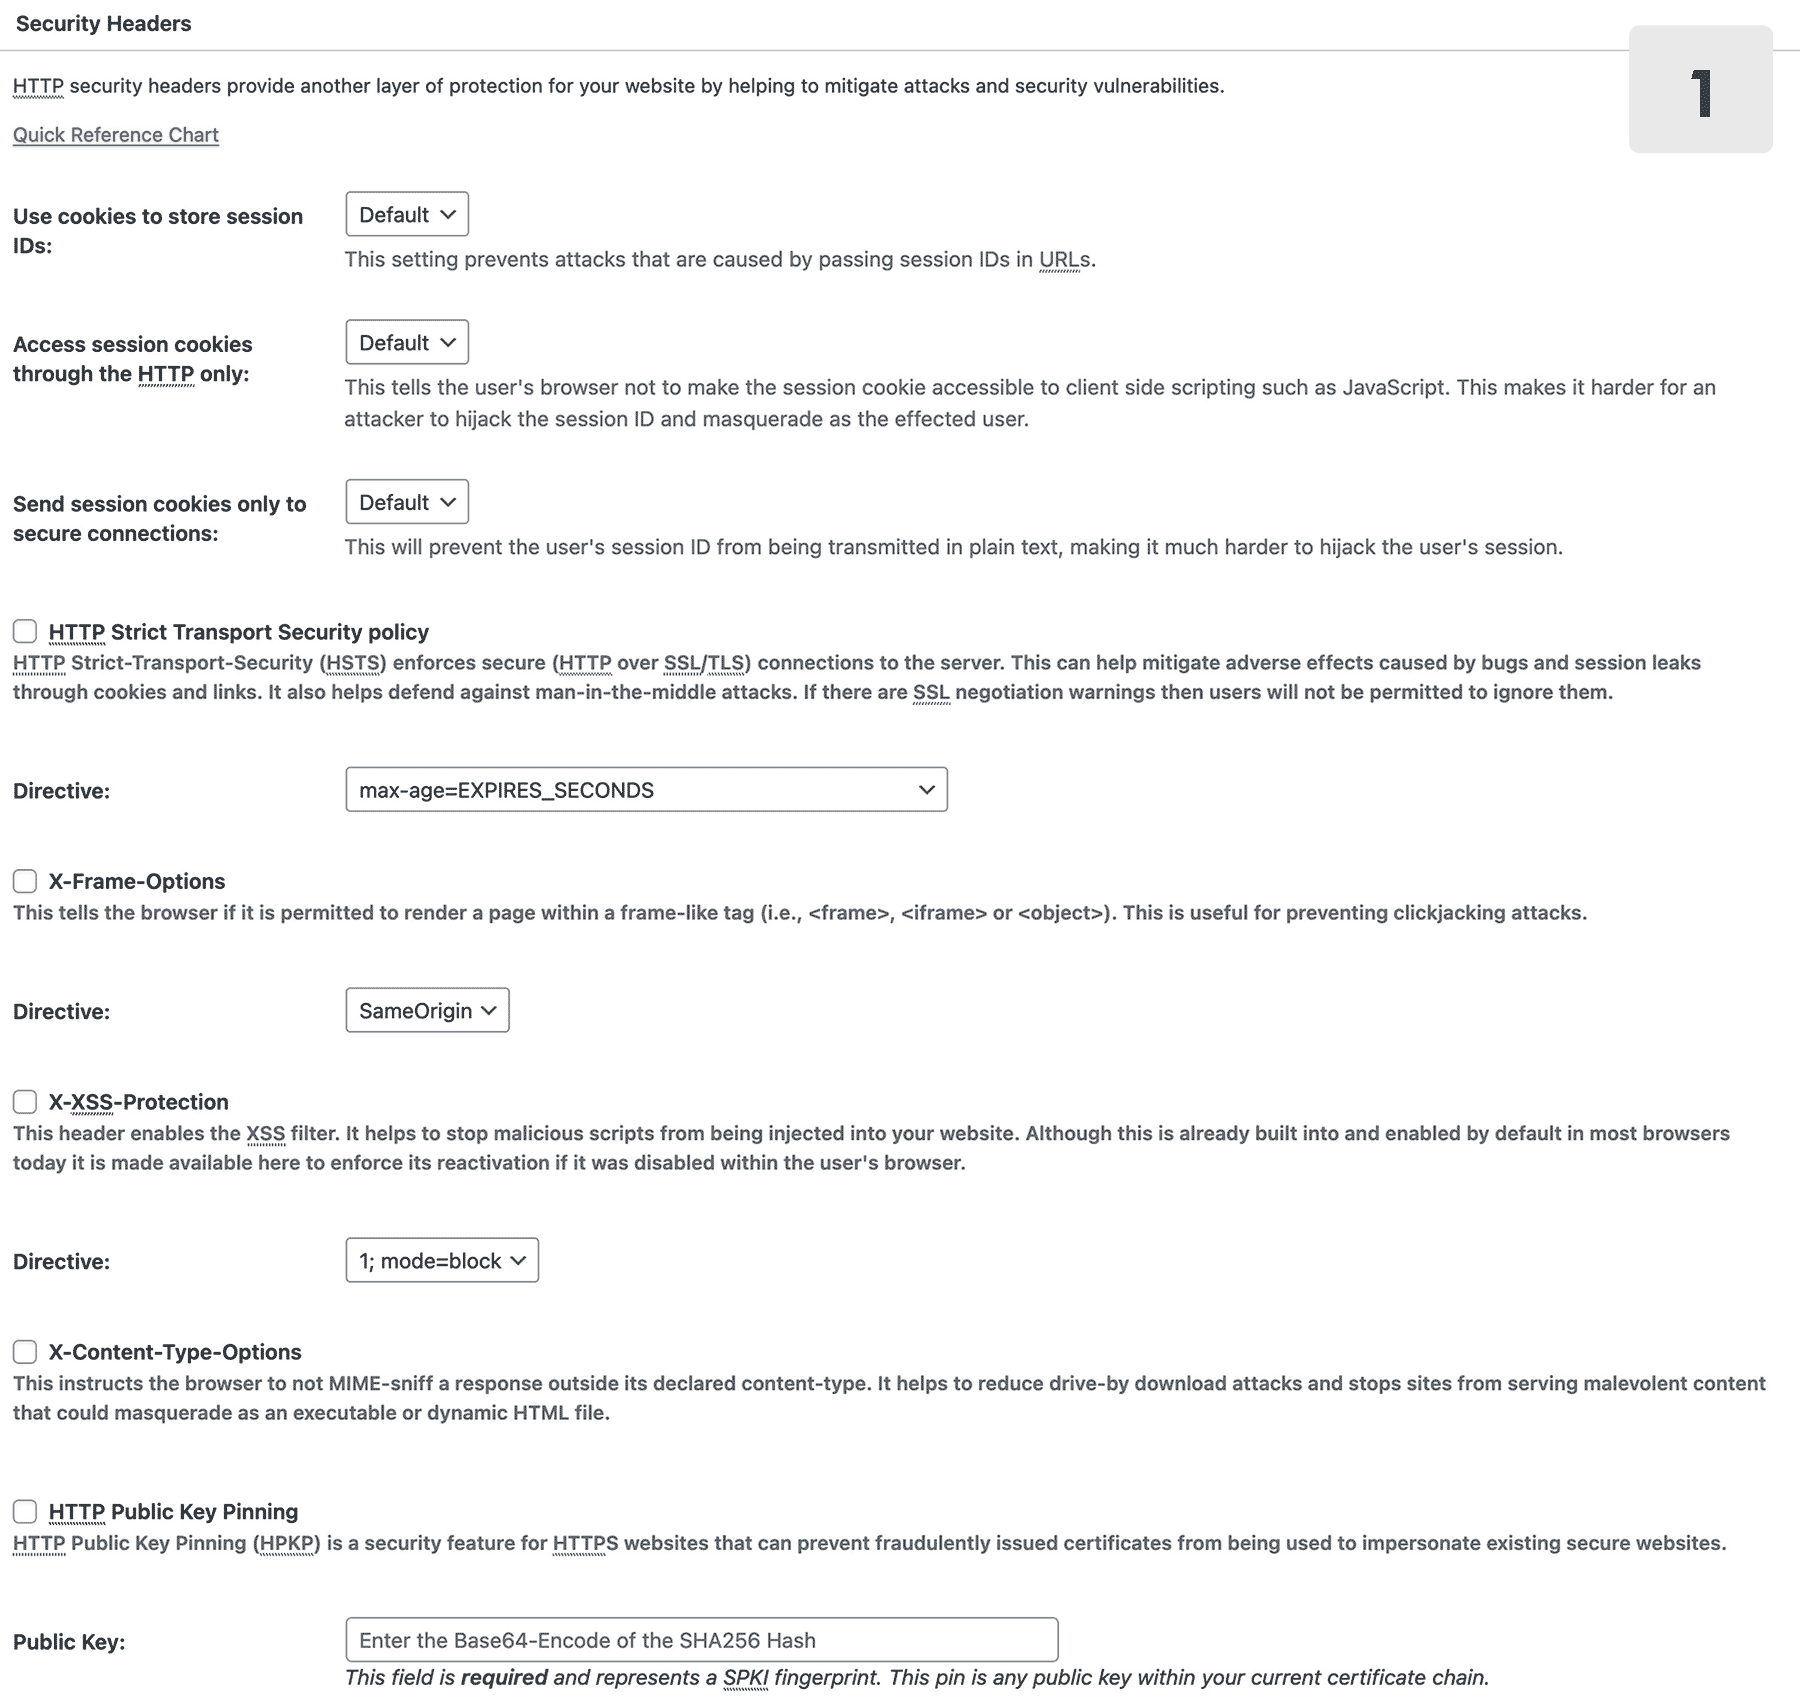
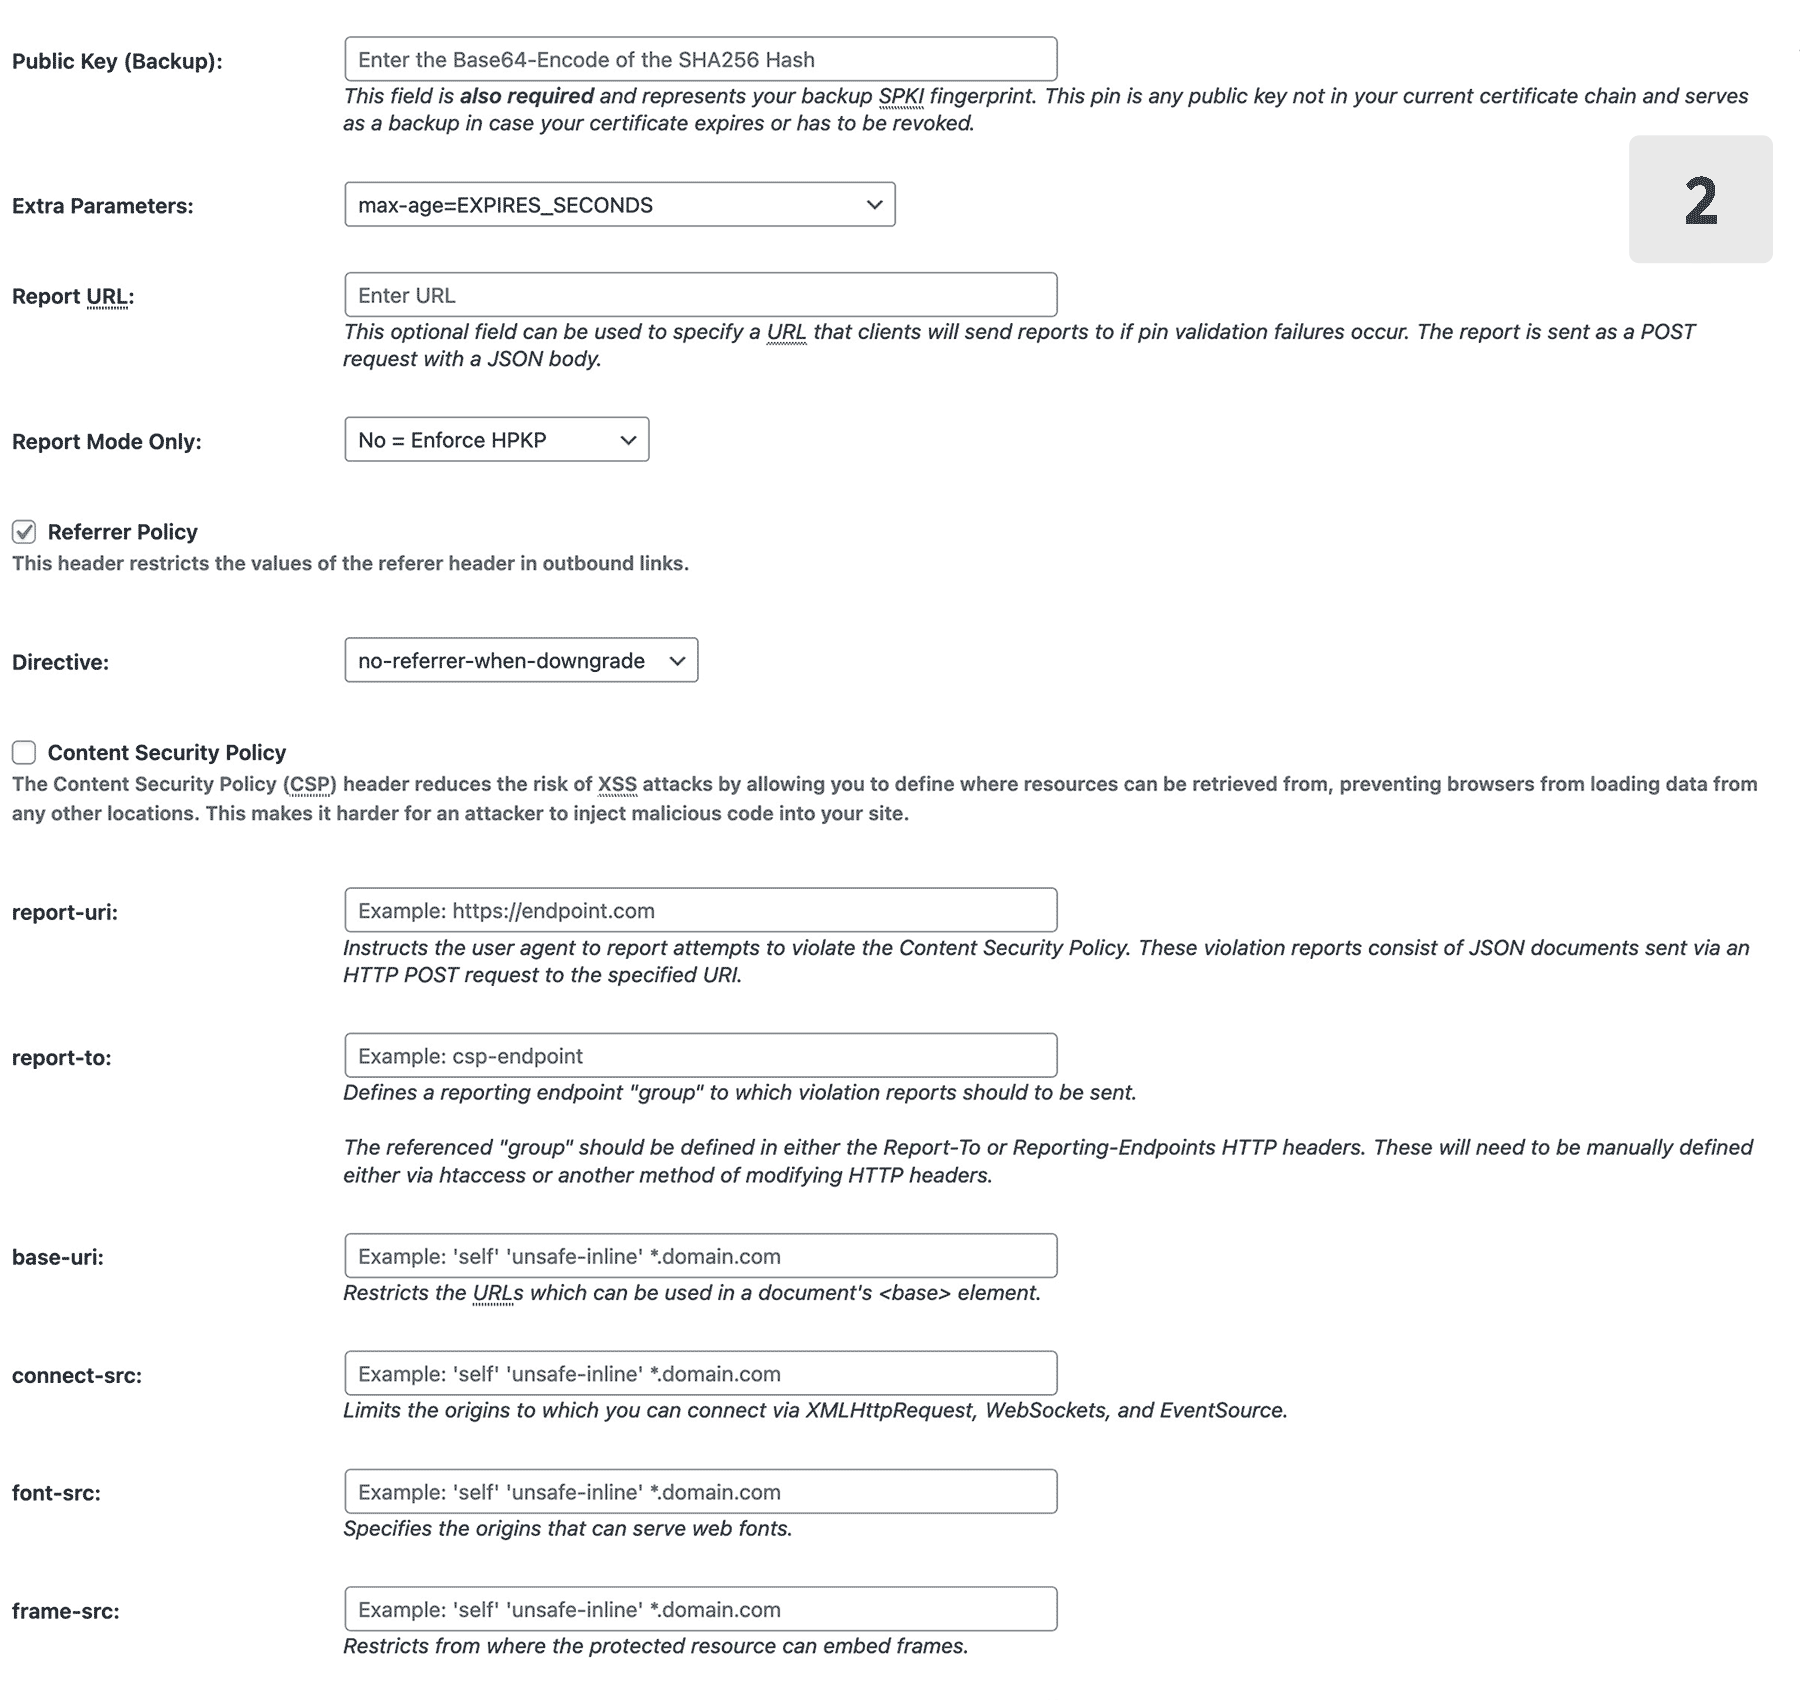

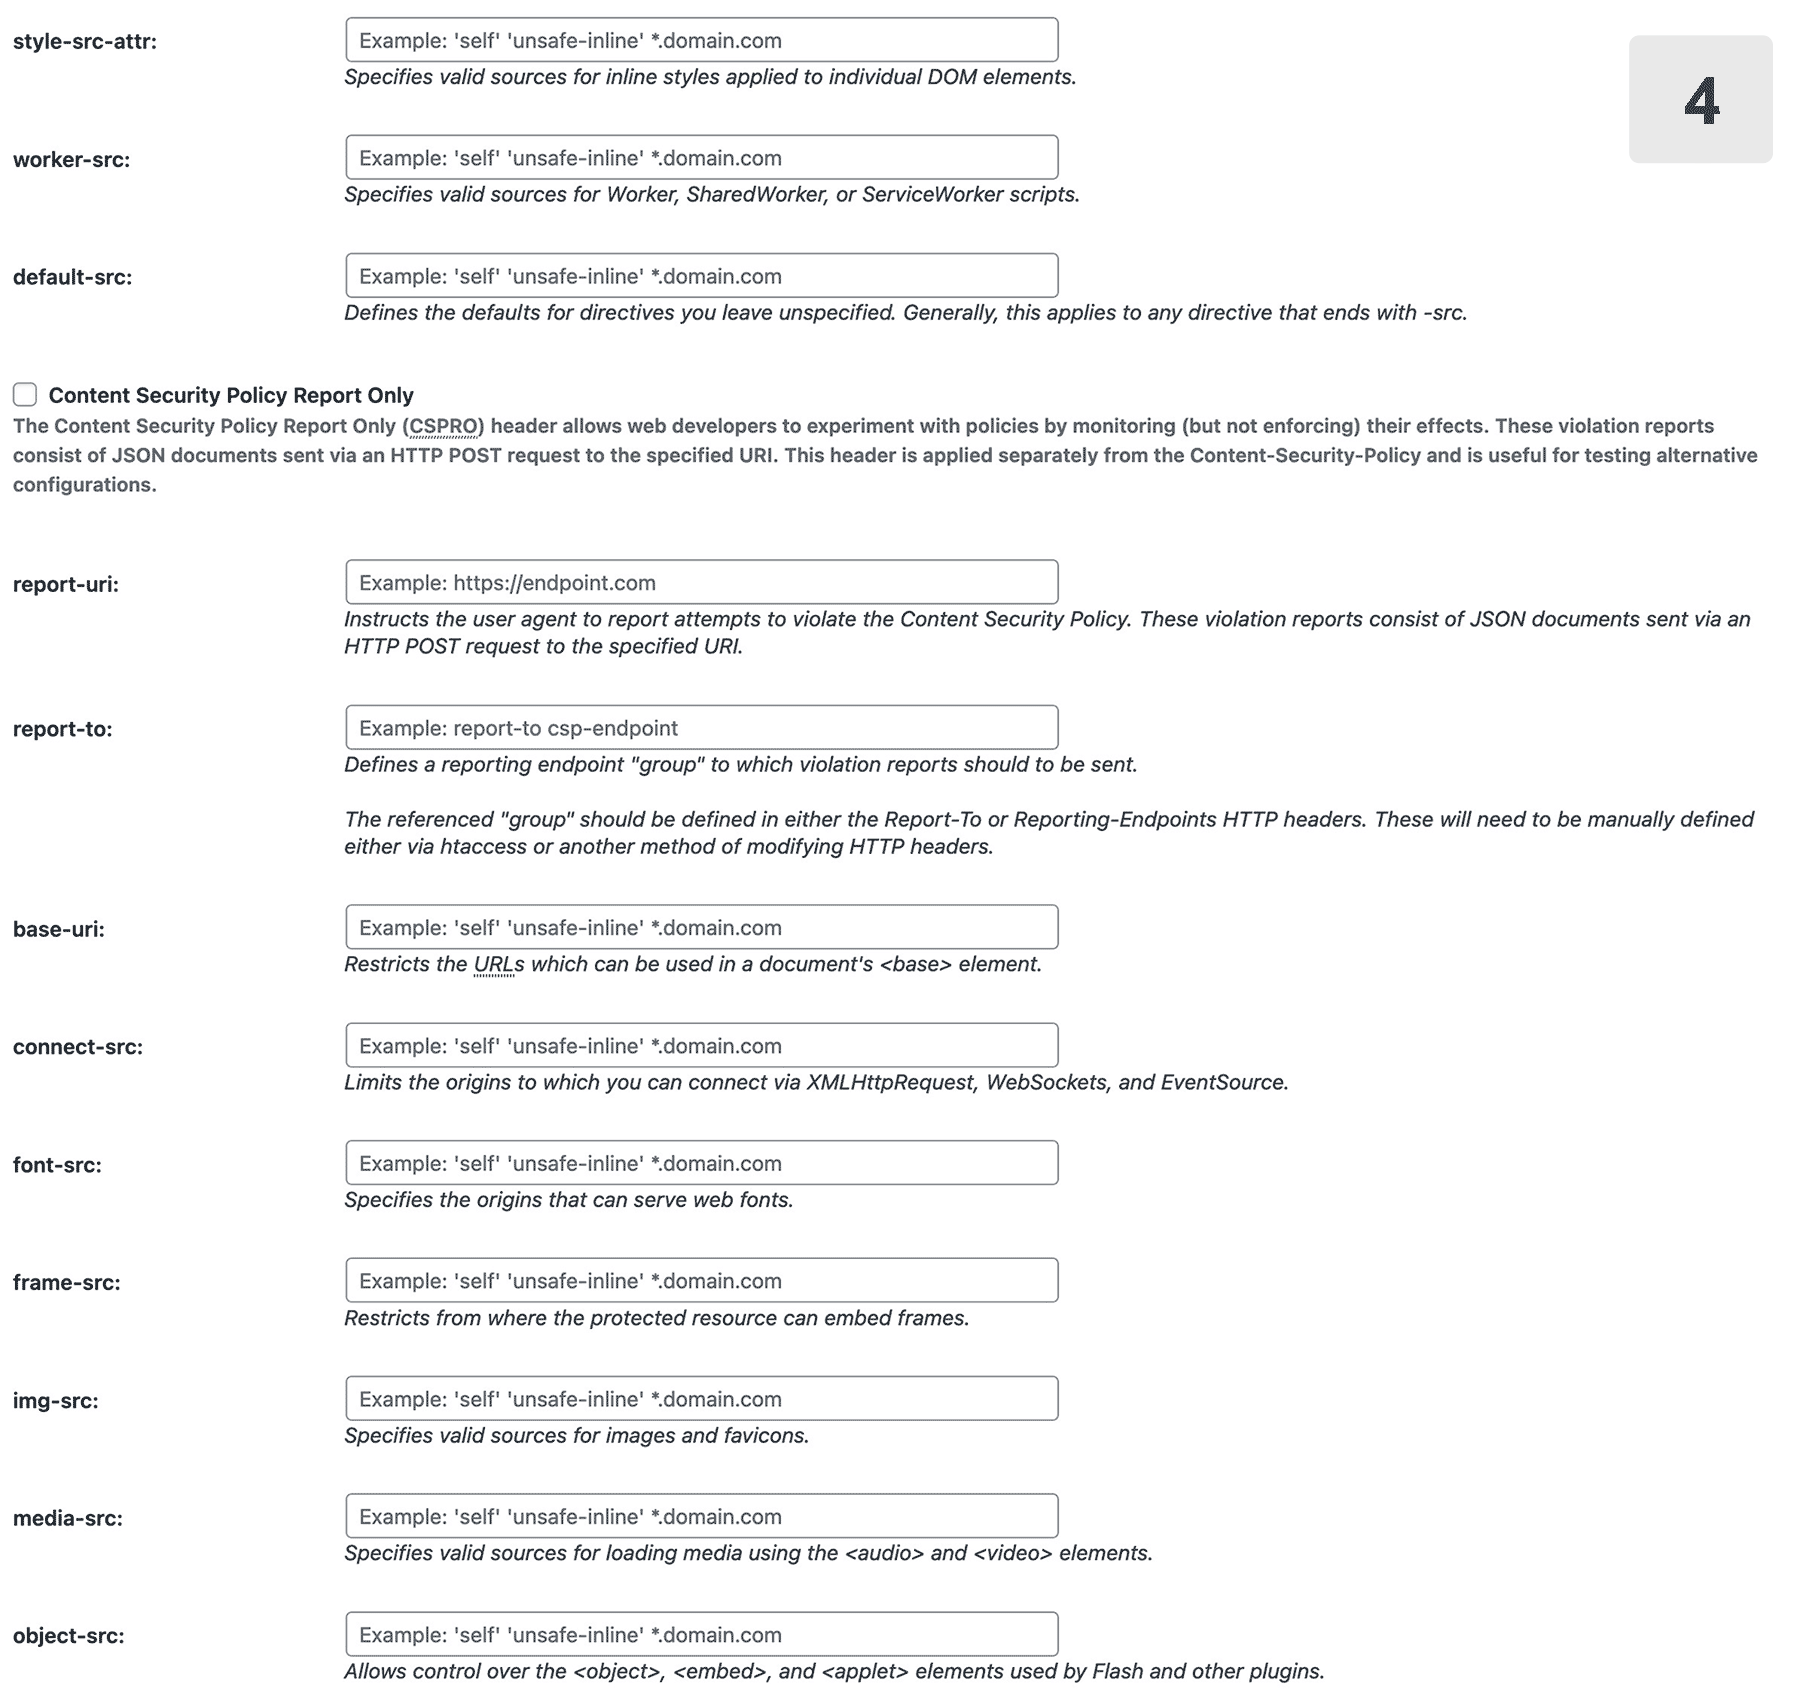
Key Security Headers:
Security Headers Quick Reference:
All directives that end with—src support similar values, known as a source list. Multiple source list values can be space-separated, with the exception of ‘none,’ which should be the only value.
Cache Groups
In the W3 Total Cache plugin, cache groups refer to different categories of data that can be cached separately. They help isolate and organize cached content for efficient retrieval and management.
This option allows you to create a group of User Agents for tablets and mobile phones. Assign a set of User Agents to use a specific theme, redirect them to another domain, or create User Agent Groups if an existing mobile plugin is active to create a unique cache for each.
This option allows you to create a group of Referrers. Assign a set of Referrers to use a specific theme, redirect them to another domain, and create Referrer groups to ensure a unique cache for each group.
This option allows you to create a group of Cookies. Assign a set of Cookies to create a unique cache for each Cookie Group.

Options here will naturally vary from provider to provider but the good folks over at WPBeginner have an excellent breakdown of how to install MaxCDN with W3 Total Cache that should give you a good idea of the overall process.
The default Advanced settings should work out of the box on most setups, so begin there before starting to tweak.
W3TC Resources And Showcase
Many blue-chip companies trust the W3 Total Cache plugin for their websites. Along with Frederick Townes’ work for Mashable, high-profile sites such as yoast.com, ilovetypography.com, smashingmagazine.com, and Matt Cutts have all plumped for this plugin as their caching solution in the past.
Resources
As you explore W3 Total Cache further, it’s worth bookmarking a few references for general information and troubleshooting purposes:
Showcase
The following links provide some more detailed breakdowns of real-world W3 Total Cache performance that you might find useful when digging deeper into how best to implement it on your own site:
Summary
We hope the points above will shed further light on some of the more advanced features of W3 Total Cache and help you make the most of it within the parameters of your own particular setup. Two takeaways: