How To Use the Dynamic Options In The Countdown Element
Last Update: November 18, 2025
Dynamic Content options can be found in the Countdown Element, which are particularly useful for users of WooCommerce and The Events Calendar, as you can use them to link the Countdown Element to specific WooCommerce sales or Event Calendar events. Read on to find out how you can use these Dynamic Content options.
Dynamic Content Options
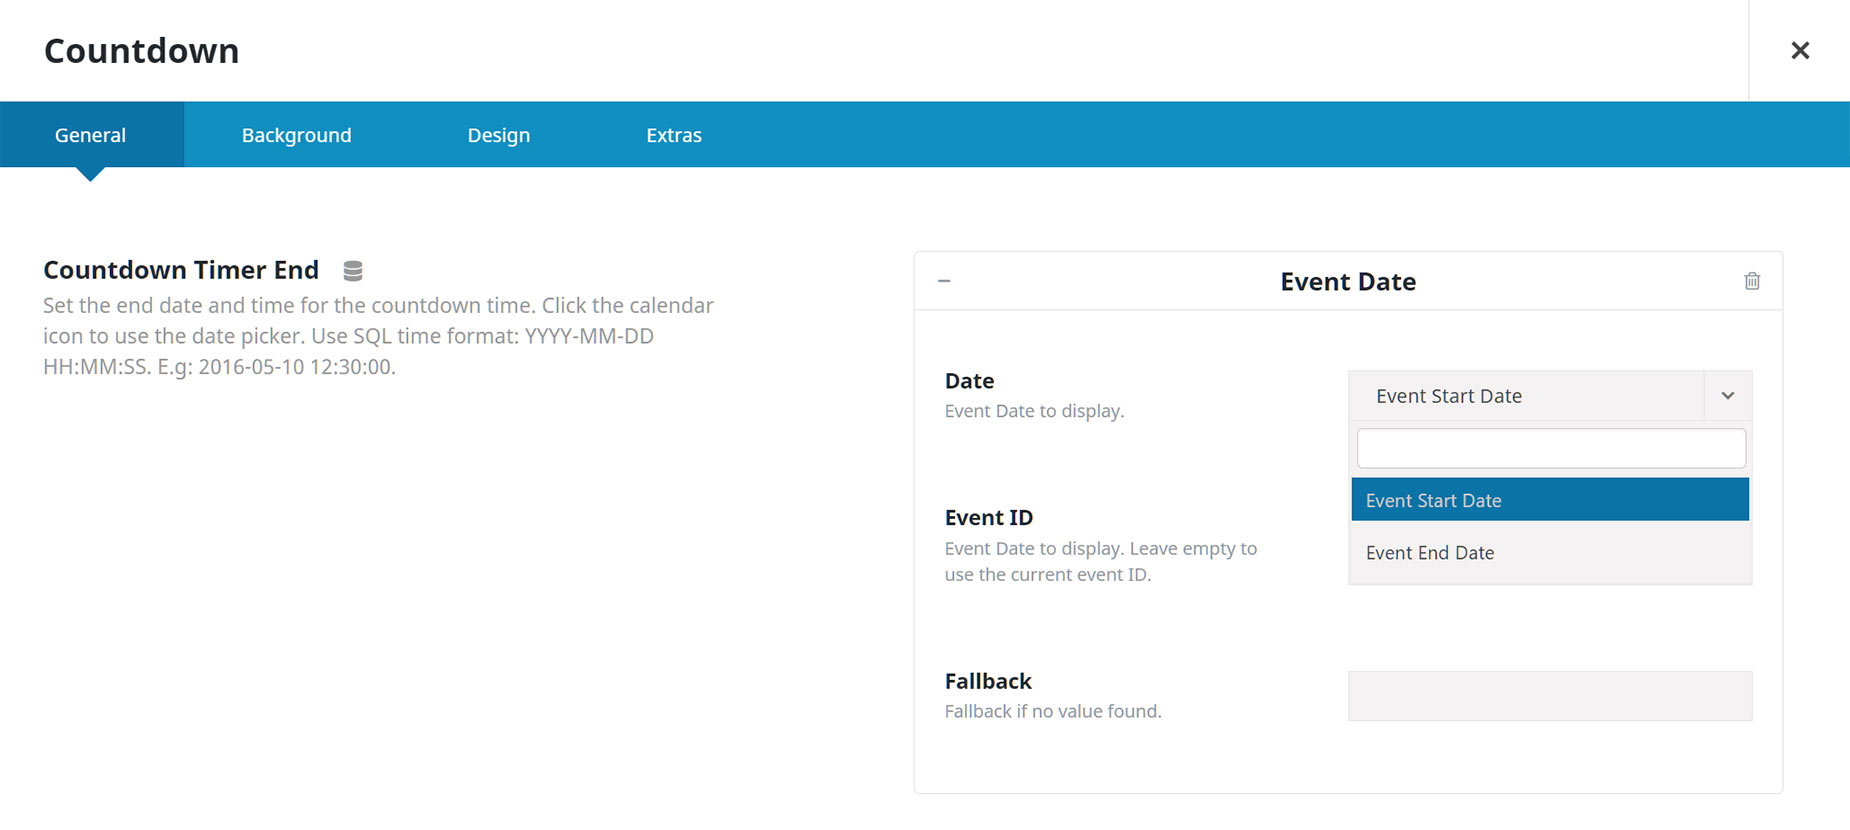
With the Countdown Timer End option of the Countdown Element, it is now possible to use Dynamic Content, instead of simply adding a date and time. To do this, simply click on the Dynamic Content Icon to the right of the Option Title, and a dropdown selector will appear. Here, you can choose one of four Dynamic Content types, a Custom Field, a Shortcode, a WooCommerce Sales Date, or an Event Calendar Event Date.
The first one is a Custom Field, which is pretty much for advanced users. If, for example, a user had a Custom Post Type and a custom field into which they added a date, they could use that here. Likewise, with the Shortcode option. If a user created their own shortcode which returned a date, then they could use that here. But using the last two options is going to be much more likely for the majority of users, so let’s focus on those.

Linking To WooCommerce Sales
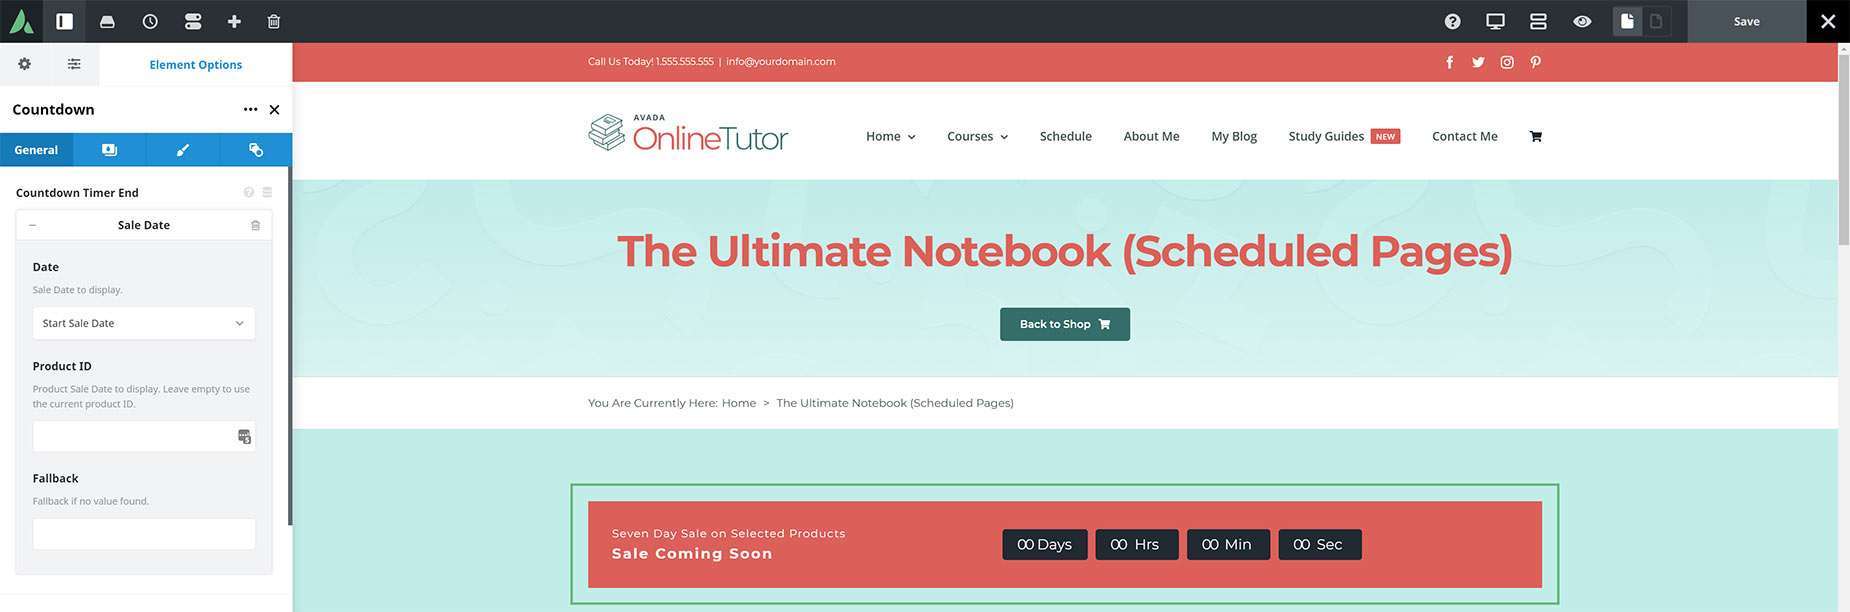
When you choose a WooCommerce Sale Date as the Dynamic Content type, a further dialog appears. As you can see in the screenshot below, this allows you to choose a Sale Start Date, or a Sale End Date to count down to, as well as having a field for a Product ID, and one for a Fallback value.

Product ID
You can enter a Product ID to display a specific product’s sale date, or if you leave it empty, it will auto-pull the product ID of the currently viewed product to check for sales dates. How this works depends on where you place the Countdown Element, and whether you use the Hide When Inactive option.
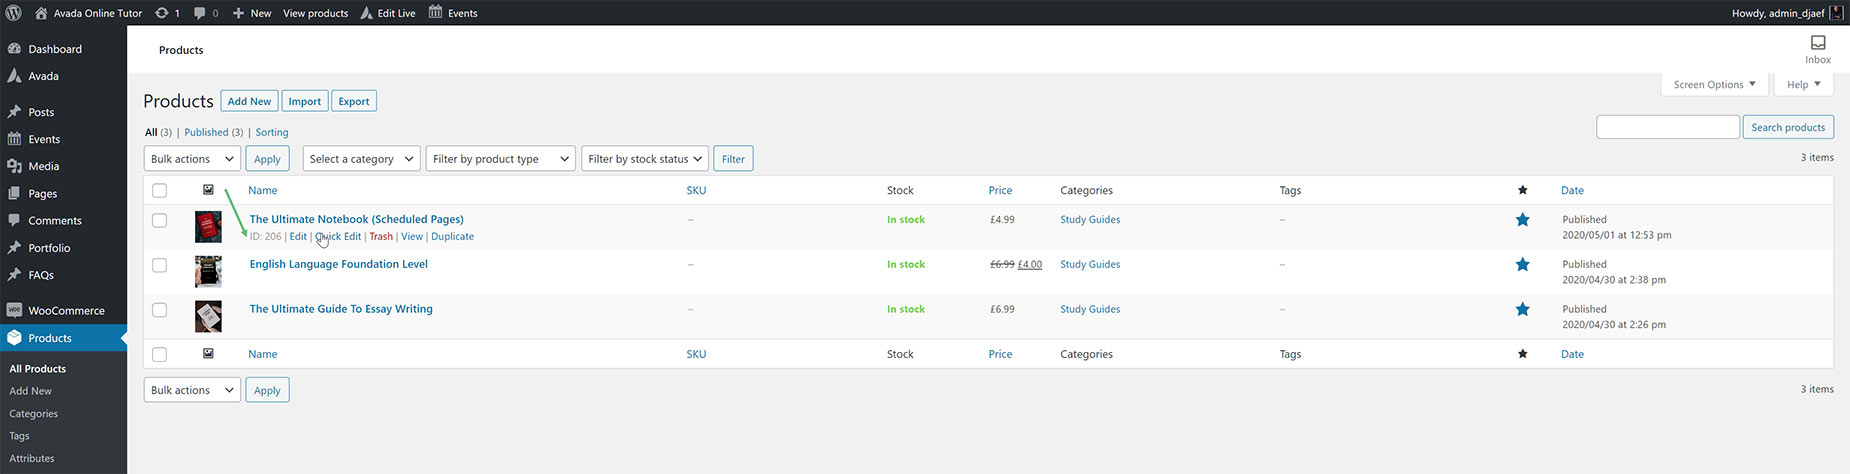
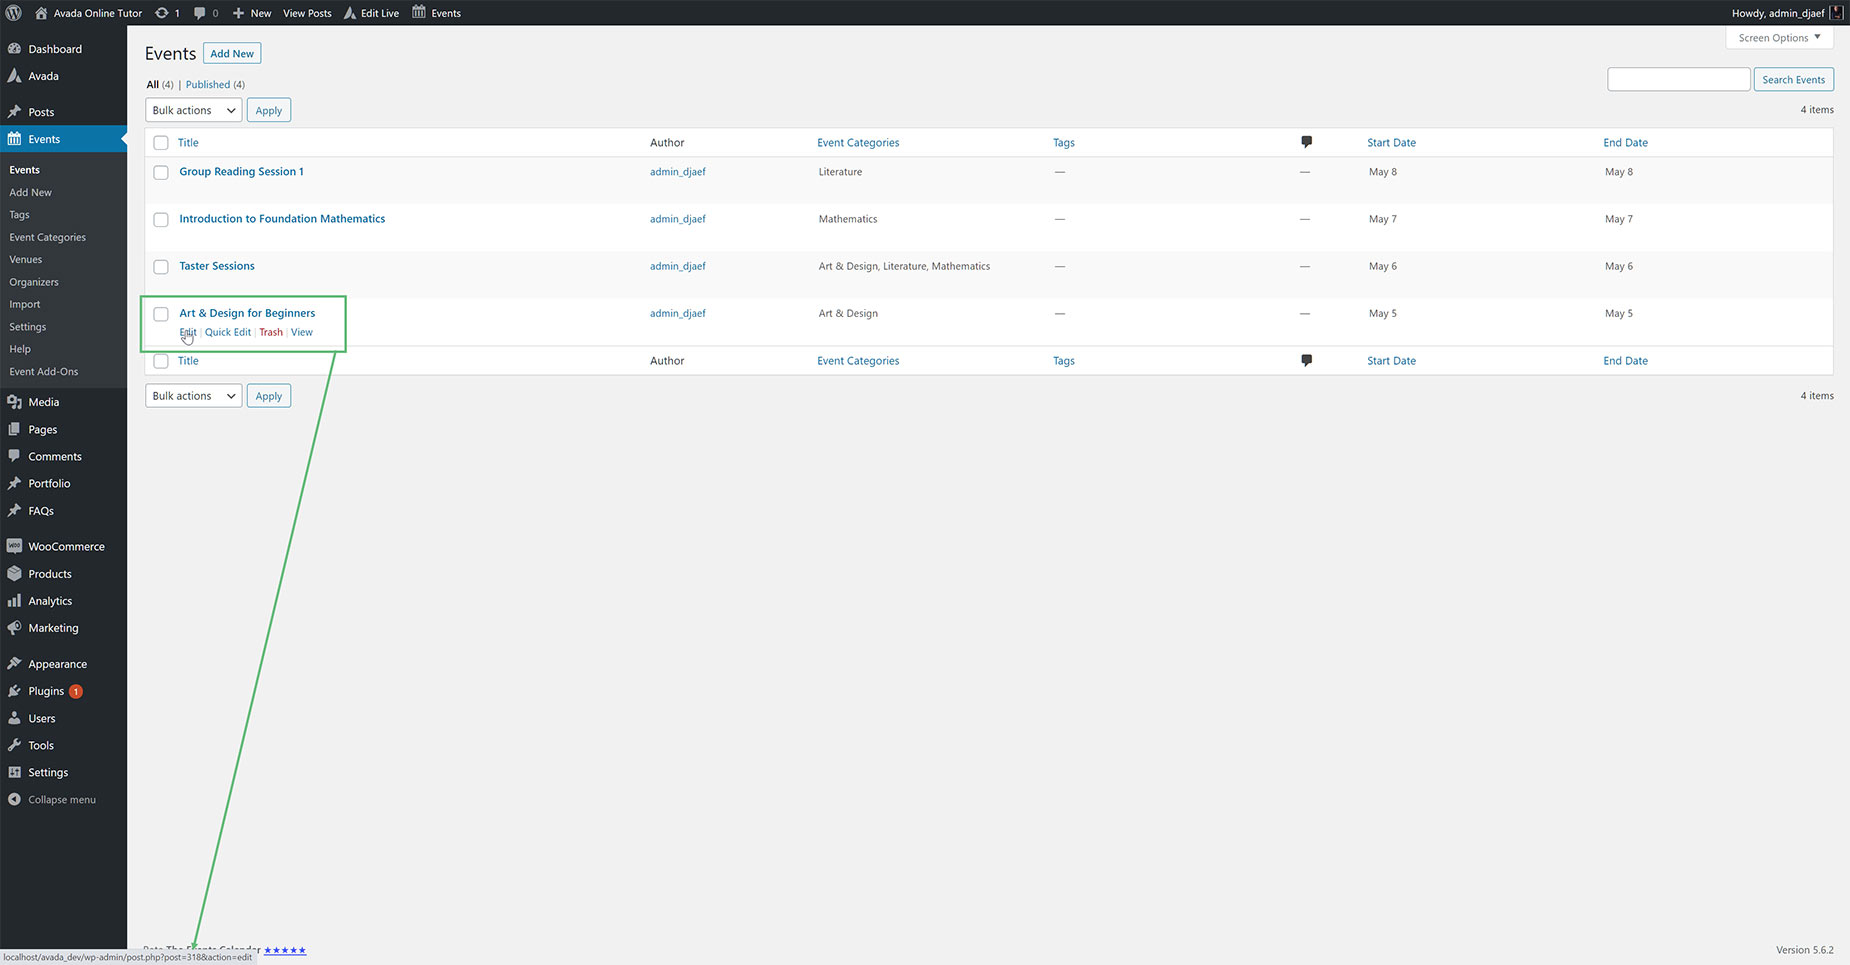
To find a Product ID is relatively easy. With WooCommerce Products, it’s right there when you mouse over the product, as can be seen in the first screenshot below. For The Event Calendar Events, as you can see in the second screenshot, the Event ID can be seen at the bottom of your browser when you mouse over the Edit button. If your browser does not display this, simply edit the Event, and the Event ID is the number in the Event URL.
It’s also important to remember that sales dates are set on individual products in WooCommerce, not for the shop as a whole. So where the Dynamic Content option is most useful would perhaps be in a Single Product Layout, where the Element would pull the sales dates of the various products as they were viewed. To clarify how the Dynamic Options can work, let’s look at a couple of different scenarios.
Countdown To Sale Start In A Layout
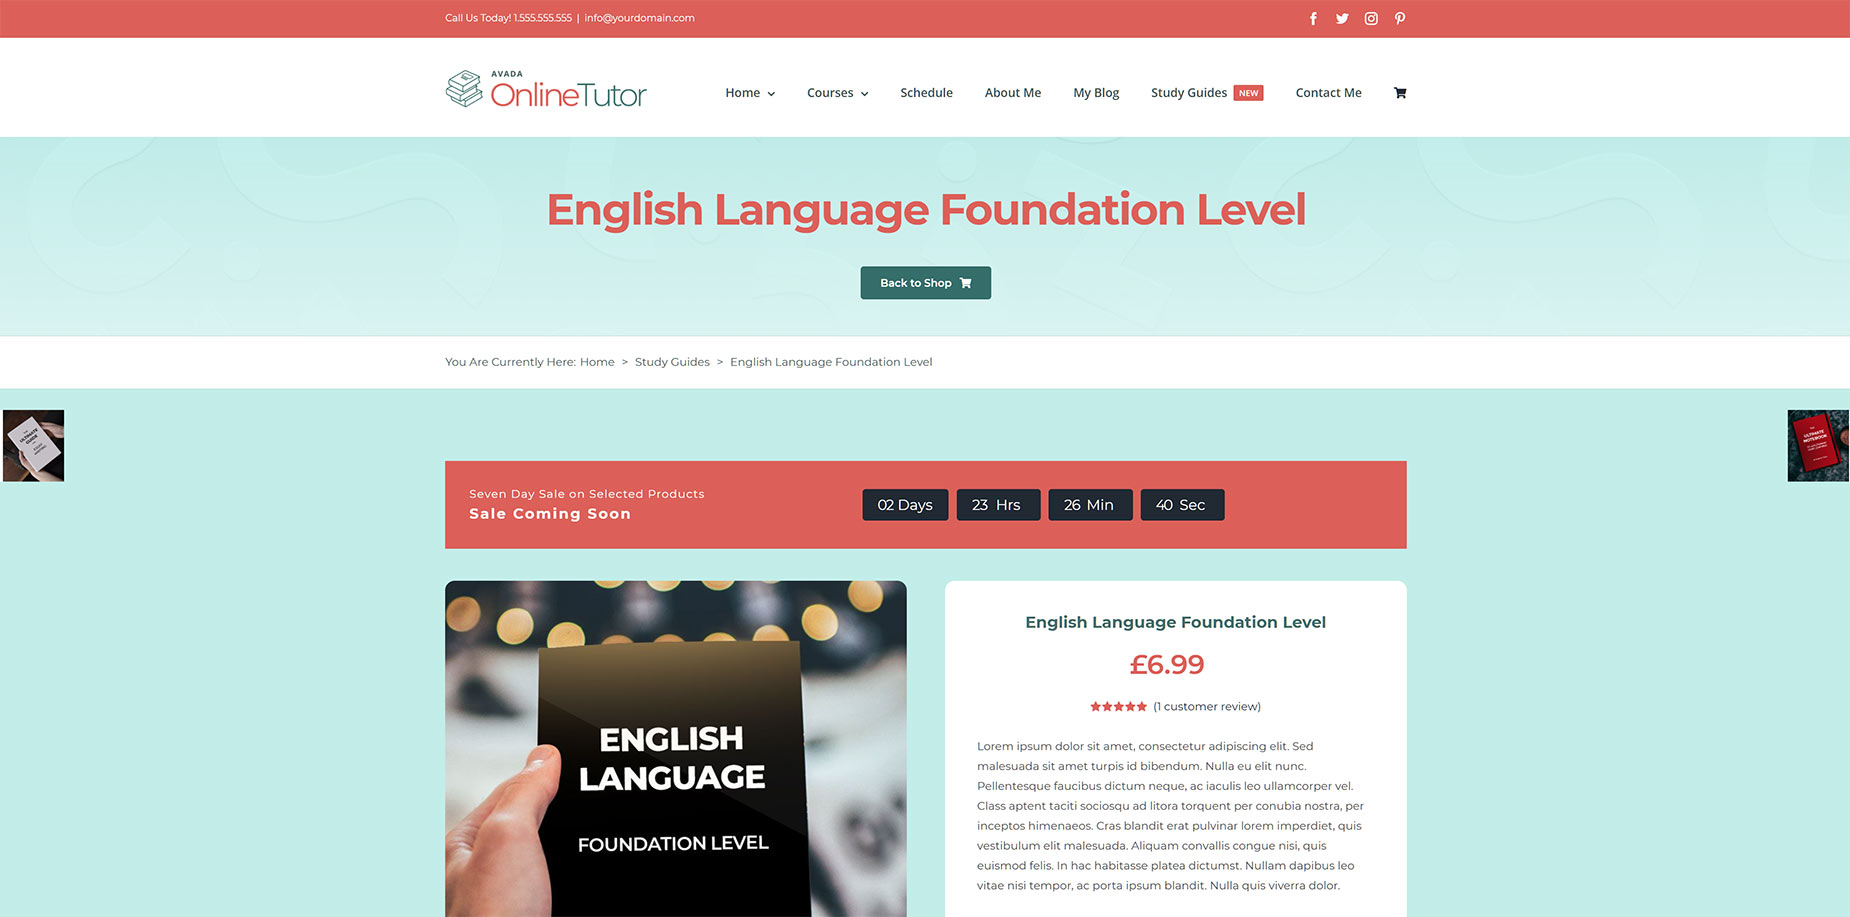
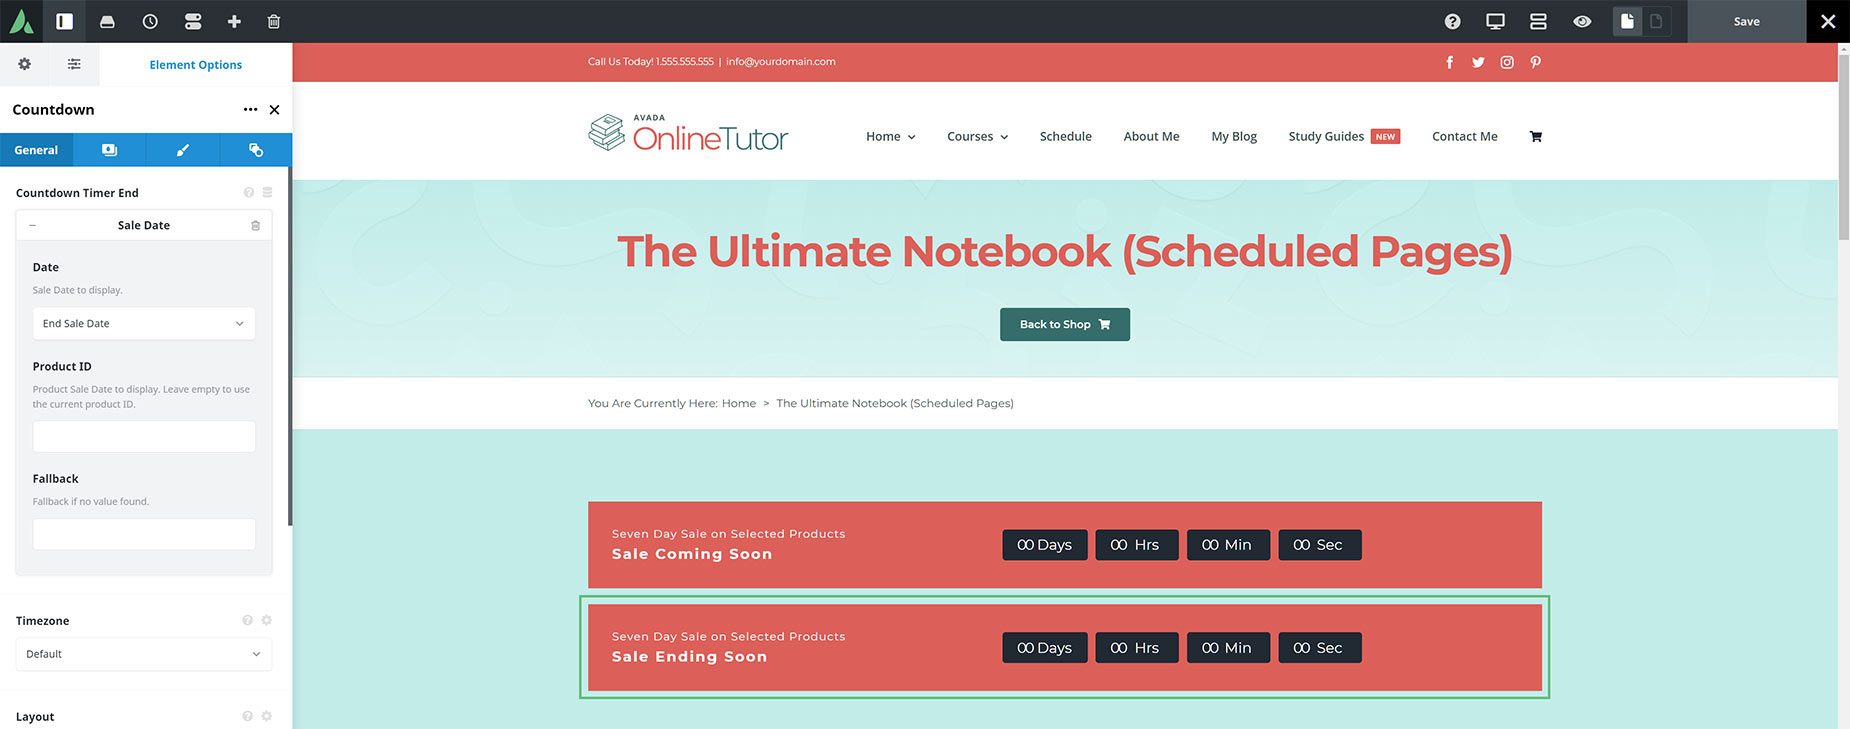
Let’s say we add the Countdown Element to a Single Product Layout, and use the Dynamic Content options to set it to display the Sale Start Date. Because it’s being used in a product template, we don’t want to set an ID for a specific product, so here, we leave that empty. In the screenshot below, you can see the Element added to the top of the Layout Section, with the Date set to Sale Start Date.
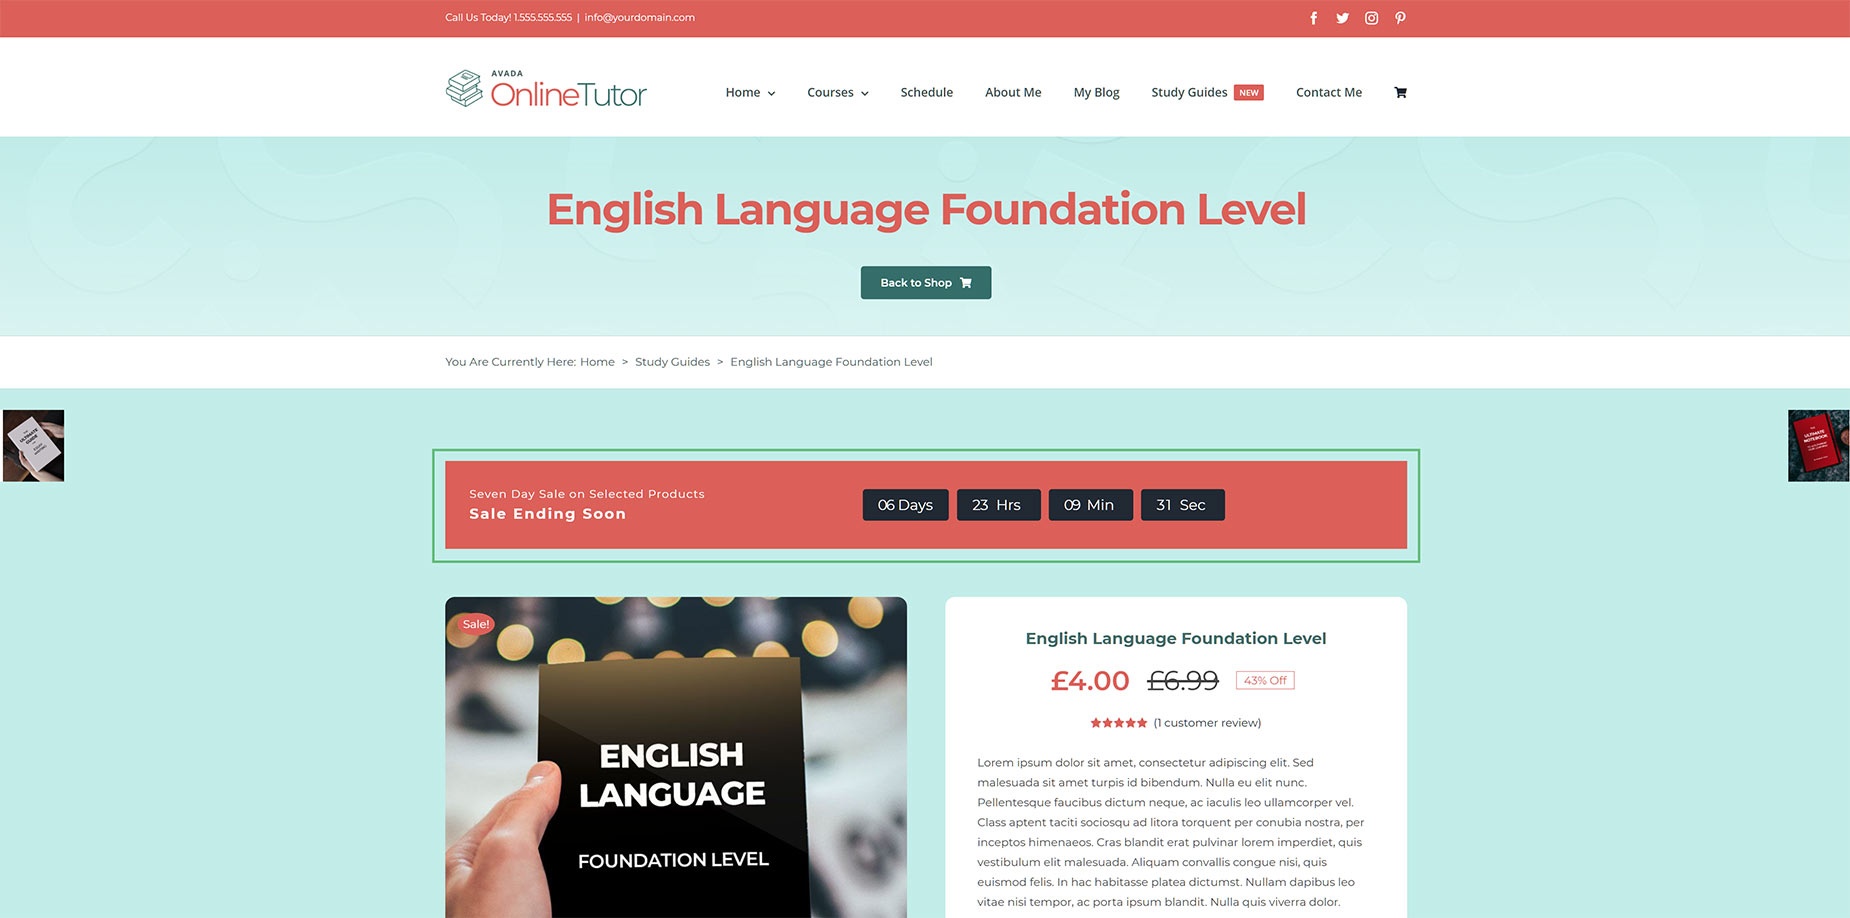
But also, let’s say only selected products in our shop will be going on sale. Because the Element is being used in a template, it would normally be displayed on all products, including those with no sale dates. But in the Countdown Element, there is a very useful Display When Inactive option. If we set that to Hide, then the Element will only display on products with upcoming sales! And because we didn’t add a Product ID, the Element will auto-pull the dates from the individual products viewed, so even if the sales started on different dates, this would be reflected in the actual products. In the screenshots below, we can see what a product with a sale coming up would look like, and below that, what a product with no sale coming up would look like.
Countdown To Sale End In A Layout
OK, but what about when the sale starts? Our Sale Start Date now becomes Inactive, as it has passed, and so the Element no longer displays on the product. And now we might want another Countdown, this time to the end of the Sale. With the Dynamic Option in the Countdown Element, we can set both of these up at the same time.
In the same Product Layout Section, we can now add another Countdown Element, but this time we set the Dynamic Content of the Countdown Timer End option to Sale End Date. We also set the Display When Inactive Option To Hide, and change the Title and Subtitle Text. That’s it!
So now, before the sale has started we see the initial Countdown Element on any products that have a Sale Date, just like before. But after the sale has stared, this instance of the Element does not display any more and our second Countdown Element becomes active and displays on the page, as can be seen in the second screenshot. And on products that don’t have any sale, neither instance of the Element displays. How cool is that!
Countdown To Sale On Static Page
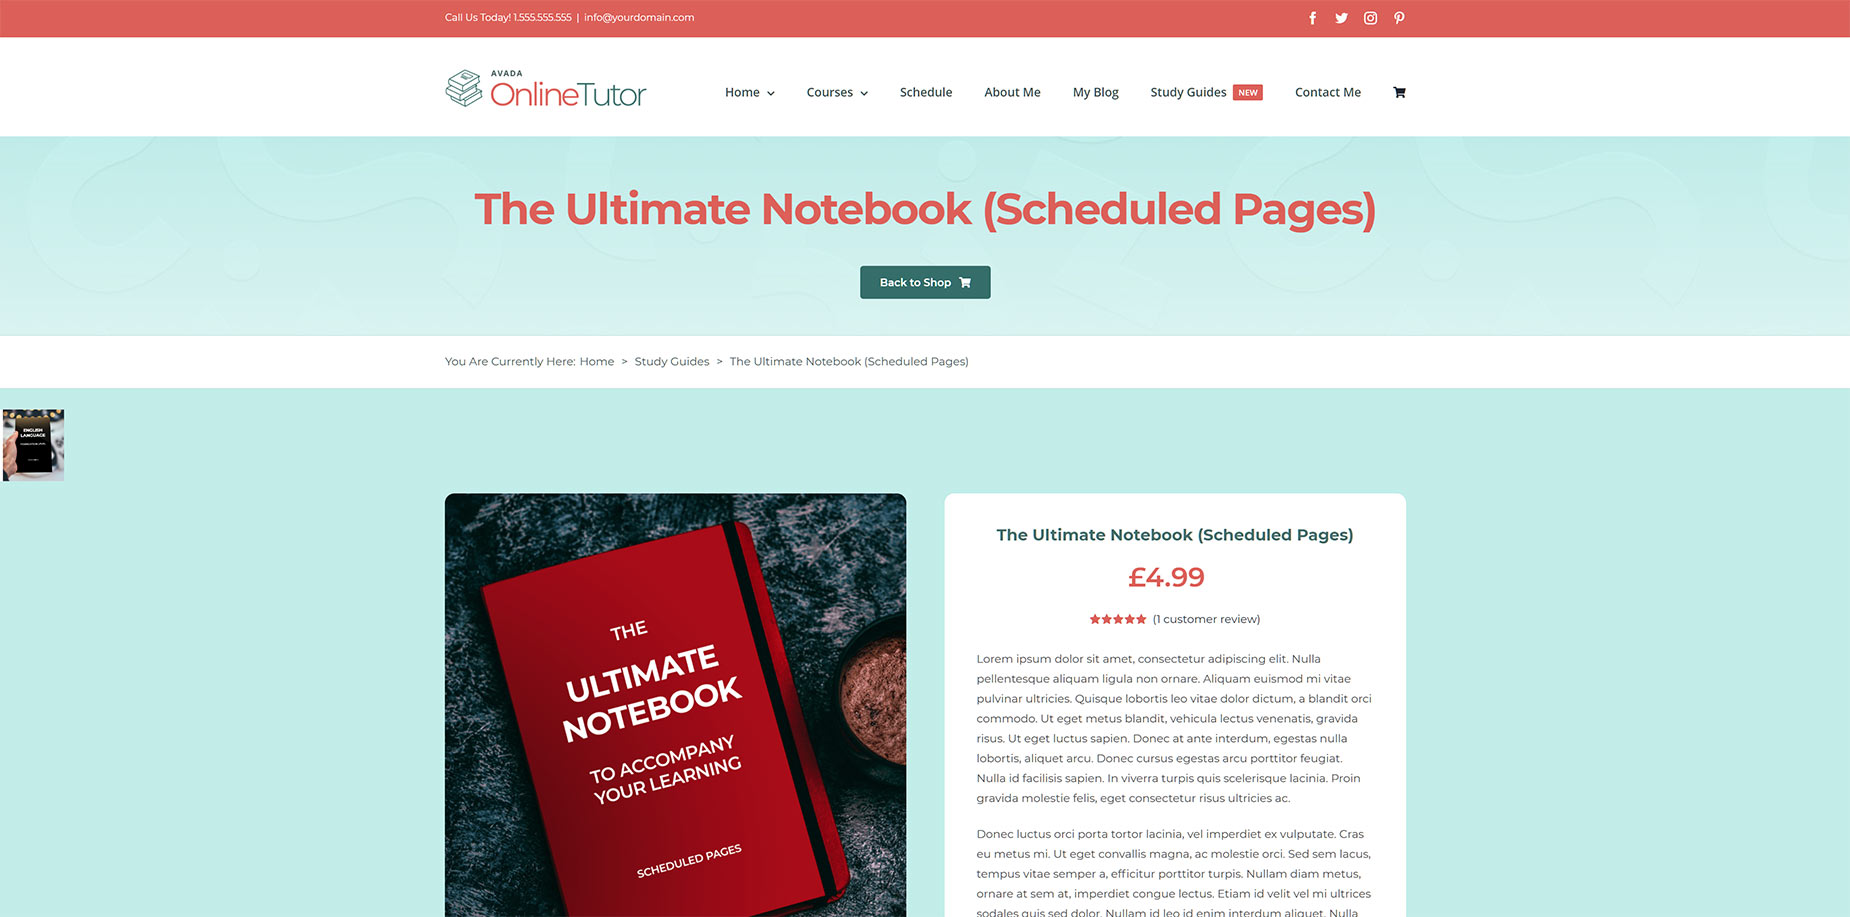
If you want to use the Countdown Element to count down to the start or end of a sale on a Home, or other static page, then the Dynamic Content options are not as useful as when used in a dynamic item like a Layout, as it’s very easy to just enter a date manually. But if you wanted to highlight the sale of a specific product, you could easily add the Element, and add the Product ID so that the Sales date of that specific product is used.
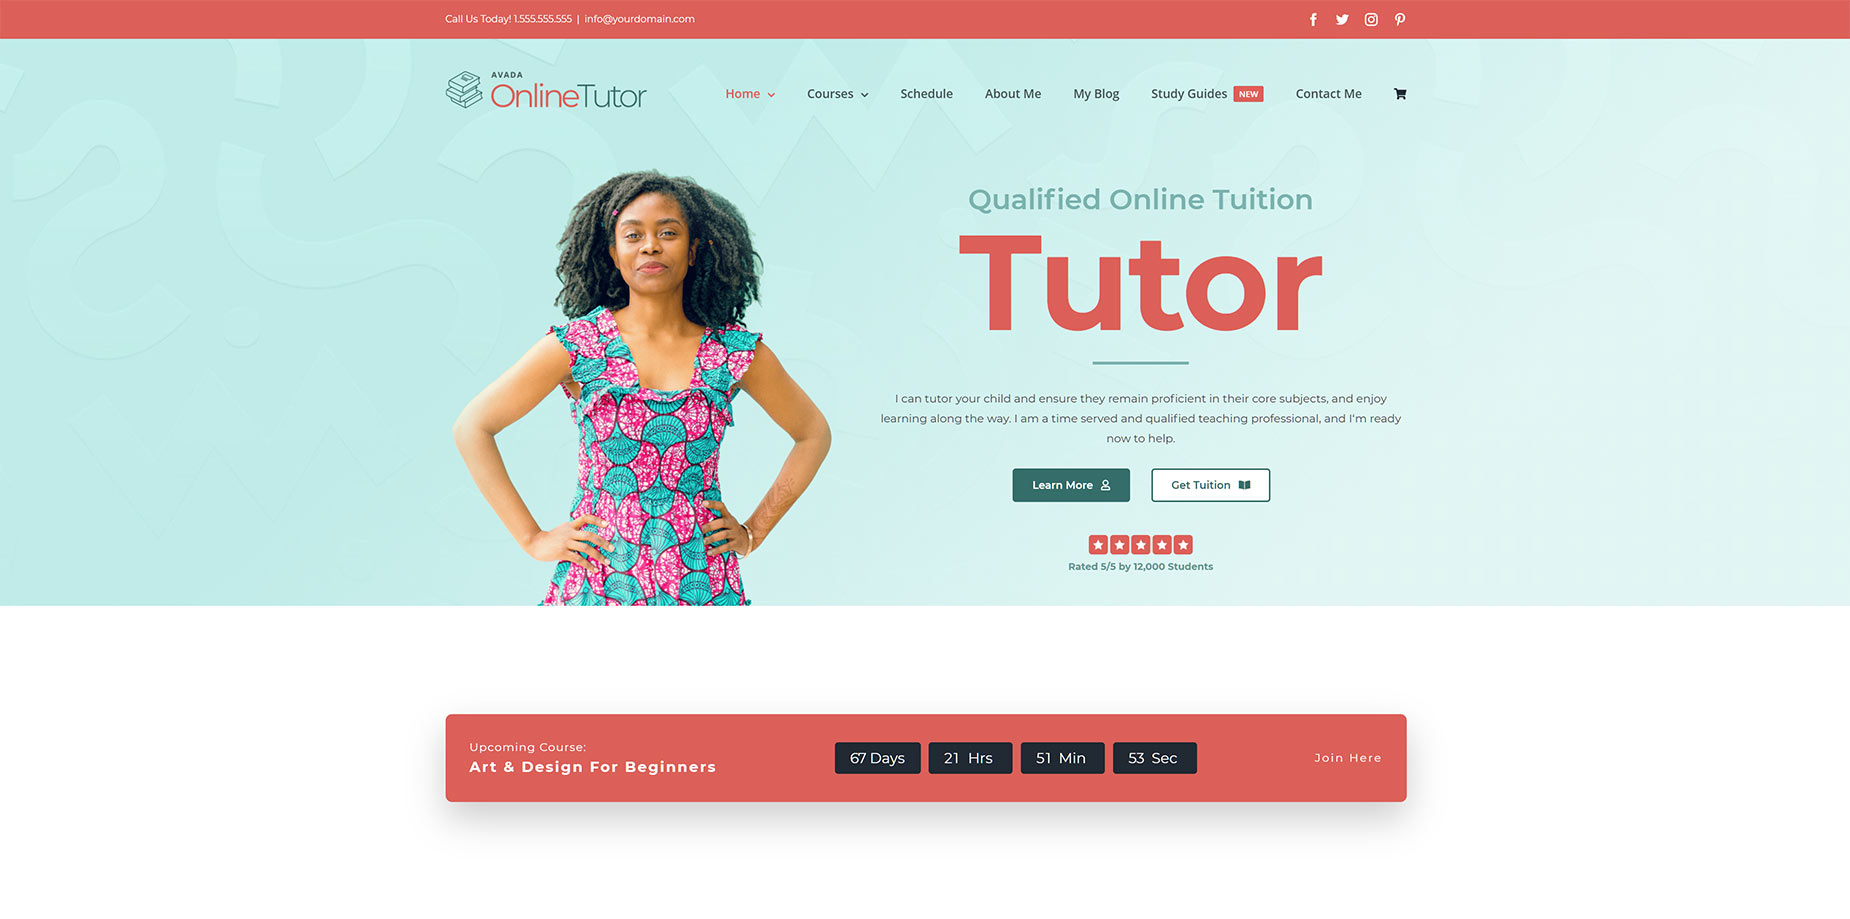
In the screnshot below, you can see an example of a specific product being promoted on the home pgae on the online Tutor website. It’s also set to Hide on the Display When Inactive option, so it will not display once the sale is live. This could of course be a count down to the end of a sale, or there could be both as done in the Layout above.

Linking To Event Calendar Events
The process is basically the same with linking the Dynamic options of the Countdown Element to an Event Calendar Event. Again, when selecting the Event Date Dynamic Content Type, you are met with exactly the same options.
That said, Event Calendar Events are inherently different from WooCommerce Products. The Events page itself is automatically generated, and so is not a page that can be edited directly. And unlike WooCommerce Products, Layouts are not in use for Events, so the most likely places to use the Countdown Element with Dynamic Content is on a static page, like the Home page, or on the actual Event pages.
Countdown To Event On Static Page
Here is an example of a Countdown to an Event on the Home page of the Online Tutor site. The Event Start Date option was selected in the Dynamic Content options, and a specific Event ID was added to pull the start date from the event in question. See the Product ID section above to see how to find IDs for Events.
Countdown To Event On Event Page
To be able to edit your individual Events in Avada Builder, make sure that ‘Event’ is selected under Post Types in the Builder Options (Avada Dashboard > Options > Builder Options > Post Types).
Then it’s the same as any page. Simply add the Countdown Element, select the Start or End Date in the Dynamic options, and set the Event ID for that specific Event. Using the Dynamic Content options here doesn’t really have any advantage over manually enterting the date, but it’s another option you have.


