Share
One of WordPress’s key features is its taxonomies, which are also known as categories and tags. WordPress categories and tags are assigned to posts, not pages, and an intrinsic feature of the category and tag system is to help you keep your posts organized. Organization is essential for bloggers who release a lot of long-form content online. However, you can also create custom taxonomies or use advanced options for distinct purposes — like organizing an eCommerce store built with WooCommerce.
Think of taxonomies as a digital filing system. They help you keep everything in its place, make it easier for your audience to find what they’re looking for, and give your website a structured SEO boost. Let’s explore how to use and manage WordPress categories and tags correctly.
Overview
A Brief History of WordPress
WordPress is an open-source Content Management System (CMS) that powers nearly 45% of all websites on the Internet. It was founded by Matt Mullenweg and Mike Little in 2003 with the idea of democratizing and simplifying publishing for the masses. WordPress started off as an easy-to-use blogging system that is suitable even for content authors with little to no technical knowledge of publishing content on the Internet.
Categories and tags are critical components of the WordPress CMS, helping you manage search engine optimization (SEO), as well as the general hierarchical structure of websites.
What are WordPress Categories and Tags?
Categories and Tags are two default WordPress taxonomies. While both categories and tags help organize content, categories are used to group topics. In contrast, tags are more keyword-specific and can group posts under different categories.
Understanding categories and tags is important before rushing to create them. The Category and Tag management pages are located in the WordPress Dashboard under the Posts menu in the sidebar.
From their respective pages, you can view any items that exist on your website, as well as create new ones. Each category and tag has a name, a slug, and an optional description. The name is visible to your readers when a category or tag is displayed on your website. At the same time, the slug is used in the URL (permalink) for category or tag pages.

You can assign tags and categories to any post from the Add New Post screen or the post-management page after creating a post.
If your WordPress theme supports them, which Avada does, the description will be displayed to your readers on your category or tag archive pages, which we will cover in more detail next.
What Are WordPress Category and Tag Archives?
A WordPress archive page is an automatically generated page that lists posts in the same category, tag, written by the same author, published around the same time, and so on. Category and tag archives are unique types of archive pages that group and display posts based explicitly on the categories and tags assigned to them. These archives help organize content, making it easier for visitors to find related posts.
Because the archive pages are automatically generated (style and layout), customizing the layout traditionally required using a WordPress child theme, knowledge of PHP, and then modifying the archive.php file. Thankfully, WordPress and Website Builders like Avada have moved well away from complicated restrictions like this.
With Avada, you can create fully Custom Archives Layouts for an enhanced user experience and a unique style that better matches your website’s brand and marketing goals. For each Custom Archive Layout, you can assign Layout Sections, each with a unique header, page title bar, content, or footer, using Avada Conditional Layouts to assign and manage where and when the layouts should be used. Check the Avada Restaurant prebuilt website and, more specifically, the blog post news archive. You will see an Avada Custom Archive Layout in use.

Check out this help file and tutorial video to learn more about creating and using Avada Custom Archives Layouts.
The Difference Between Categories and Tags
Before we dive into categories and tags in more detail, here is a rundown of their main features and differences to help you get a quick overview of their purpose and what they can do:
Imagine you have a blog with three main categories: Destinations, Food, and Lifestyle. By using tags like “Beach,” “Healthy,” and “Family-Friendly,” you can make it easy for your readers to find related content across these categories.
For example, someone looking for beach-related content can find posts about the best beach vacation spots under Destinations, recipes for beach picnics under Food, and tips on beach fashion under Lifestyle. Someone interested in health can find posts about wellness retreats under Destinations, healthy recipes under Food, and articles on maintaining a healthy lifestyle under Lifestyle. Similarly, a reader searching for family-friendly content can discover posts about family vacation spots under Destinations, child-friendly recipes under Food, and tips for family activities under Lifestyle.
This way, tags help to connect your content, making it easier for readers to explore all related posts across different categories, providing a seamless and enjoyable experience on your blog.
How to Create And Manage WordPress Categories or Tags
To ensure you are familiar with this aspect of WordPress, let’s briefly look at where you will find them in your website’s WordPress Admin area and how to manage them before we cover how to use them most effectively.
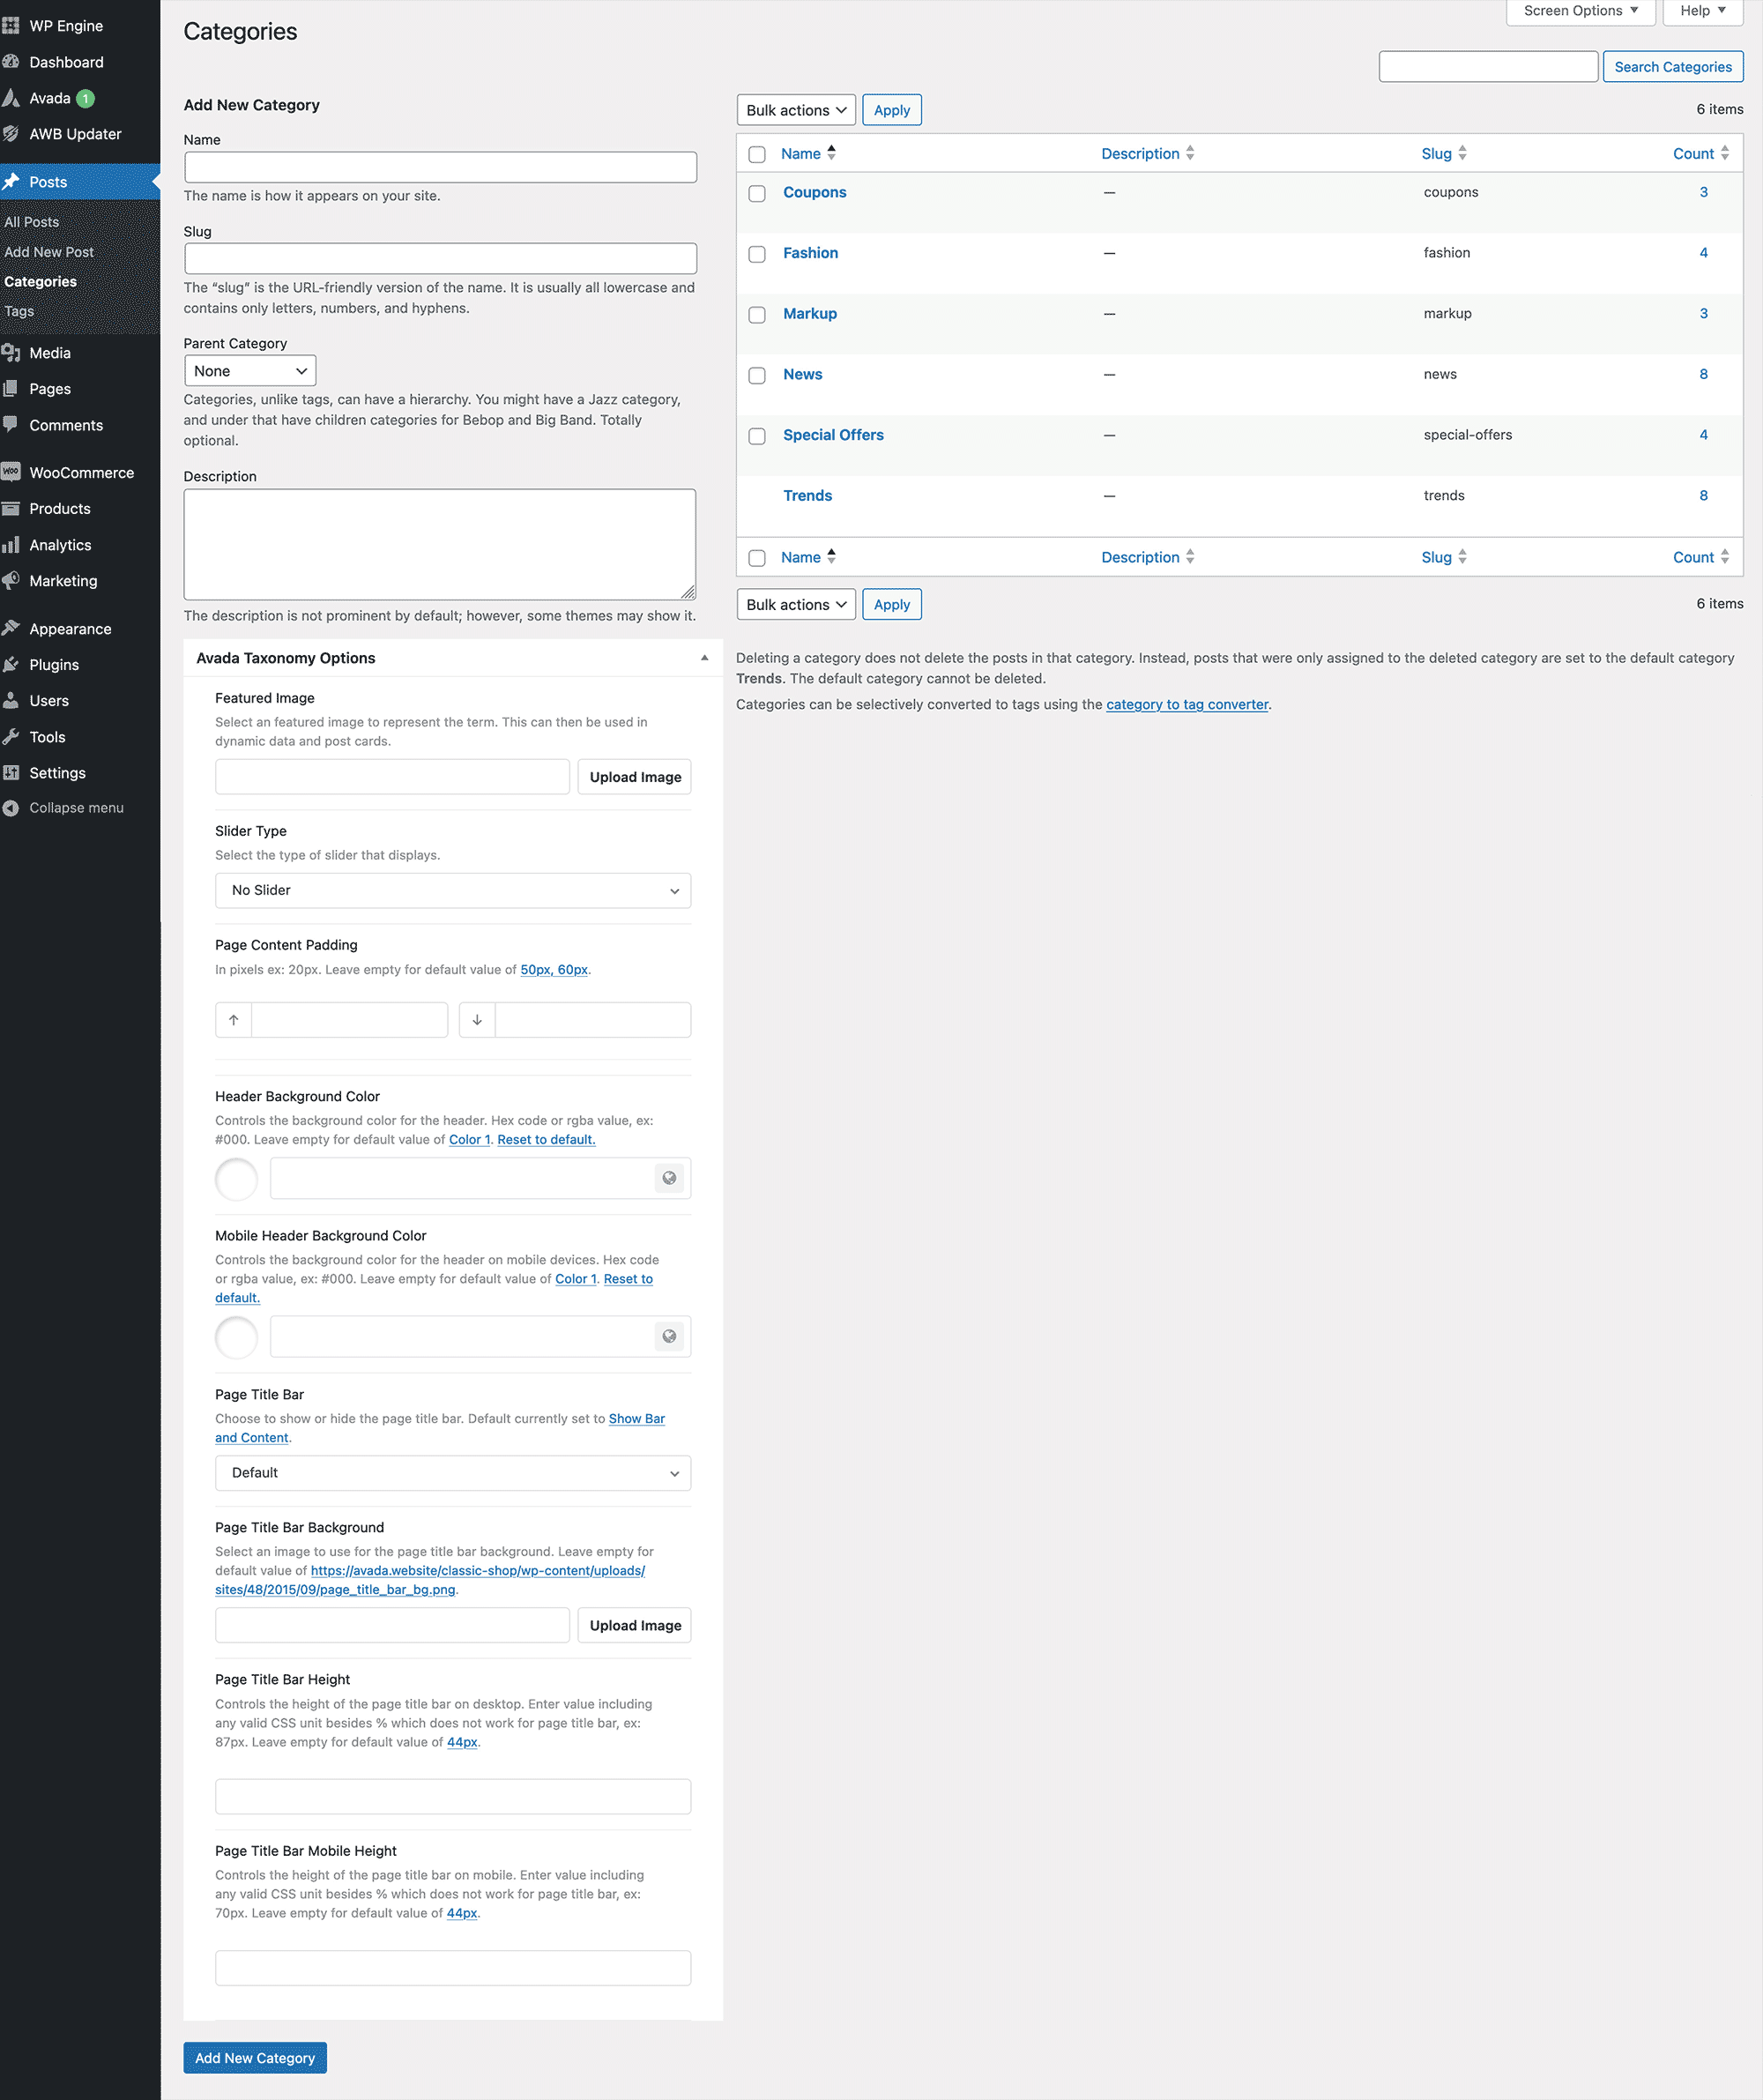
The category and tag management pages are located under the Posts menu on the sidebar. Below is a step-by-step overview of how to create and assign categories or tags.
Step 1: Access The WordPress Dashboard
To log in to the WordPress Dashboard, type your website’s full URL followed by /wp-admin or /wp-login.php in the browser address bar.
Step 2: How To Add Categories
Navigate to Posts > Categories in the dashboard. In the “Add New Category” section, enter the name of your category, optionally set a “Slug” (a URL-friendly version of the category name), and if creating a subcategory, select a parent category from the “Parent Category” dropdown. You can also add a description if needed (this is optional and often depends on your theme).
You can now click the Add New Category button to save it.
Step 3: How To Add Tags
Go to Posts > Tags in the dashboard. In the “Add New Tag” section, enter the name of your tag, optionally set a “Slug,” and add a description if needed (optional).
You can now click the Add New Tag button to save it.
Step 4: Assigning Categories and Tags to a Post
To assign categories and tags to a post, create a new post by going to Posts > Add New or edit an existing post. On the right-hand side of the post editor, you’ll find the “Categories” box where you can check the relevant categories for your post and add a new category directly from this box if needed.
Below the “Categories” box is the “Tags” box, where you can enter your tags separated by commas and press Enter or select from your most used tags.
Step 5: Click to Save The Post
Once you’ve assigned the appropriate categories and tags, click Publish if it’s a new post or Update if you’re editing an existing post to ensure your changes are saved and visible on your website.
Step 6: Review and Organize Regularly
it is good practice to periodically review your categories and tags to ensure they remain relevant and organized. To review categories, go to Posts > Categories to see all your categories and edit them if necessary. Similarly, go to Posts > Tags to see and manage all your tags, keeping your site content well-organized and easy to navigate.
Why Does Your Website Need Categories and Tags?
Simply put, it is because they are essential for organization, user experience, and SEO. Categories provide broad groupings of your posts, creating a structured hierarchy that makes managing and navigating your content accessible. Tags offer specific details about each post, acting like keywords that help link related content across different categories.
This organization improves the user experience by making it easier for visitors to find and explore related topics, keeping them engaged for more extended periods. Additionally, search engines use categories and tags to better understand and index your website content, improving the website’s structured SEO and making your content more discoverable when searching.
SEO Best Practice For Categories Add Tags
People often ask which is best for SEO, categories, or tags. We will briefly overview some best practices for organizing your content with categories and tags and how this can impact SEO rankings.
Know The Difference
Categories are intended to broadly group your posts, similar to a Table of Contents (ToC) of a website. Conversely, Tags intend to describe specific details regarding posts and allow you to micro-categorize your post content. Note that tags are not hierarchical.
Keep It Simple
Avoid overcomplicating your categories and tags. Stick to a few well-chosen categories that cover your site’s main topics and use specific, relevant tags. Too many categories or tags can confuse readers and dilute their effectiveness.
Consistency is Key
Use a consistent naming convention for your categories and tags. Apply them consistently across all your posts. This helps with SEO and makes your site look more professional and user-friendly.
Update Regularly
Periodically review and update your categories and tags to ensure they still fit your content. As your site grows, you may need to merge similar tags, create new categories for emerging topics, or reorganize existing ones to reflect your content better.
Use Descriptions
Adding descriptions to your categories and tags can provide additional context for search engines, enhancing your SEO. While not always visible to readers, these descriptions help search engines understand the content and relevance of your categories and tags.
Interlink your Content
Use tags to interlink related posts across different categories. This helps users find related content easily and improves your site’s internal linking structure, which is beneficial for SEO.
Summary
Armed with some helpful information, you can now start fully utilizing categories and tags to make your WordPress website more accessible for your readers to navigate. This will help them find more of your great content and spend longer on it. Mastering categories and tags can help your website achieve its objectives more effectively, whether that is greater user engagement, selling more products, better promoting your services, or generating more ad revenue.
In addition, categories and tags will facilitate the website’s SEO, making your content more discoverable online. Keep it simple, be consistent, and regularly maintain your categories and tags to keep your site organized and engaging.


