Portfolio Single Post Pages
Last Update: March 13, 2023
At the core of the Portfolio system in Avada are the Portfolio Single Post Pages. Each portfolio item you create generates a corresponding Portfolio Single Post page. The single post page is the full portfolio post and associated content such as Featured Images, Project Details, Project URL text, Copyright URL text, etc. In this article, we will explain all the relevant sections in a single post page and how to configure it to your preferences.
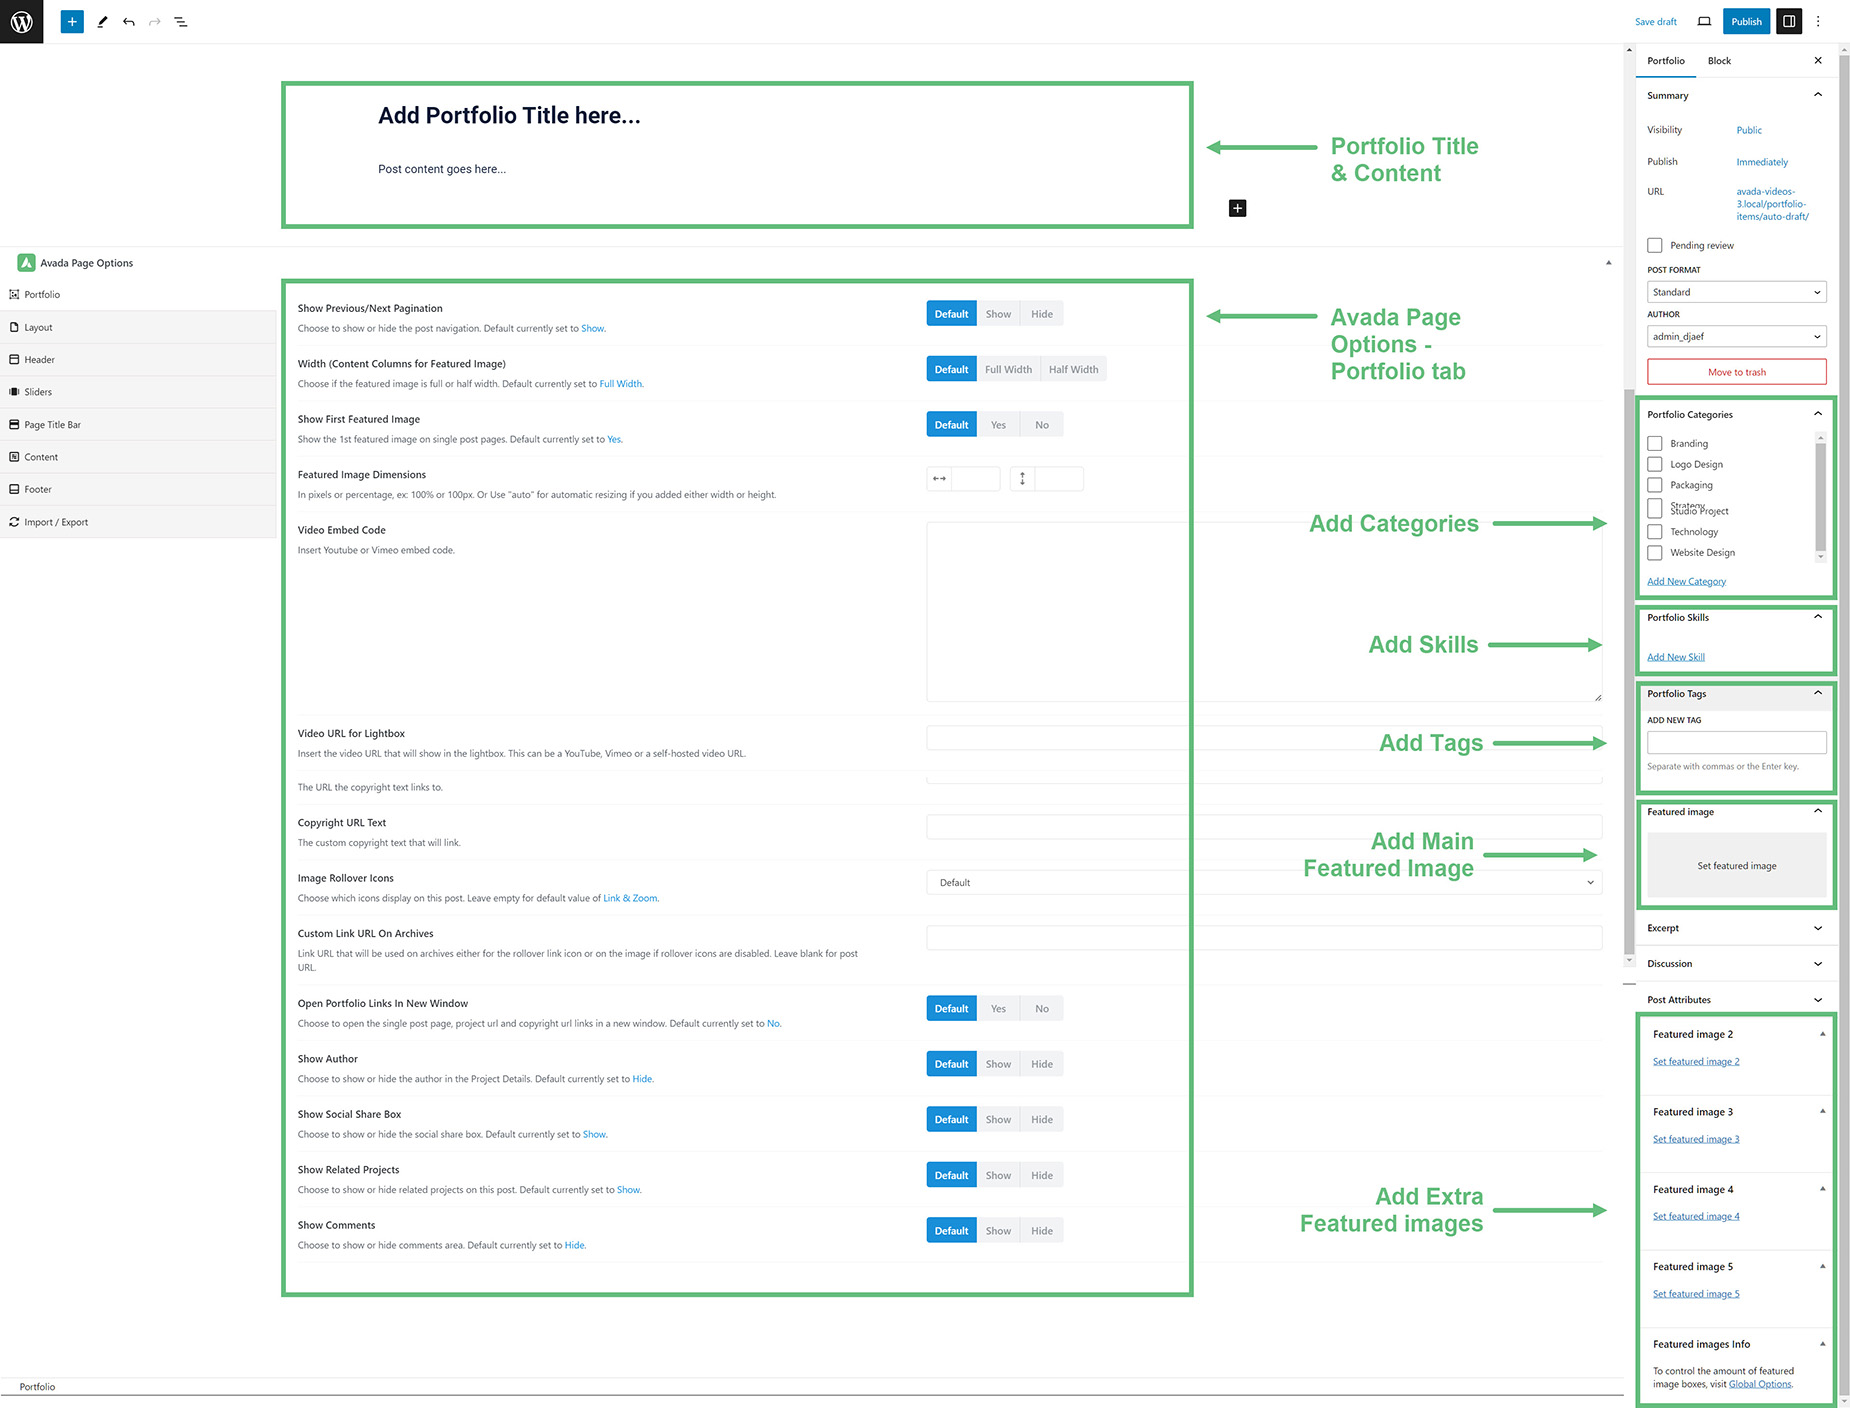
The Post Editor
The Post Editor is where you add your page content for your Portfolio posts. Other content comes from the Custom Post Type Fields, and through the Portfolio tab of the Avada Page Options, so depending on the type of Portfolio Post you are making, you might add more or less content via the Editor. Avada allows you to use any editor on the single post pages, from the WordPress Editor, the Gutenberg Editor or the Avada Builder. To enable the Avada Builder, simply click the ‘Avada Builder’ button above the WordPress Content Editor to access the Avada Builder. Any elements and content added to the post is treated exactly like regular page content.
As an example, this portfolio post on the Avada Agency demo has just two paragraphs of dummy text added through the Editor, while this post has a full Avada Builder layout.
The Custom Post Type Fields
There are four fields added to the Portfolio Custom Post Type to allow you to add specific portfolio details to your posts – Portfolio Categories, Skills, Tags, and the Featured Images fields. These are accessed on the right-hand side of the page.
Avada Page Options > Portfolio Tab
The Portfolio Tab of the Avada Global Options is a very important part of the Portfolio post type. Here you can accept or override the global Portfolio Single Post Options on your individual post, and there are extra fields to add further information to your Portfolio items, such as the Video Embed field, and the Project and Copyright URL and Text fields.
Please see the Portfolio Post Options doc for the full range of options. Below, we will look at some of the less understood post options available.
Selecting The Column Width Layout
Each Portfolio post you create allows you to set the width of the Featured Image’s column. This option is called the ‘Width (Content Columns for Featured Image)’ option and you can set it to be Full Width or Half Width. You can also set the entire Portfolio post to display 100% of the browser width.
Featured Image Dimensions
The Featured Image you upload to each post will show the full image ratio on the single post page by default. The width of the featured image will be set to the site width or the column width if you’re using a Half Width layout and the height is set to auto so it displays the original height. In addition to this, you can set a custom featured image width and height to control the size of the image. This is useful in specific situations when you need a custom featured image size.
The ‘Featured Image Dimensions’ option (Image width and height) is located in the Avada Page Options > Portfolio section of the posts page. Values are set in pixels or percentage, ex: 100% or 100px. Or Use “auto” for automatic resizing if you added either width or height.
Featured Videos
You can also upload a Youtube or a Vimeo video to be displayed in the Featured Image section of the portfolio post. You can even have a combination of videos and images, displayed as a slideshow on the portfolio single post page. Read below to learn how to upload a Youtube or a Vimeo video.
How To Upload A Youtube/Vimeo Video
Step 1 – Go to the ‘Portfolio’ tab on your WordPress admin sidebar and clicking ‘Add New’ to add a new post.
Step 2 – Give your portfolio post a title and add your content as normal.
Step 3 – In the Avada Page Options box, switch to the ‘Portfolio’ tab, then find the ‘Video Embed Code’ option.
Step 4 – Enter the Youtube or Vimeo embed code into the provided field. You can find the embed code by clicking the ‘Embed’ option on Youtube, and the ‘Share’ option on Vimeo.
Step 5 – Click ‘Save Draft’ or ‘Publish’.
Project Description Title and Project Description
The Project Description section is any content you insert in the WordPress Content Editor. This is usually the text description of the project, but it can also contain any of our elements. This is where you can put any descriptive content detailing your project. The Project Title Description option on the Portfolio tab allows you to add the Project Title automatically at the top of the content added in the Editor.
Project Details
The Show Project Details option shows the meta information relating to the project. For Full-Width layouts, the Project Details are placed in a sidebar next to the Project Description. For Half-Width layouts, they’re displayed below the Project Description.
The information shown in the Project Details consists of the Project categories, Skills and Tags added to each Portfolio Post, as well as the Project URL & URL Text, and the Copyright URL & URL Text.
The key to understanding the Portfolio Single Post page is to understand how the various areas of the page contribute to the end result, and how you can use the Portfolio tab of the Avada Page Options to override the Single Post Global Options set in the Avada Global Options.
Once you have your Portfolio items created, you can think about how to display the Portfolio as a whole, which is done with the Portfolio Element. But before we do that, let’s have a deeper look at how the Global and Local Options affect the various parts of the Portfolio system.