Share
So you want to create an online store? It’s never been easier to launch a store, and the e-commerce industry is experiencing a boom in growth.
But while getting online has gotten a lot easier, you still might not know where to start if you’ve never built a store before. That’s why we decided to create a three-part series that takes you through everything you need to know about launching a store and selling online with WordPress, WooCommerce, and Avada.
Starting from zero, we’ll take you through how to use the WordPress CMS and Avada to create a beautiful, high-converting WooCommerce store.
In this tutorial (part 1), we’re going to cover the basics of how to build a website for your store using Avada. Then, in parts two and three, we’ll cover how to start selling with your store and, more importantly, how you can maximize your sales and boost your online revenue. Let’s get started.
Overview
- Overview
- How to Choose a Web Hosting Service and Install WordPress
- How to Install and Activate Avada
- How To Install Avada
- How To Register Avada
- The Best Avada Prebuilt Sites For eCommerce
- How To Choose Your Prebuilt Website
- Import Your Prebuilt Website
- How to Customize Avada for eCommerce
- How to Choose the Best Plugins for Your eCommerce Website
- Next Steps: Set Up WooCommerce and Start Selling
How to Choose a Web Hosting Service and Install WordPress
Before you can create your online store, you need web hosting. Web hosting is the engine that powers your website, and it will play an essential role in the success of your online store. Why’s that? Well, because web hosting has a significant effect on how quickly and reliably your site loads.
Every minute of downtime your store experiences means potential lost sales and trust with your customers. What’s more, there’s plenty of data linking slow page load times with a drop in conversion rates. With that in mind, you’ll want to pick a WordPress host that offers:
We recommend these web hosts for WordPress:
Both hosts also offer easy WordPress installers, so you’ll be able to set up a fresh WordPress install with just a few clicks. In addition, you can reach out to your host’s support if you encounter any problems with installing WordPress.
How to Install and Activate Avada
Once you’ve purchased your web hosting and installed WordPress using your host’s auto-installer, your next step is to install and activate the Avada.
Essentially, Avada controls every aspect of how your store looks, and it will help you launch your website with a great-looking design. You’ll also be able to customize every part of your store’s design using Avada’s visual Drag-&-Drop interface – no coding knowledge required!
If you haven’t already purchased the Avada Website Builder, your first step is to head to ThemeForest and purchase Avada. Once you’ve made your purchase, you can download the Avada installation files from your ThemeForest account’s downloads section:
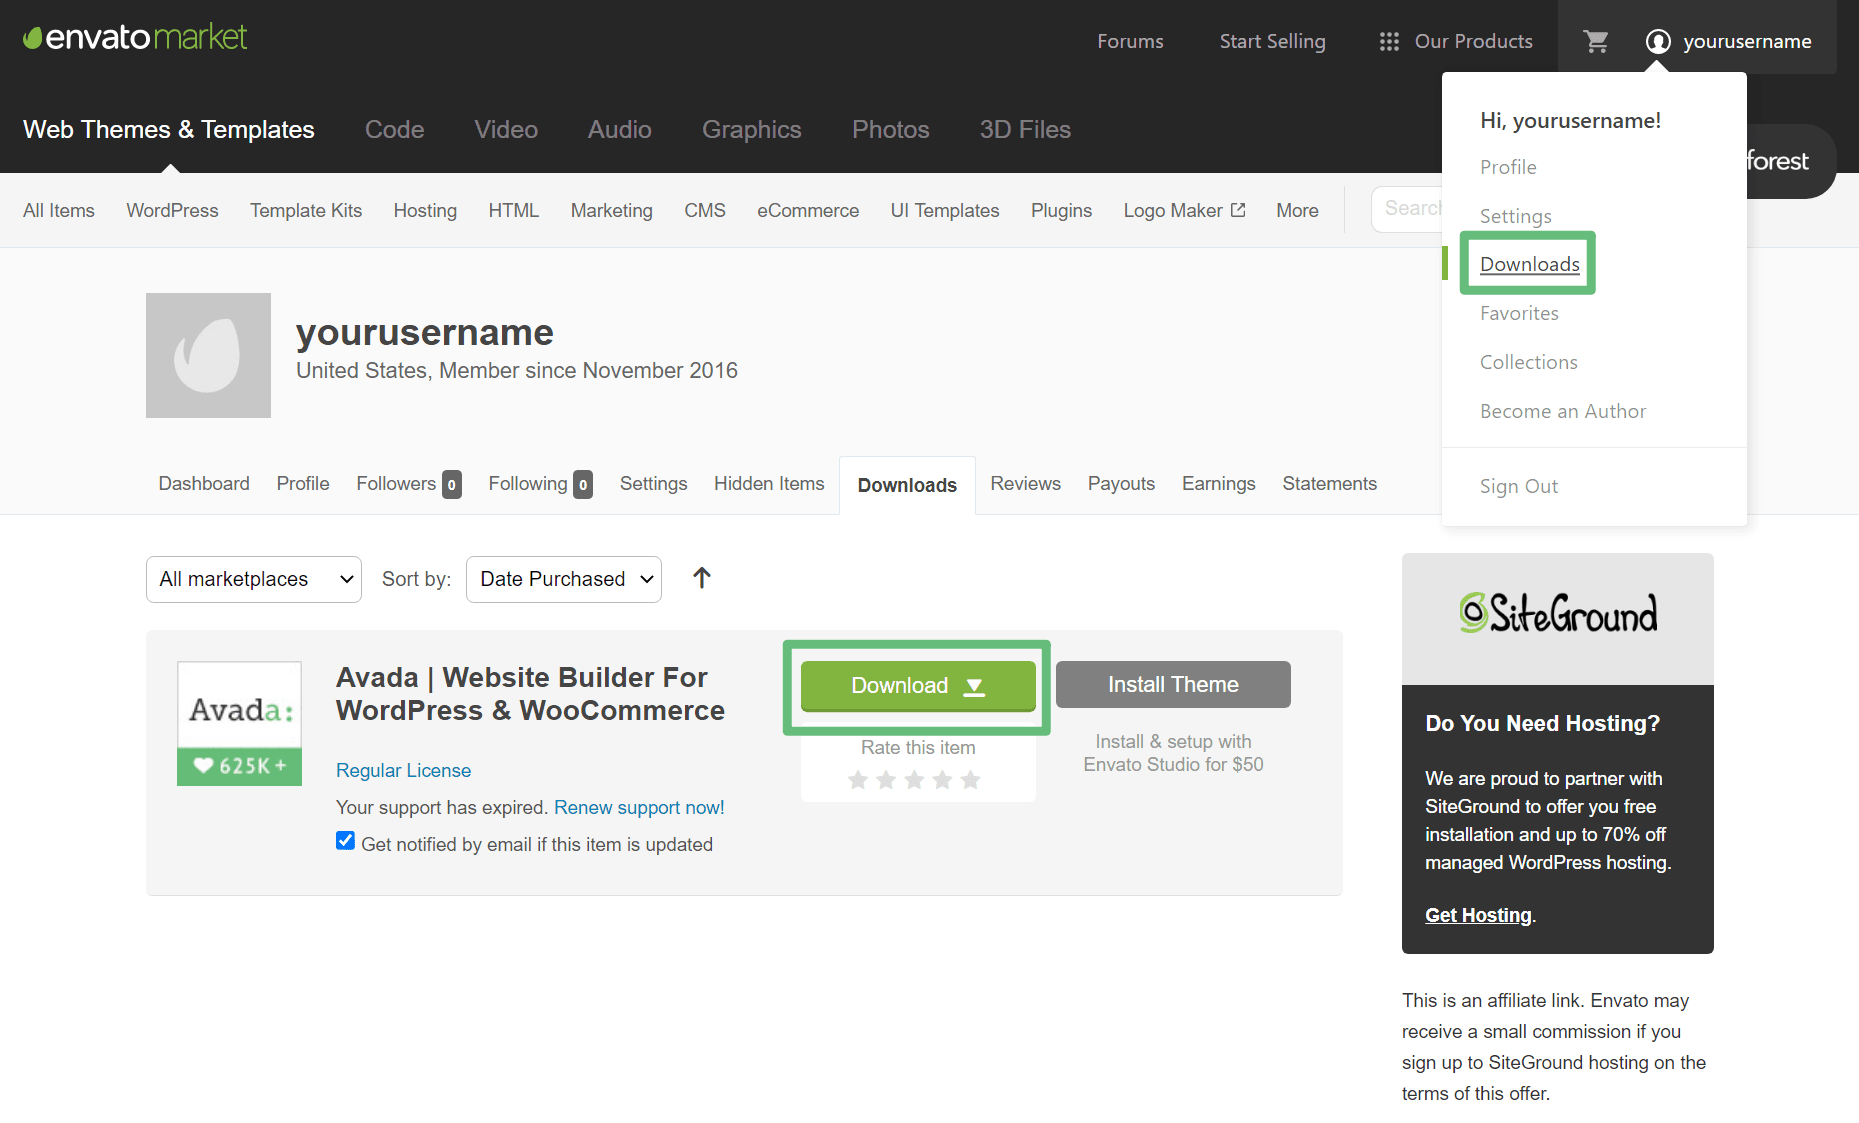
When selecting your download option, you can choose the Installable WordPress file only to download:
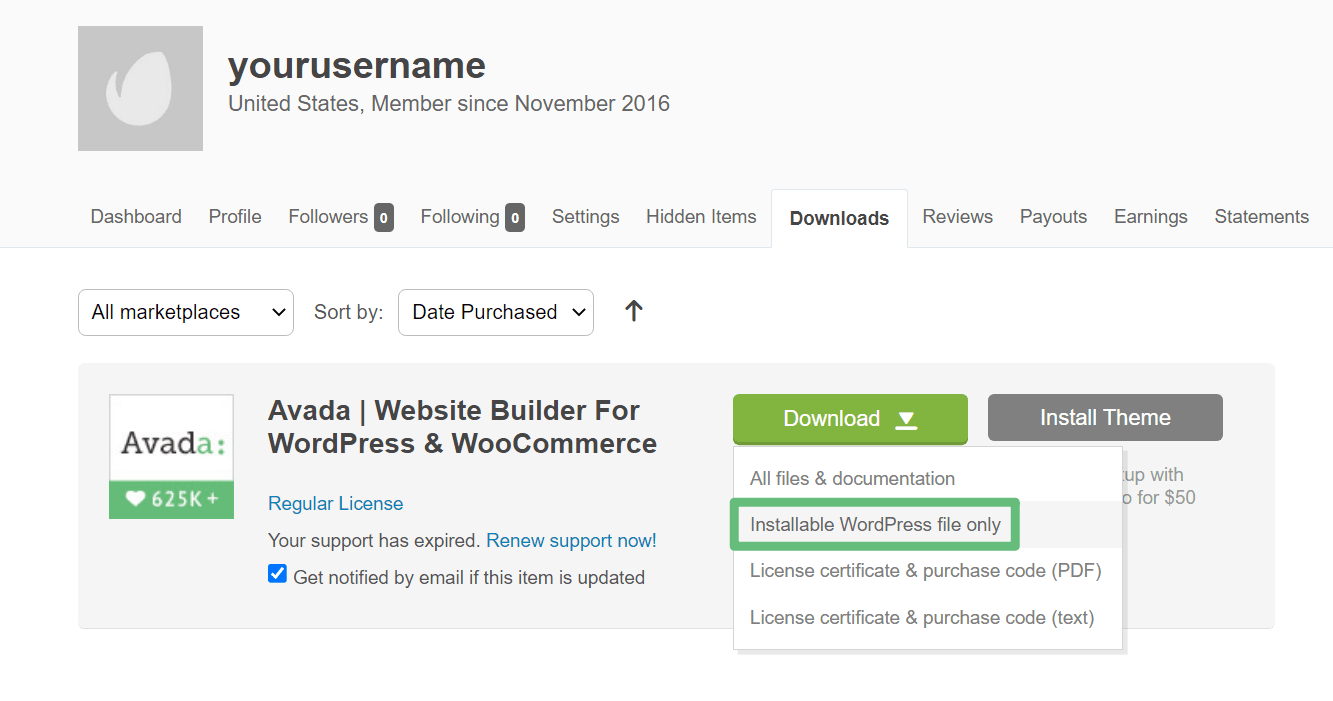
This should start the download for a ZIP file that contains Avada. Keep this ZIP file handy because you’re going to need it in the next step!
How To Install Avada
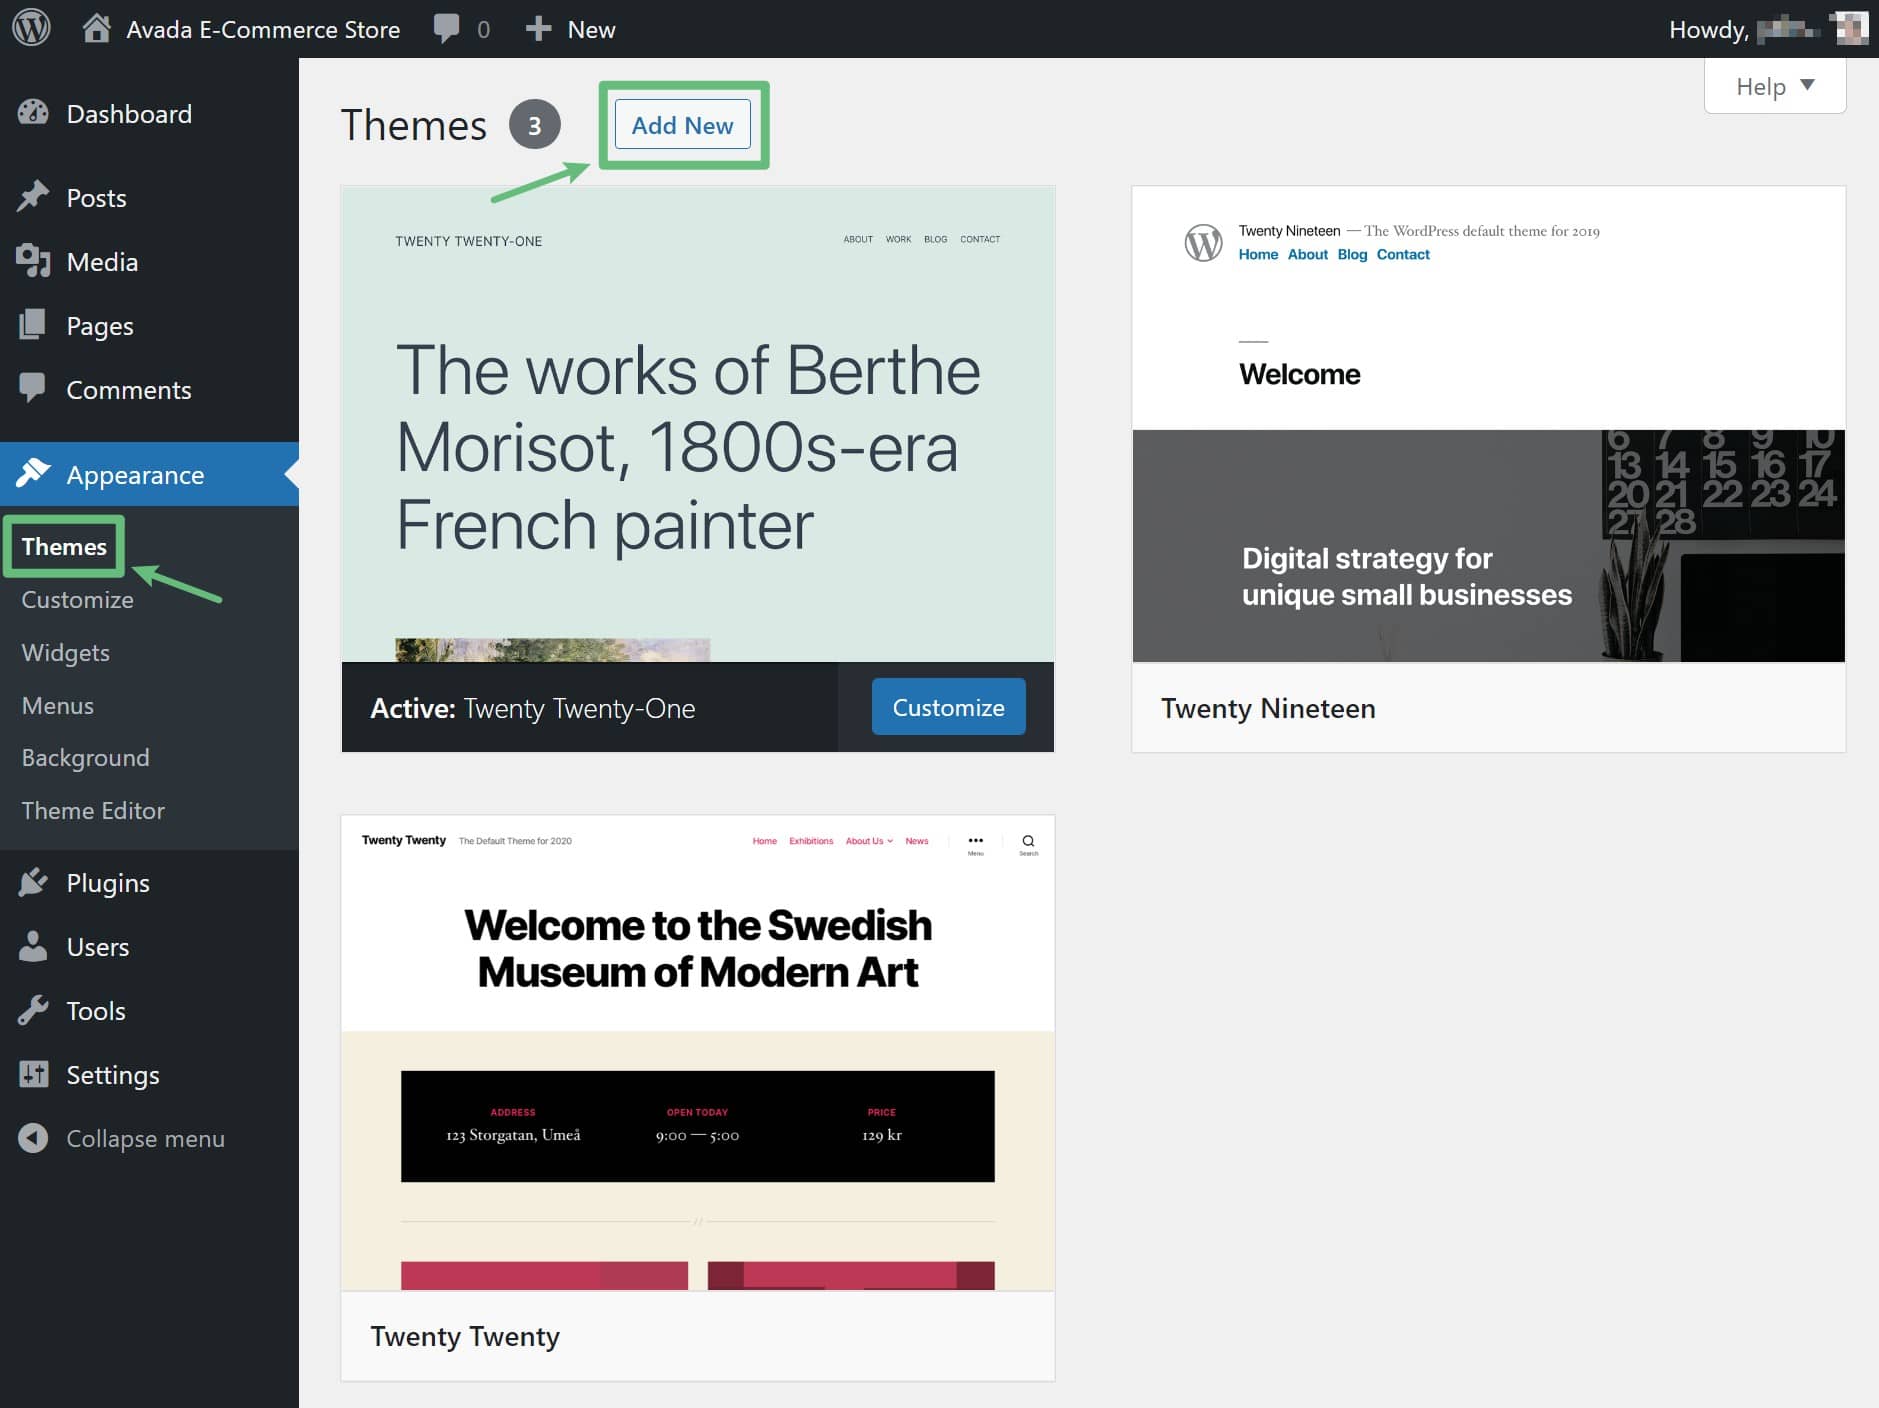
Once you’ve downloaded a copy of Avada, you can head to your WordPress dashboard to install it. In your WordPress dashboard, go to Appearance > Themes and click the Add New button:
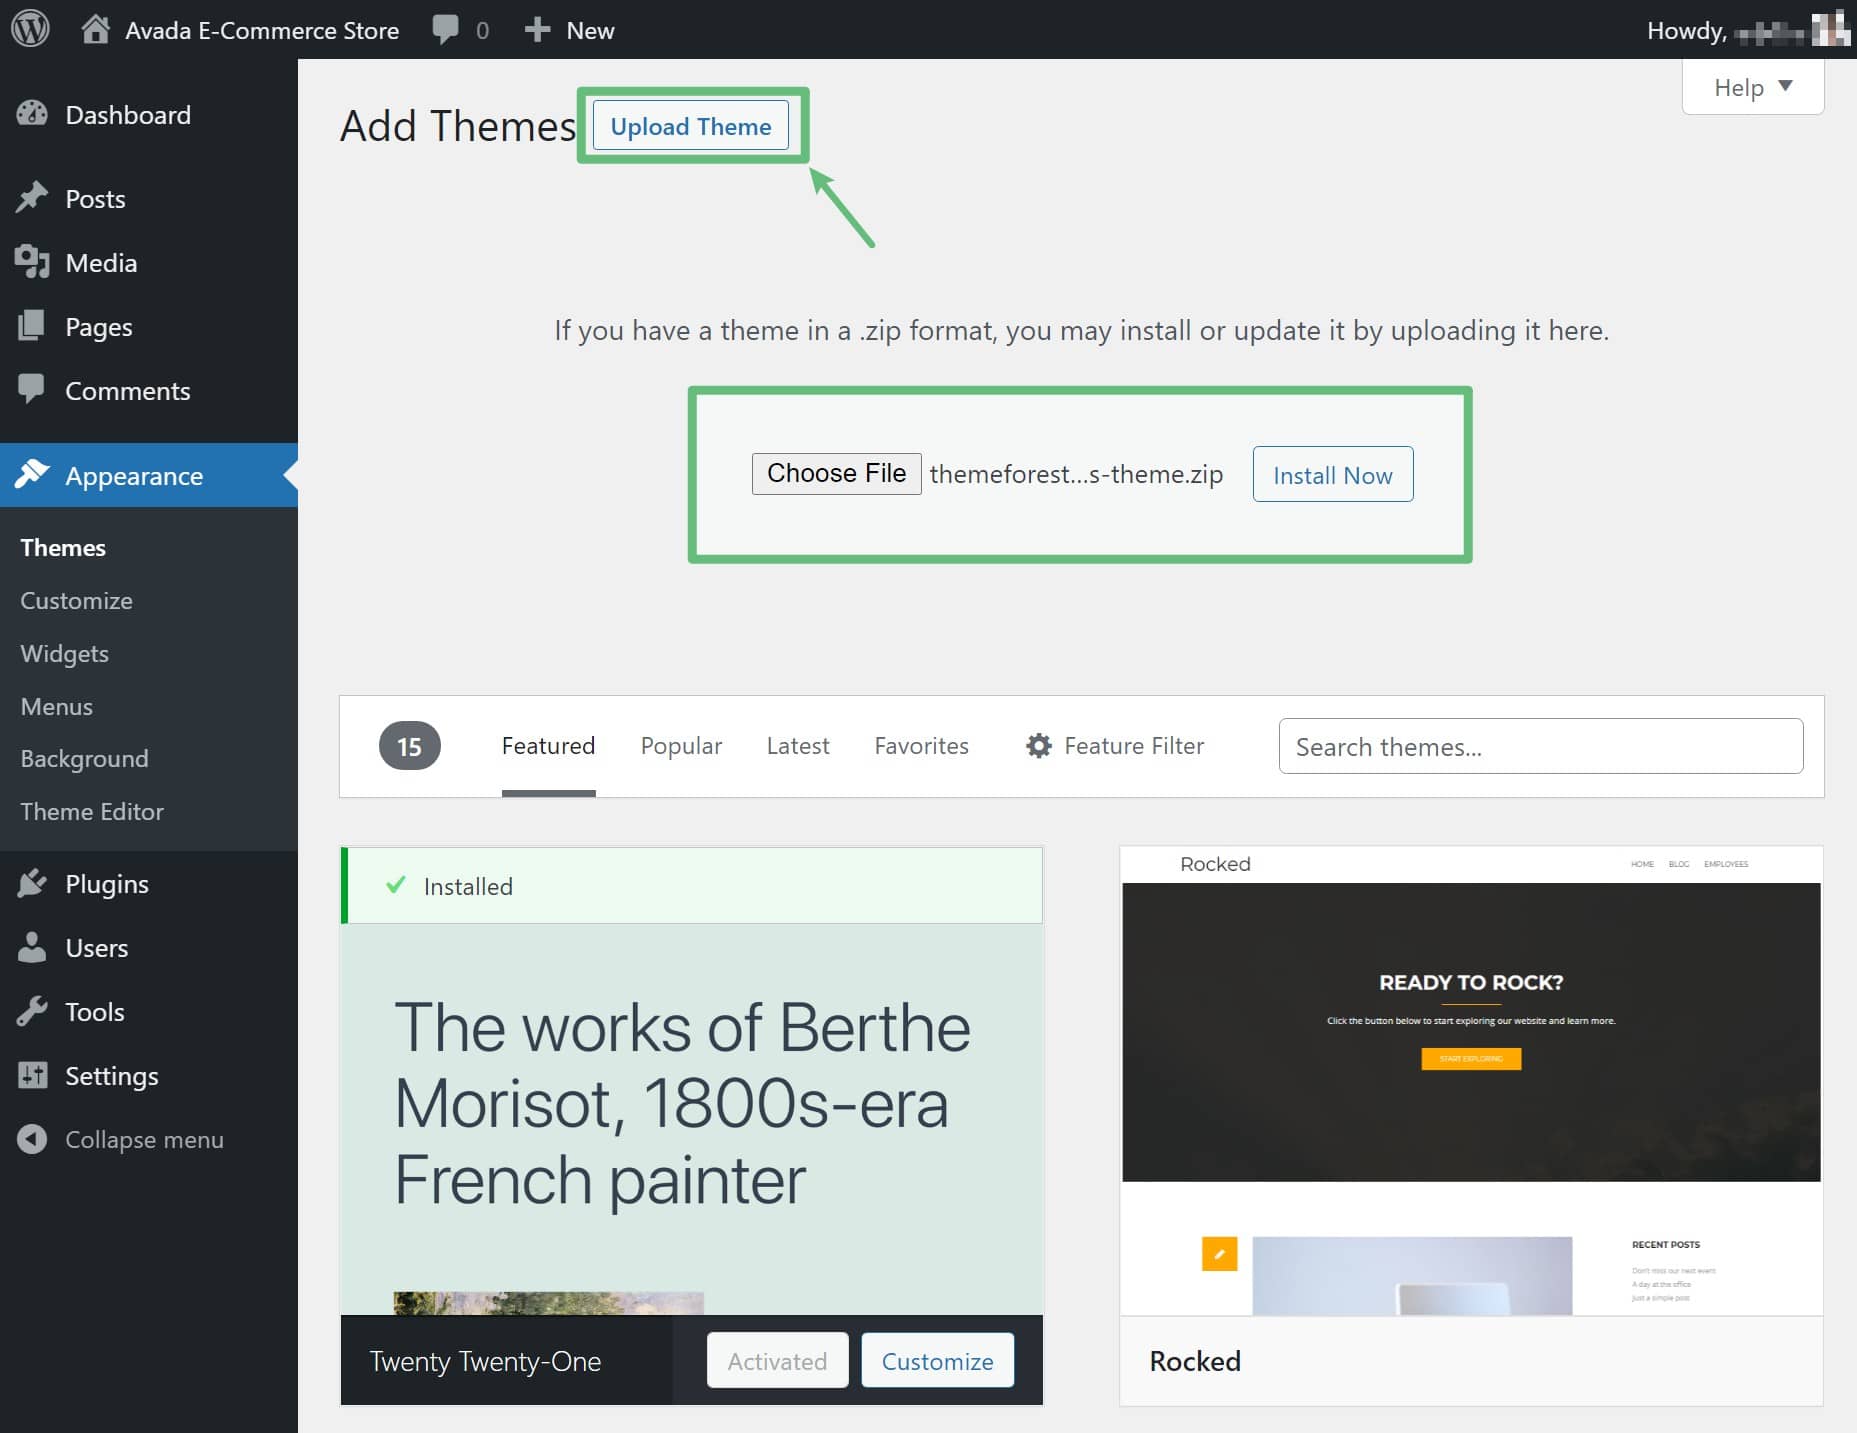
On the next screen, click the Upload Theme button at the top. Then, use the Choose File button to choose the ZIP file that contains Avada (this is what you downloaded a second ago). Then, click Install Now to install Avada:
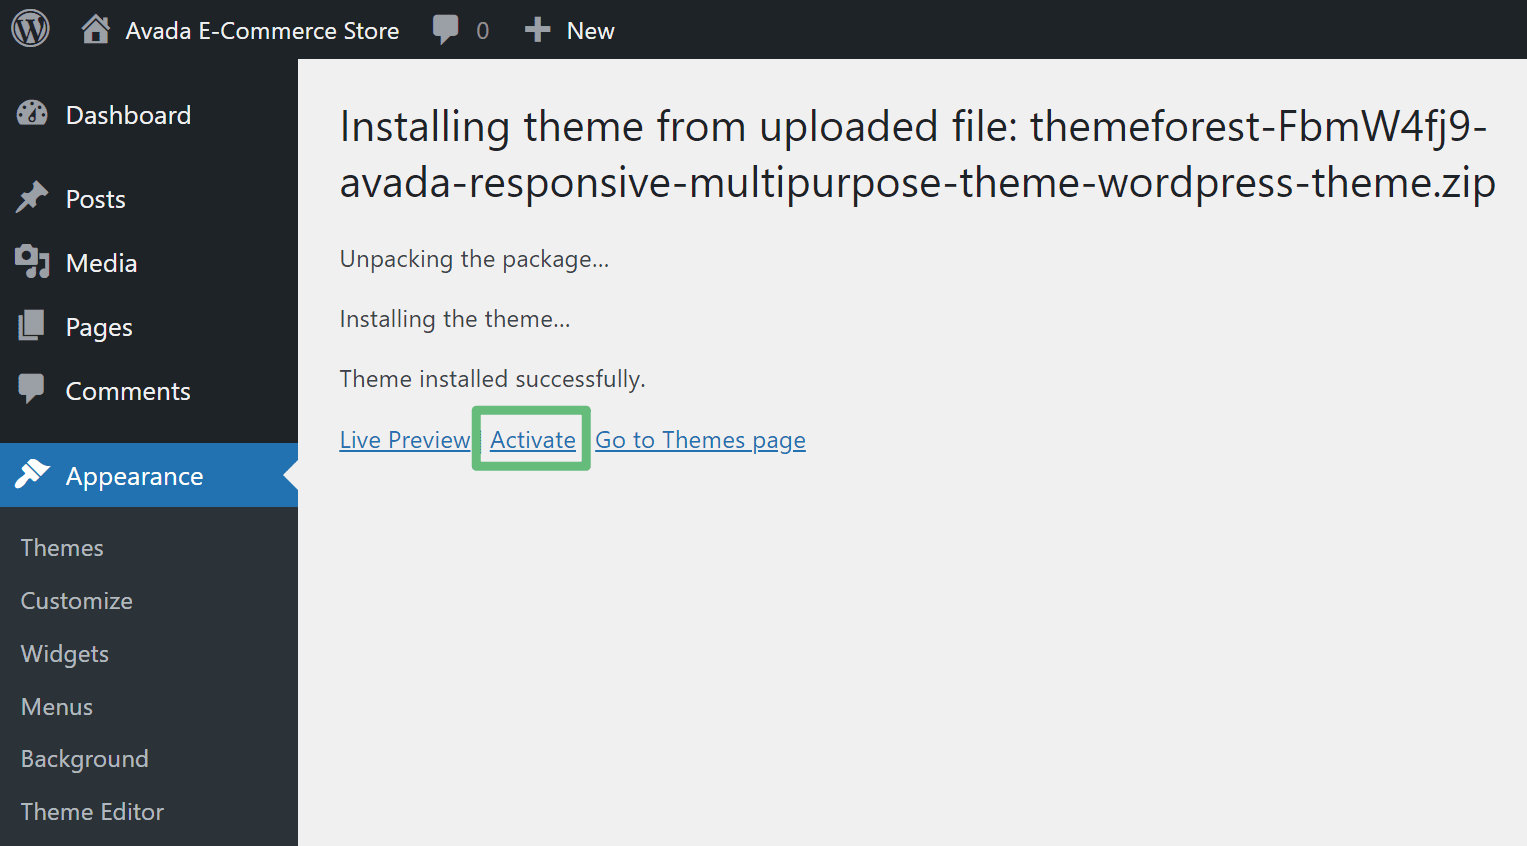
Once WordPress installs the theme, click the prompt to Activate it:
How To Register Avada
Why should you register? To receive updates to the theme and import one of Avada’s many prebuilt website templates, you need to register Avada by connecting it to your ThemeForest account. For more detailed registration and licensing information, please see this FAQ help file.
To do this, you can go to the new Avada area in your WordPress dashboard and scroll down to the Register Your Website box.
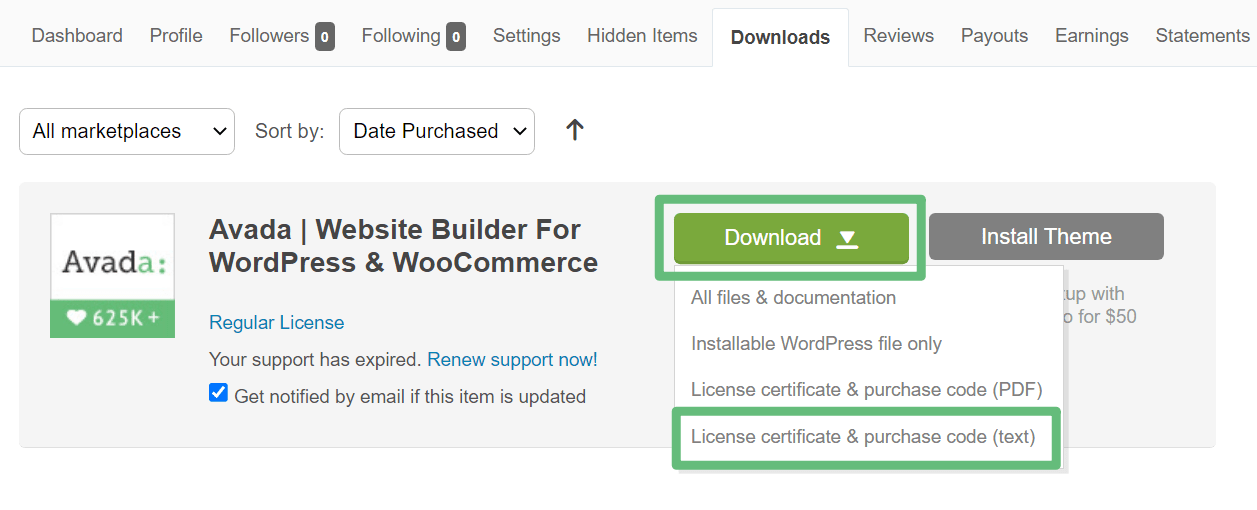
To register your copy of Avada, you need to add your purchase code, which you can get from the ThemeForest downloads page (the same place where you downloaded the zip file of the Avada theme).
You can click the Download button again. Only this time, choose the option for License certificate & purchase code (text):
Open the text file that downloads in any text editor and look for the Item Purchase Code:
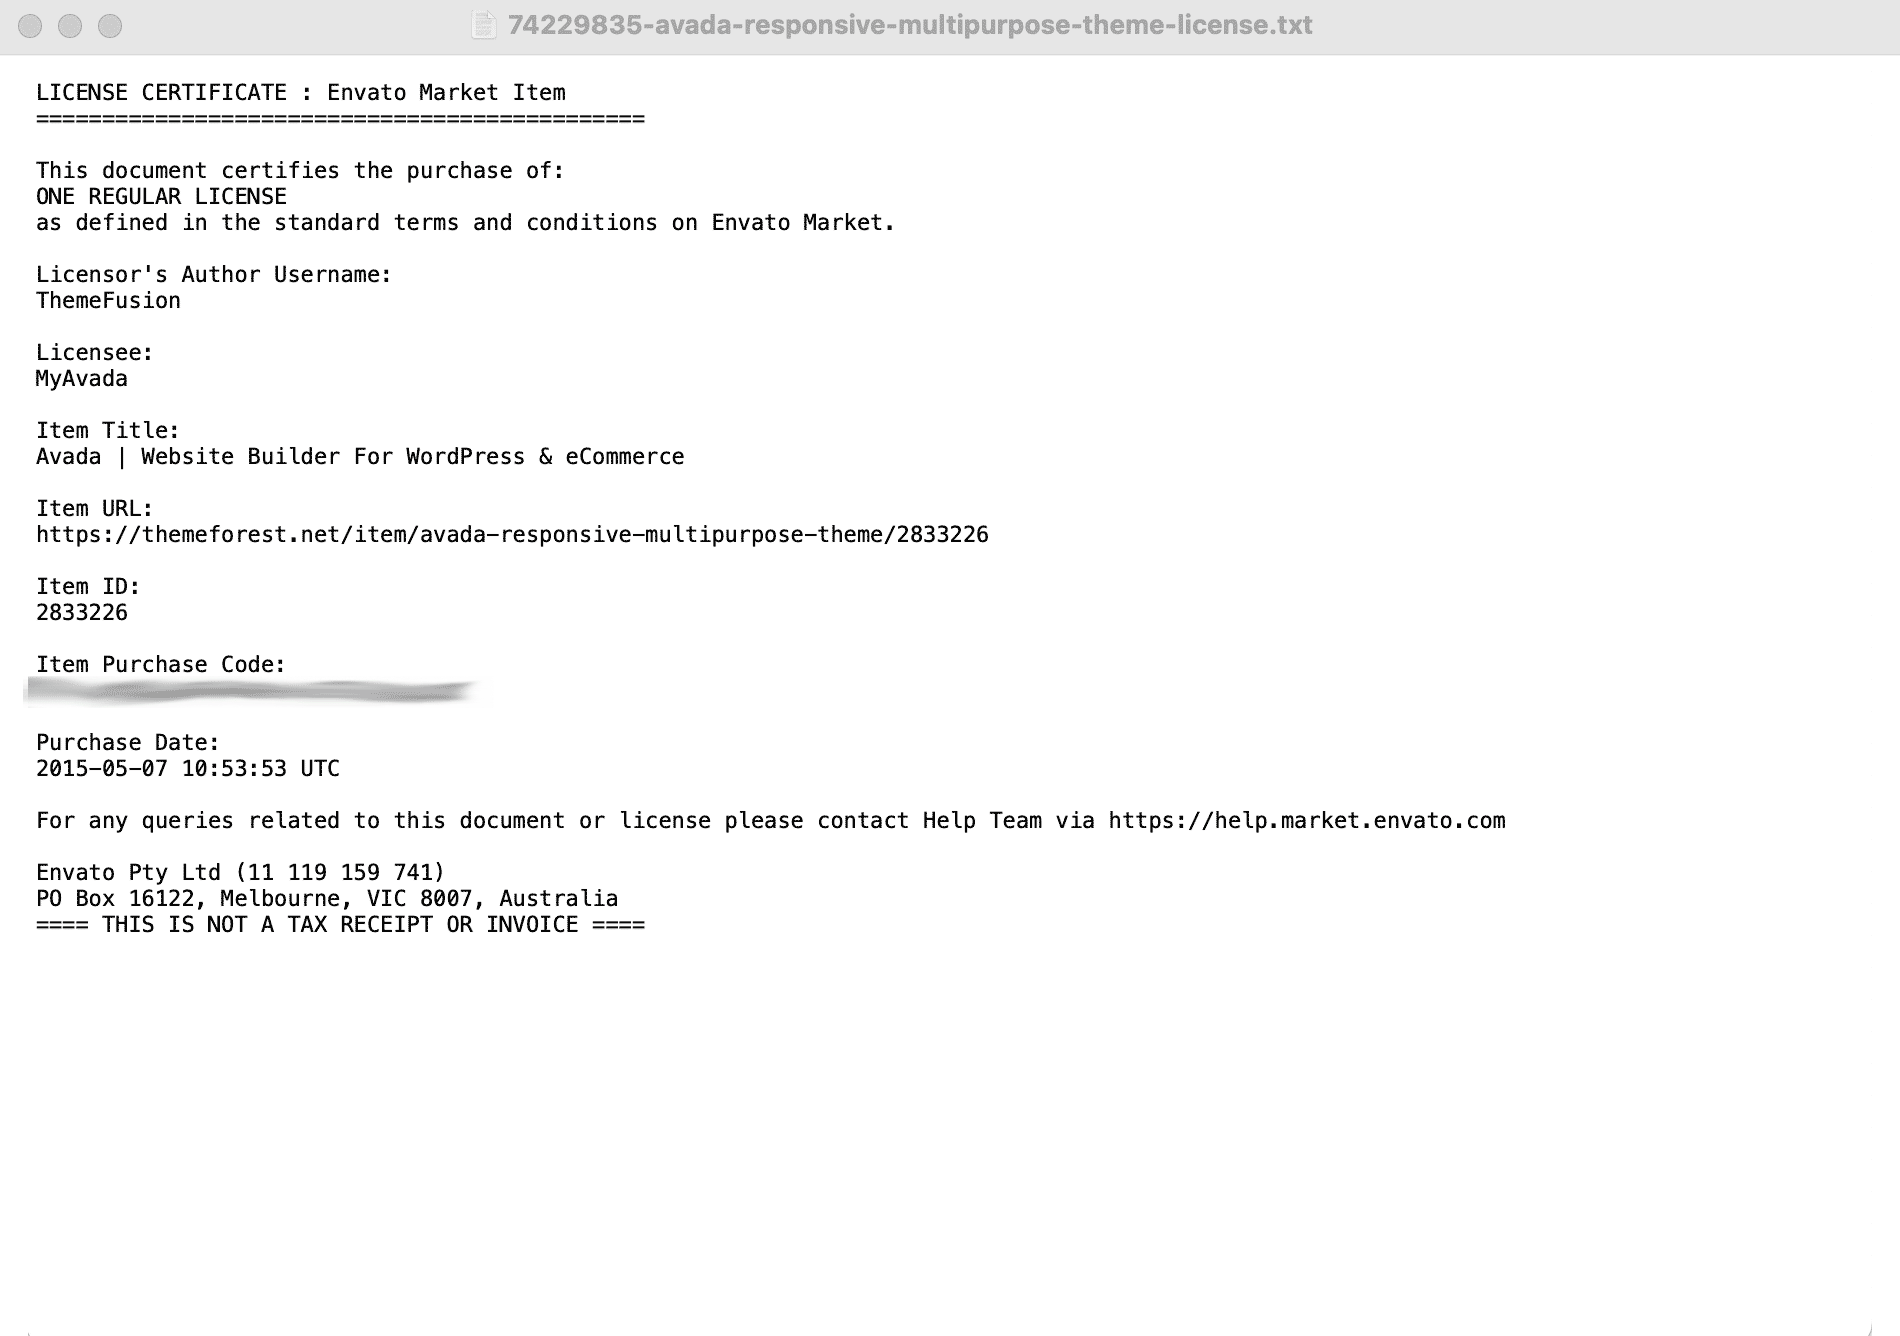
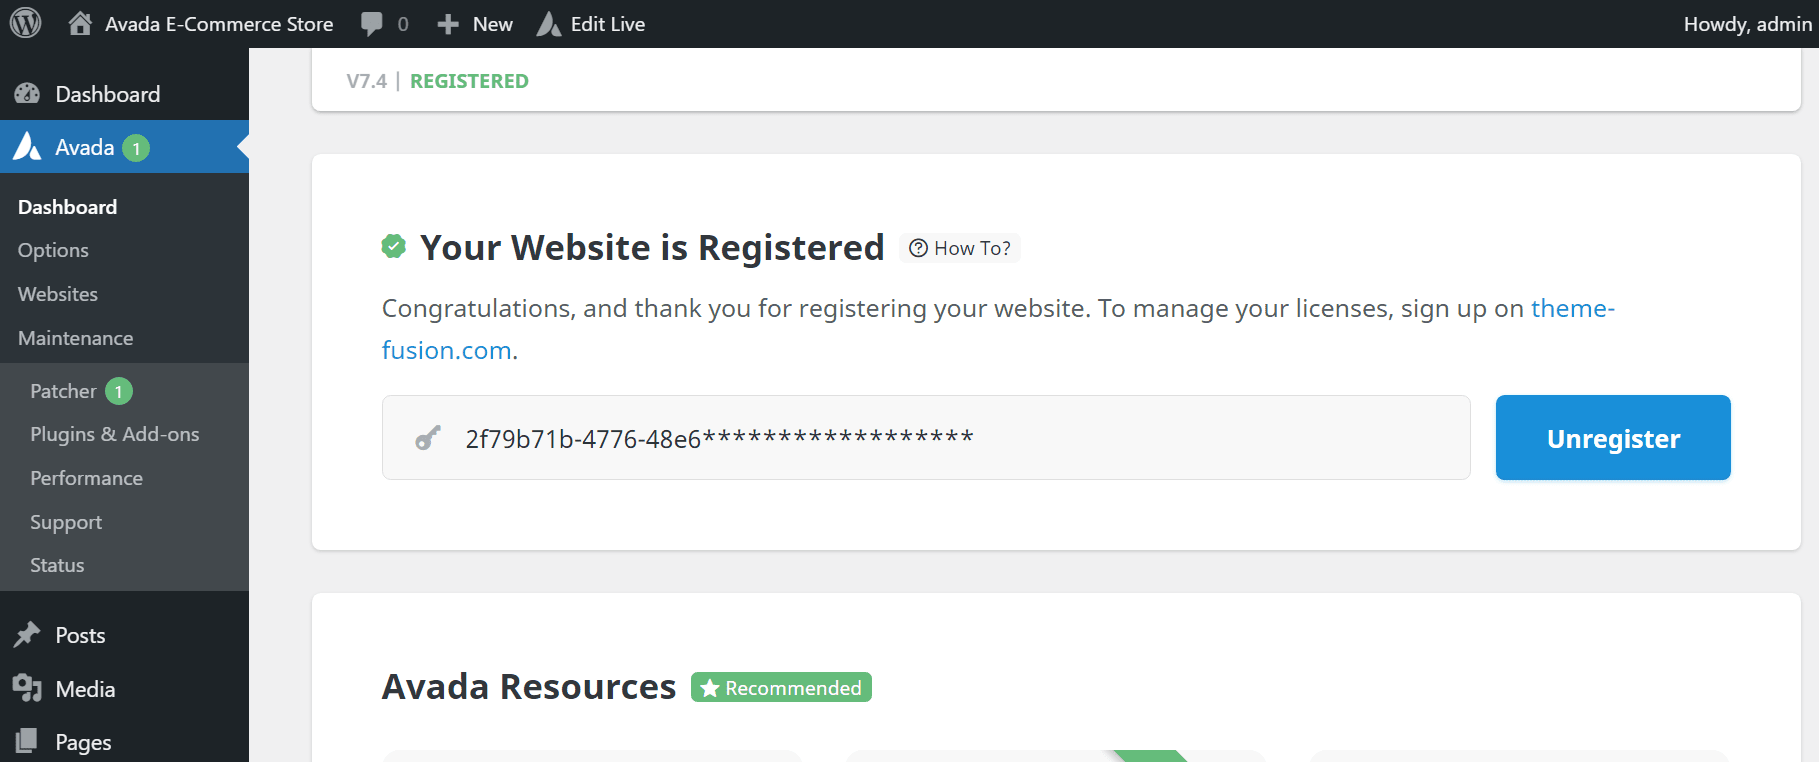
Then, plug that license code into the Register Your Website box in your WordPress dashboard and click the Register Now button.
Once you do that, you should see a success message telling you that “Your Website is Registered”:
Now, you’re ready to continue with setting up your online store!
The Best Avada Prebuilt Sites For eCommerce
To help you get up and running with a great-looking eCommerce store from day one, Avada comes with over 112 importable websites covering a variety of different niches.
All of the Avada prebuilt websites are compatible with WooCommerce, the world’s most popular WordPress eCommerce plugin. However, Avada also includes 95+ prebuilt websites that are specifically designed with an eCommerce online store in mind. Each of the prebuilt websites can easily be adapted to feature a WooCommerce store, and whether you want a clean, modern design or an artsy handmade vibe, there is a large selection to choose from.
How To Choose Your Prebuilt Website
To get started, go to Avada > Websites in the WordPress dashboard and scroll down to browse the list of prebuilt websites.
To filter by a category, select from the options in the sidebar. For example, you can use the Shop filter to instantly filter out the 95+ importable prebuilt sites dedicated to creating an online store. To see what a specific website looks like, you can hover over it and click the Preview button:
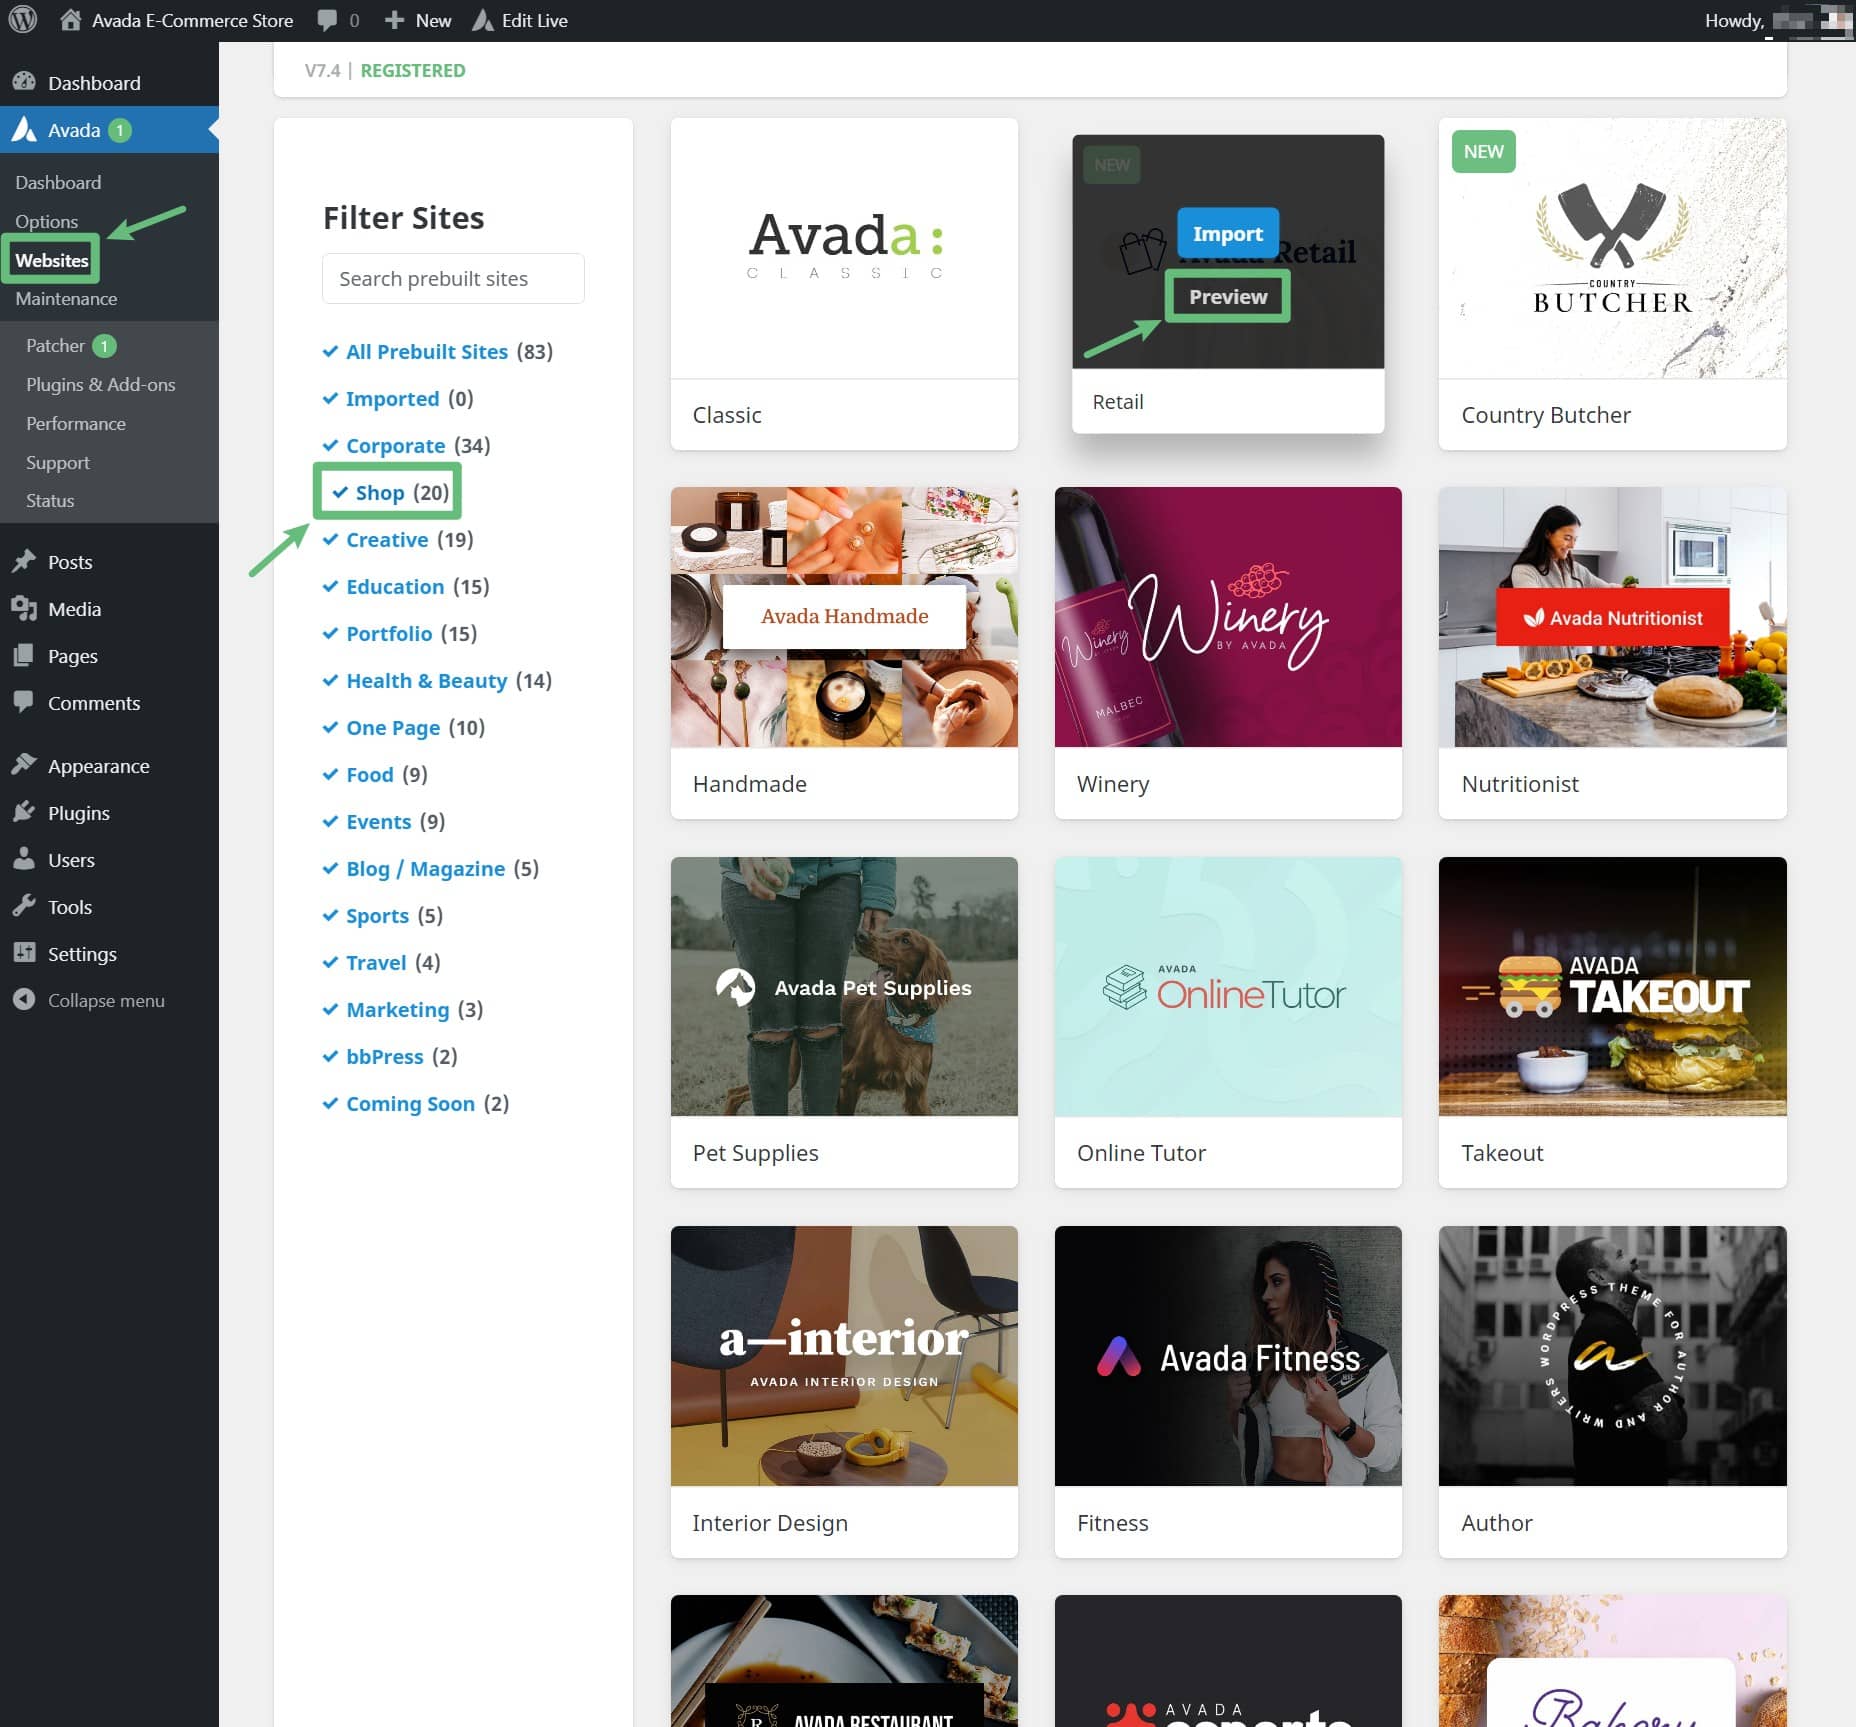
That will open a new tab in your browser that shows a live preview of the website. For example, here’s what the Avada Retail prebuilt website site looks like:

If you import any Avada prebuilt website, your website will look exactly like the preview. When browsing the prebuilt sites, you’ll want to consider factors like:
The prebuilt sites are designed and created to give you a head start. You can edit all of the page/post content and layouts to customize and personalize the result. Doing this with Avada’s intuitive visual Drag-&-Drop Visual Builder makes it easy, and you don’t need any coding knowledge. Avada is ideal for Beginners, Marketers, and Professionals alike.
Import Your Prebuilt Website
Once you’ve found the right prebuilt site for your store, your next step is to import it. For this example (and for the rest of our series), we’re going to use Avada Retail as the example we showed you above. It has a nice modern look that should work for stores in a wide variety of niches. While the content is based around clothing, you could quickly adapt it to different types of products.
With that being said, you’re free to choose a different prebuilt website if you think another one will work better for your store. However, all of the same principles that we’ll cover in this series will work no matter which design you choose.
To start the import process, hover over the prebuilt site you want to import and click the Import button. This will launch a popup to continue the process. First, you’ll need to install the required plugins. For the Avada Retail eCommerce prebuilt site, that’s:
Click Install next to each plugin:
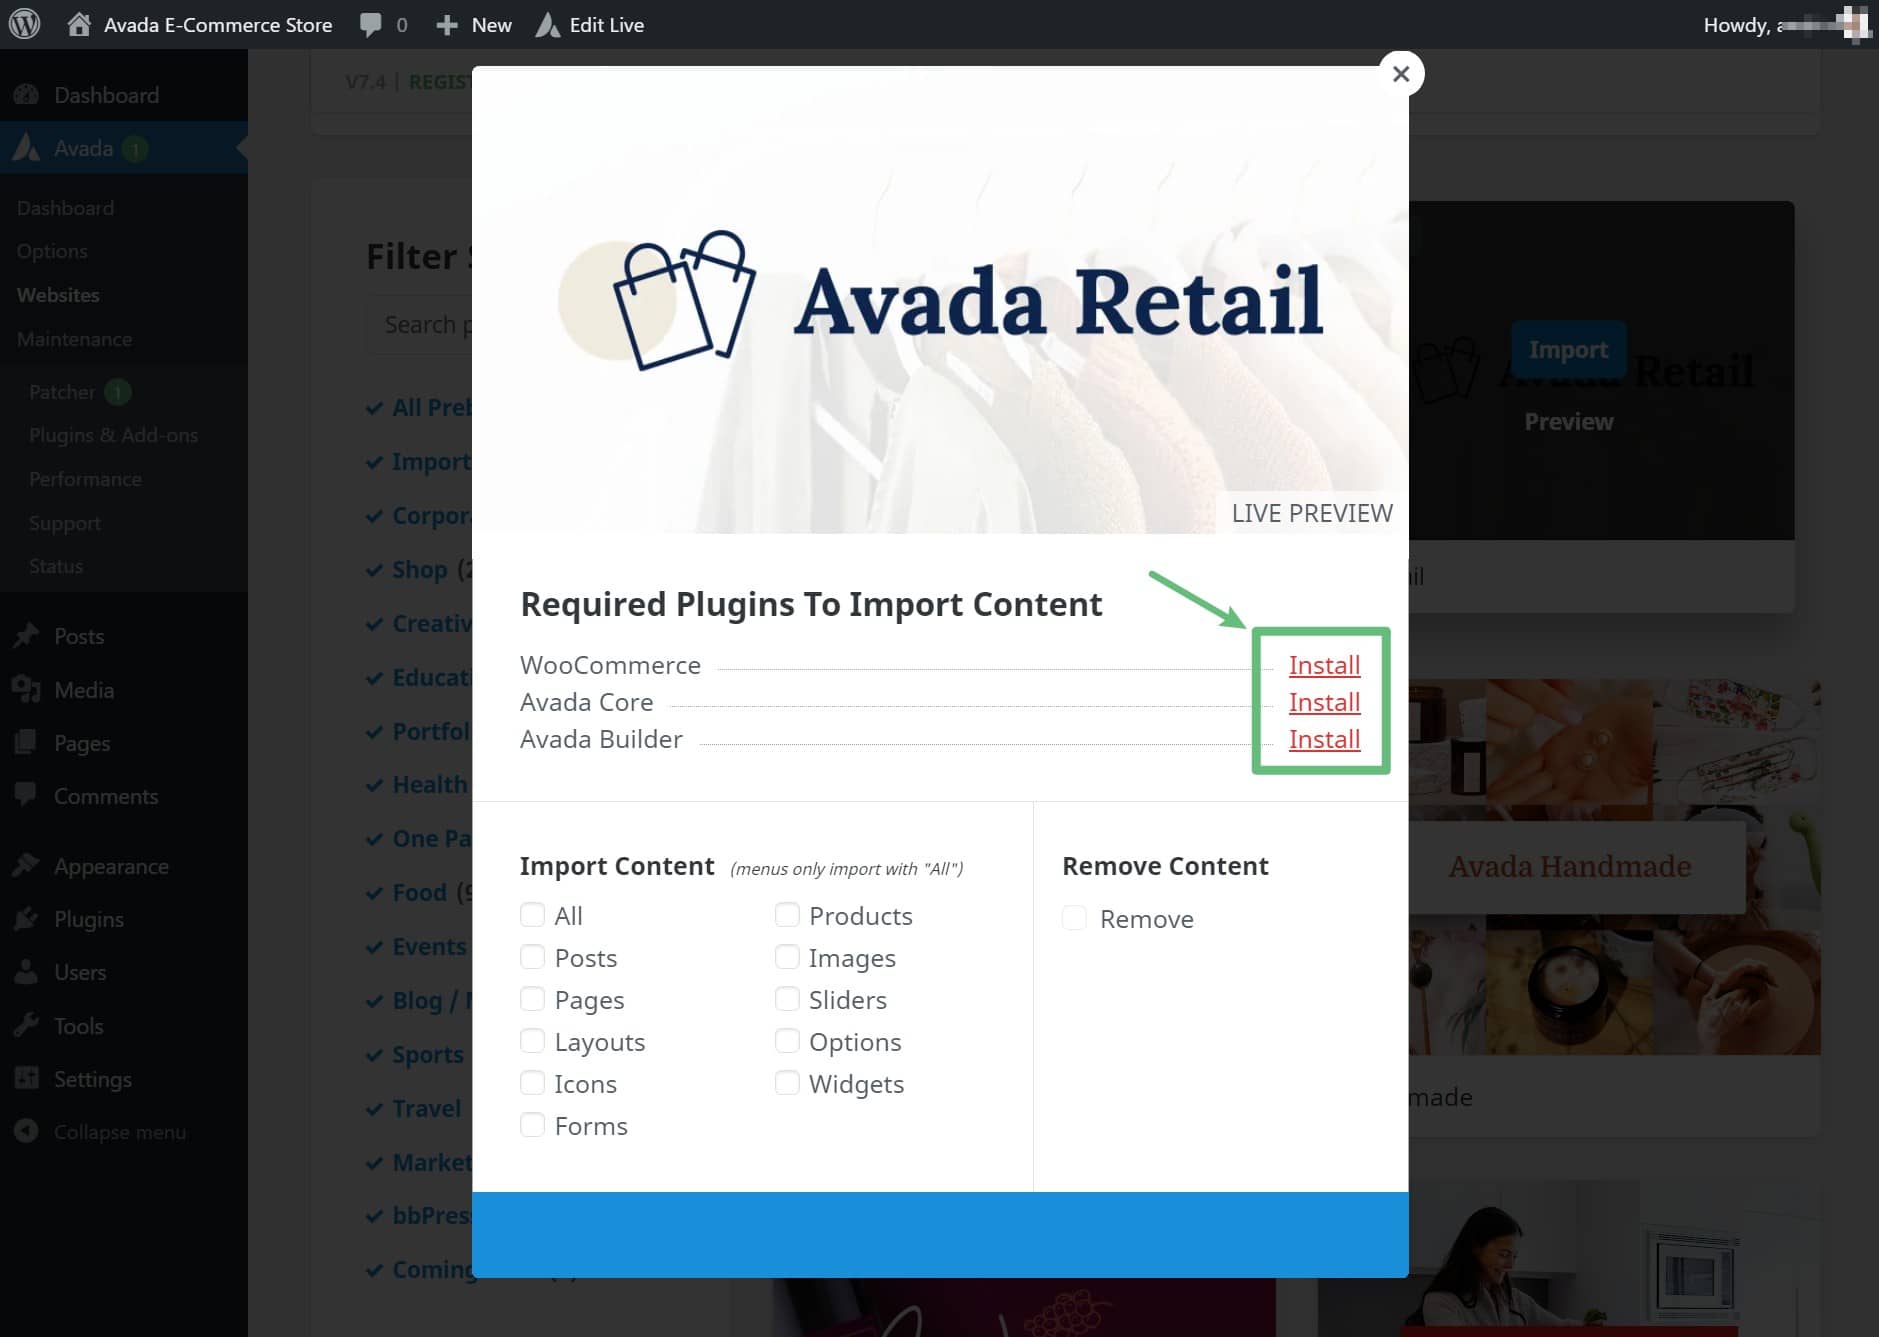
After doing that, the status should change to Active. Next, you need to choose what content to import. To make your site look 100% like the prebuilt site, check the box for All.
For a more targeted approach, you could only select specific types of content. For example, you might not want to import the WooCommerce demo products. You could skip this by unchecking the Products box.
With that being said, we do still recommend importing the WooCommerce demo products for now, as it will make it easier to customize the design of your store. You can delete them with just a few clicks once you’re ready to start adding your products. Once you’ve made your choices, click the Import button to complete the process:
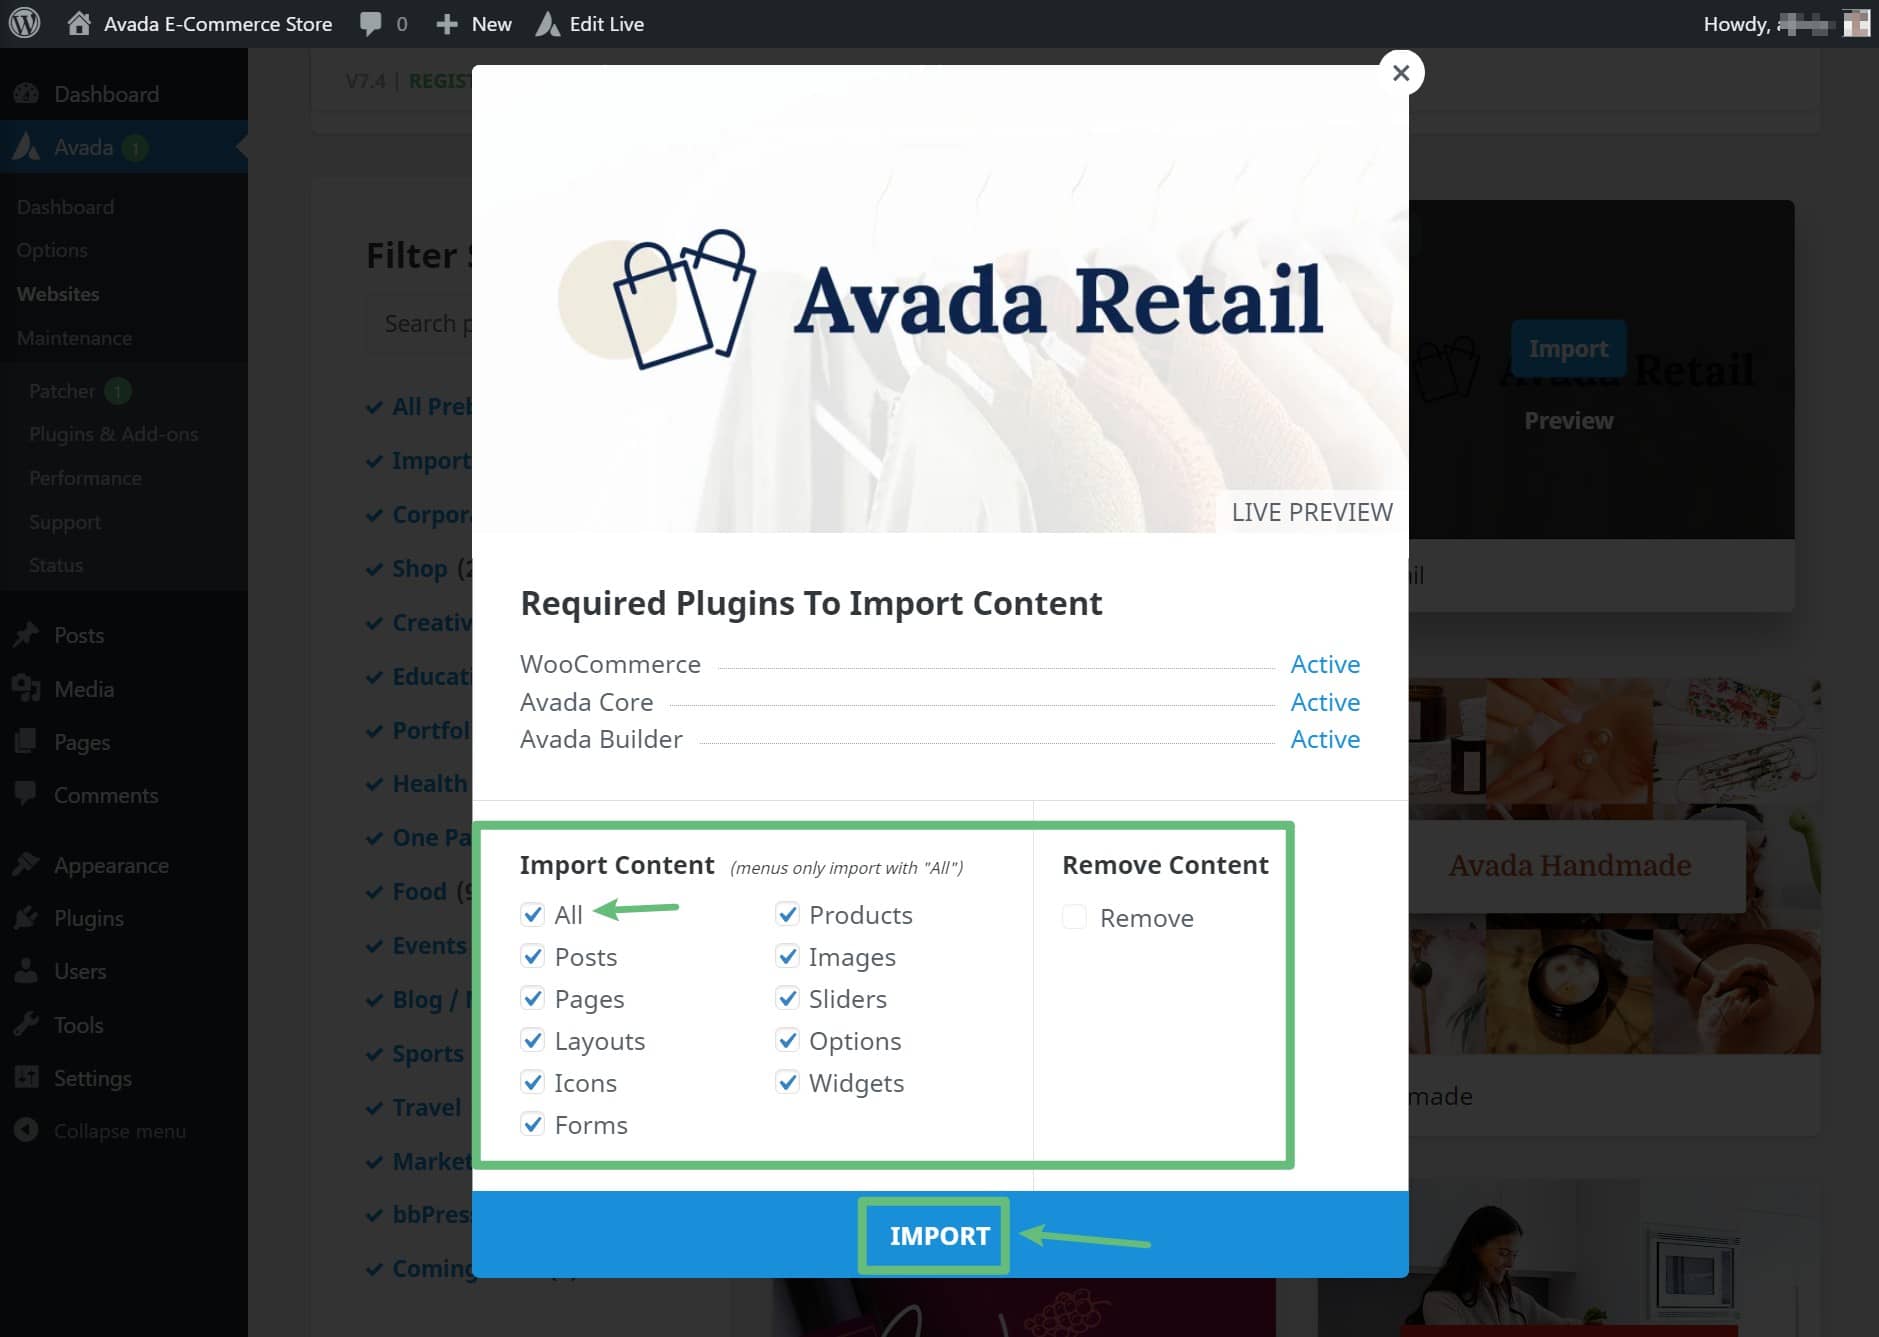
You’ll see a confirmation prompt appear – click OK to continue the process. After a short wait, you should see a success message. That means your store is ready to go!
How to Customize Avada for eCommerce
The nice thing about using an Avada prebuilt site for eCommerce is that Avada handles the basic setup.
You’ll not only have a conversion-optimized design, but Avada will also take care of creating the basic eCommerce pages like the shopping cart, checkout, etc.
Avada also gives you complete control over all aspects of your store, so you can customize content and build product layouts as you require. You’ll be able to make all these changes using Avada’s intuitive WooCommerce Builder.
If you’re not familiar with how the Avada Builder works, we have a lot of material that can help you get up and running. Here are two good places to start:
You’ll be able to use the Live Visual Builder to design the essential shop pages, for example, your primary “Shop” page, which is the page that lists all of your products. And, to change the layouts, adjust the styling, choose which products to feature, and more:
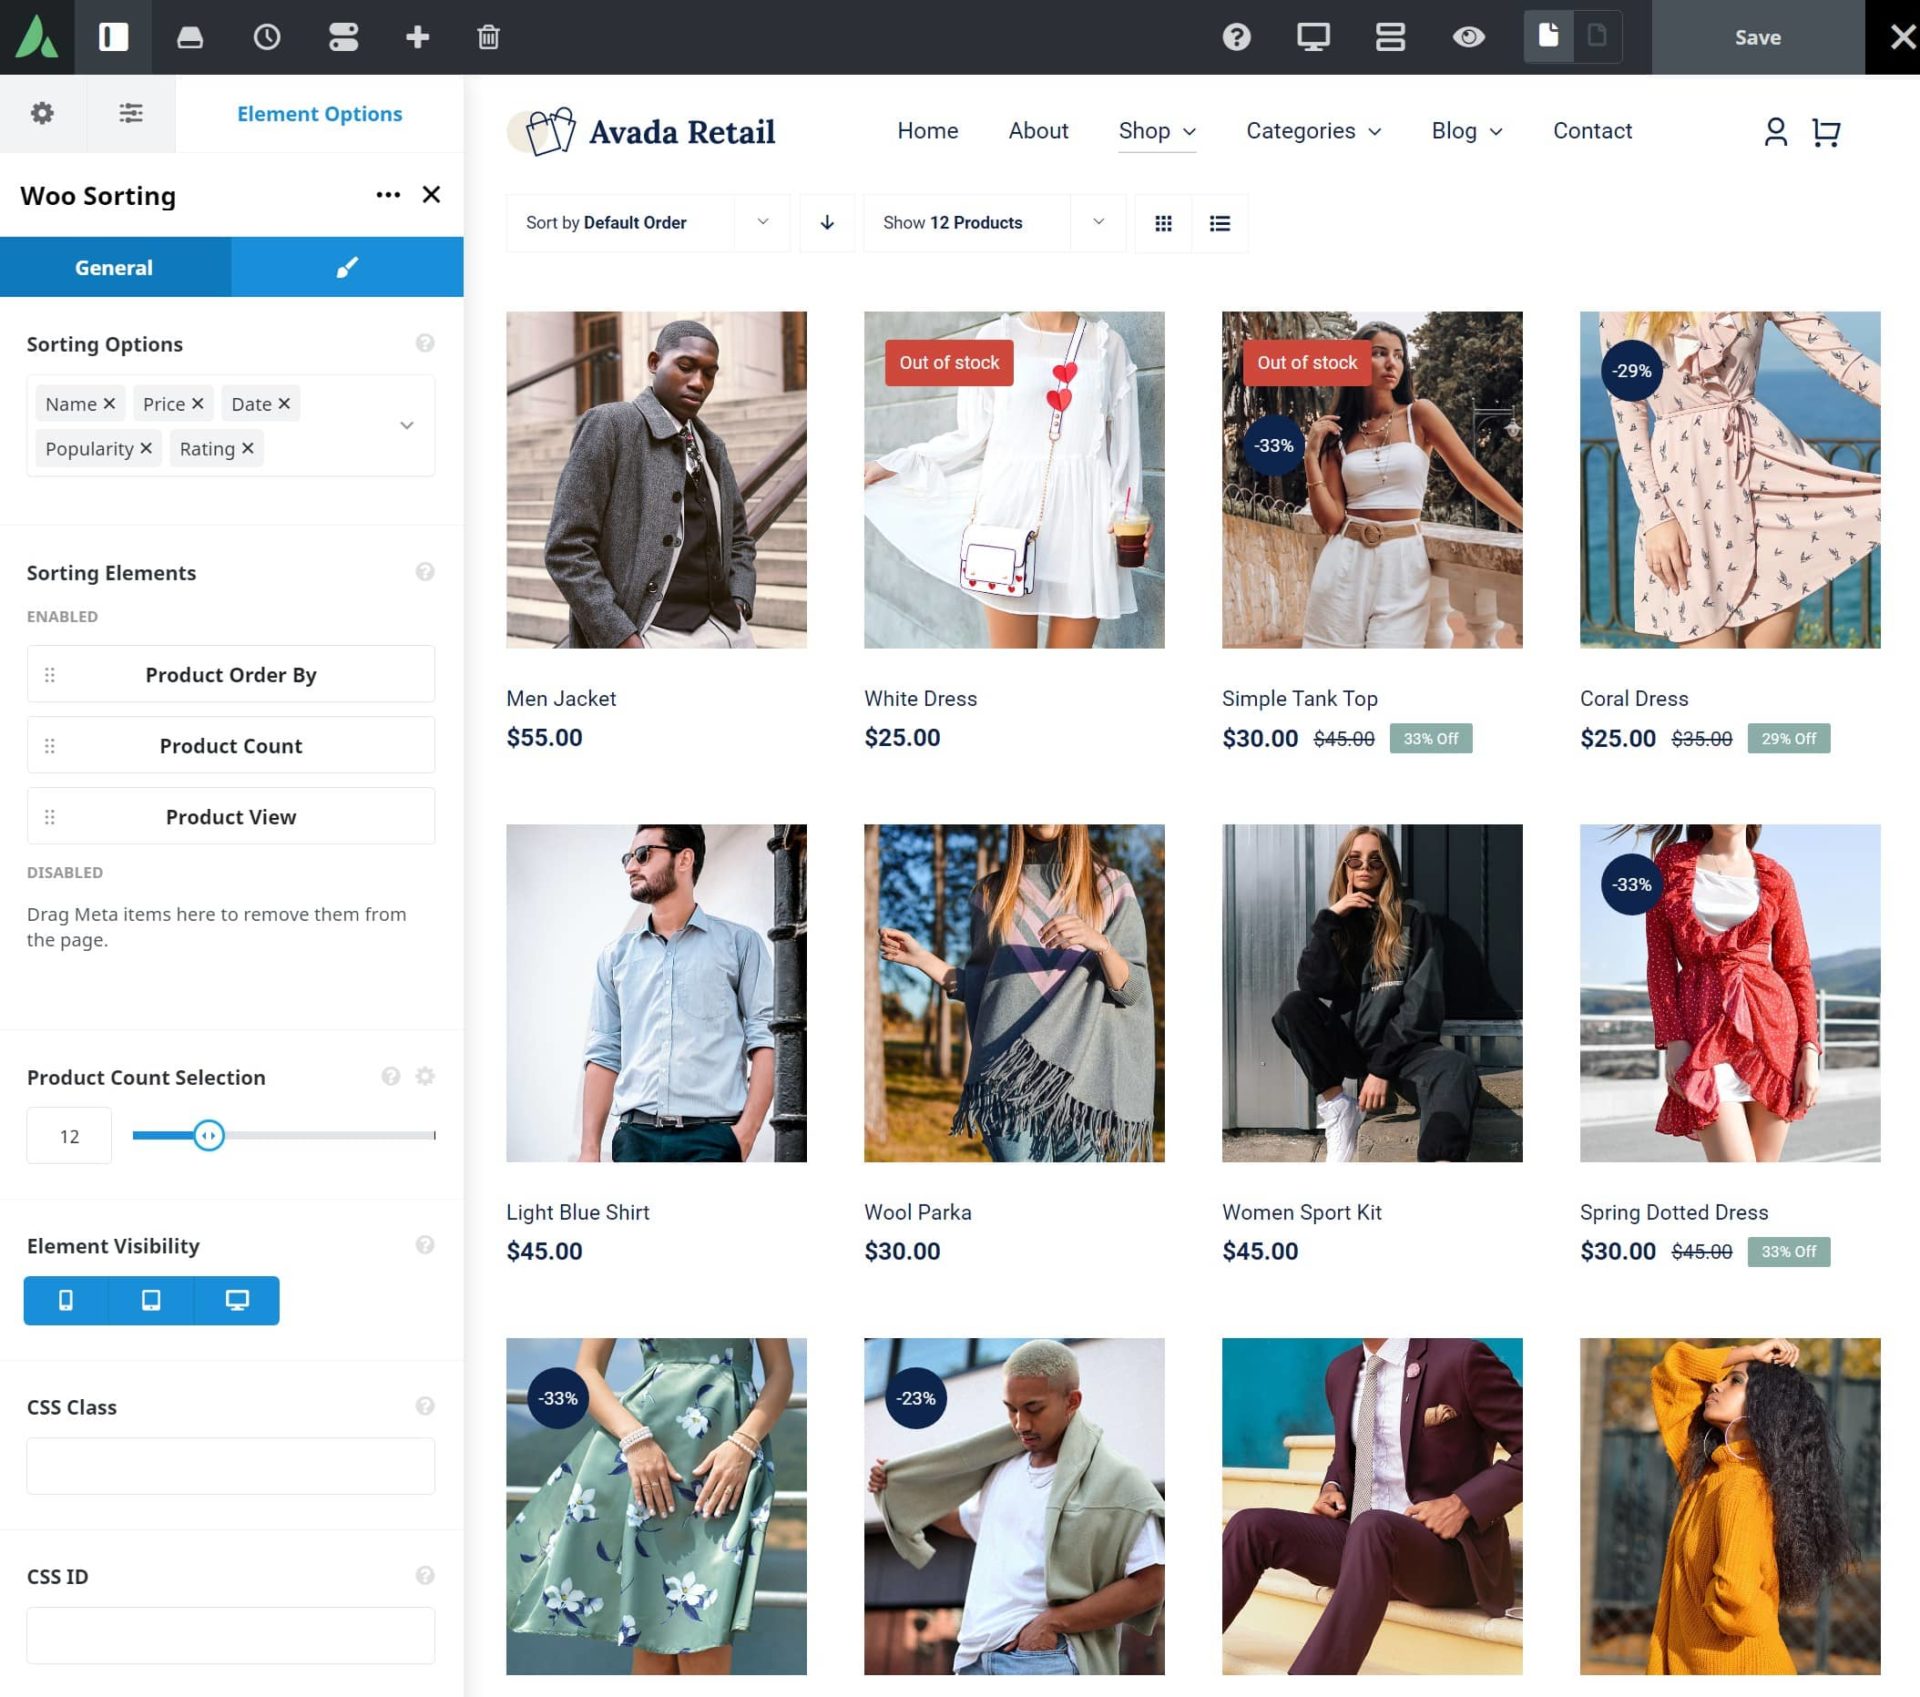
In addition to the shop page, you’ll be able to customize:
You can learn more in this article on the Avada WooCommerce Builder. Beyond that, you can also access dedicated WooCommerce settings in the Avada settings. You can access these from the Global Options area in the Avada Builder, or you can go to Avada → Options in your WordPress dashboard. Feel free to adjust the prebuilt site content as much as needed to get the perfect look for your online store.
How to Choose the Best Plugins for Your eCommerce Website
Plugins are going to play an essential role in your store. Many WordPress websites use plugins, but eCommerce stores can usually use more plugins dependant on requirements. For example, you may need plugins to account for features like payment gateway integrations, shipping integrations, eCommerce marketing, etc.
The basic plugin that all eCommerce stores need is WooCommerce, which you already installed when you imported your Avada prebuilt website. WooCommerce is essential for your online store – so important that we’re going to dedicate the next post in our series to WooCommerce entirely. So – we’re certainly not forgetting about WooCommerce.
There are many non-WooCommerce plugins that eCommerce stores need, too. In general, you’ll want plugins to:
Here are some common plugins that online stores should consider:
There are also many useful WooCommerce extension plugins, but we’ll talk about these more in part two of our series.
Your store may need additional plugins beyond those suggestions, so here are some general tips for choosing the best plugins for an eCommerce site:
Next Steps: Set Up WooCommerce and Start Selling
At this point, you’ve set up a great-looking base for your WooCommerce store. You have eye-catching layouts for your shop and product pages, as well as critical areas like your cart and checkout.
What you don’t have yet, though, is a functioning store. You haven’t set up your products, configured your payment gateways, set up shipping options, etc.
So – now that you’ve set up your base with Avada, your next step is to set up your store so that you’re ready to start selling. And that’s what we’re going to cover in part two of our series on launching your online store. Ready to start selling? Click here to go to part two of our series.


