Share
Making it as easy as possible for your visitors to find the most important posts and pages on your site is an essential task you should focus on when setting up and maintaining your WordPress website.
According to this article from HubSpot, poor navigation is right up there with slow loading times and bad design when it comes to the top reasons why visitors will abandon your website not long after they’ve first arrived. It can be hard enough to get visitors to your website in the first place. Therefore, doing all you can to keep them there makes sense. This should be a priority when creating your website and something that you work on improving continuously.
Since website navigation is vital for visitor retention and WordPress includes a pretty good menu manager tool, there is no excuse for not mastering this essential facet of your website. So, in this guide to using the WordPress menu manager, we will cover the basics of setting up a standard website menu and briefly touch on some advanced options available to design and build an engaging Mega Menu using Avada and WordPress. Let’s get started.
Overview
What Is a WordPress Navigation Menu?
A WordPress navigation menu is a customizable set of links that helps users navigate a website. It typically appears in the header or sidebar and can include links to important pages, categories, posts, and external URLs.
Menus can be created and managed through the WordPress dashboard under the WordPress Dashboard > Appearance > Menus section, allowing site owners to arrange links in a hierarchical structure, add dropdowns, and assign menus to different locations on their site. This enhances the user experience by providing precise and organized site navigation.
Examples Of Conventional Menu Placement
Typically, most websites will have a horizontal menu placed at the very top of the website, which will be the first thing your website visitors see. The example below illustrates the header menu of the Avada Real Estate prebuilt website.

A second option is to display the main navigation menu vertically on the left side of a website. The example below illustrates the header menu of the Avada Resume prebuilt website. Furthermore, you might even see menus in the footer and other areas of a website.

The list of links displayed in these menus can be fully customized. WordPress can even automatically add new items to these menus as the pages are published. Creating tiered dropdown menus and adding external links to your social media profiles or other websites is also very straightforward with WordPress.
As the main navigation menu of your website is one of the first places many visitors will click upon arrival, it’s well worth the small time investment required to learn how to set them up.
How To Set Up A Basic Website Menu
When creating your WordPress website navigational menus, in most cases, the action takes place through the menu manager tool. This feature is a core part of WordPress, which can be accessed from the admin area of your website.
However, your chosen WordPress theme will sometimes feature its proprietary menu manager interface. If so, check your theme’s documentation for information on using that custom menu system.
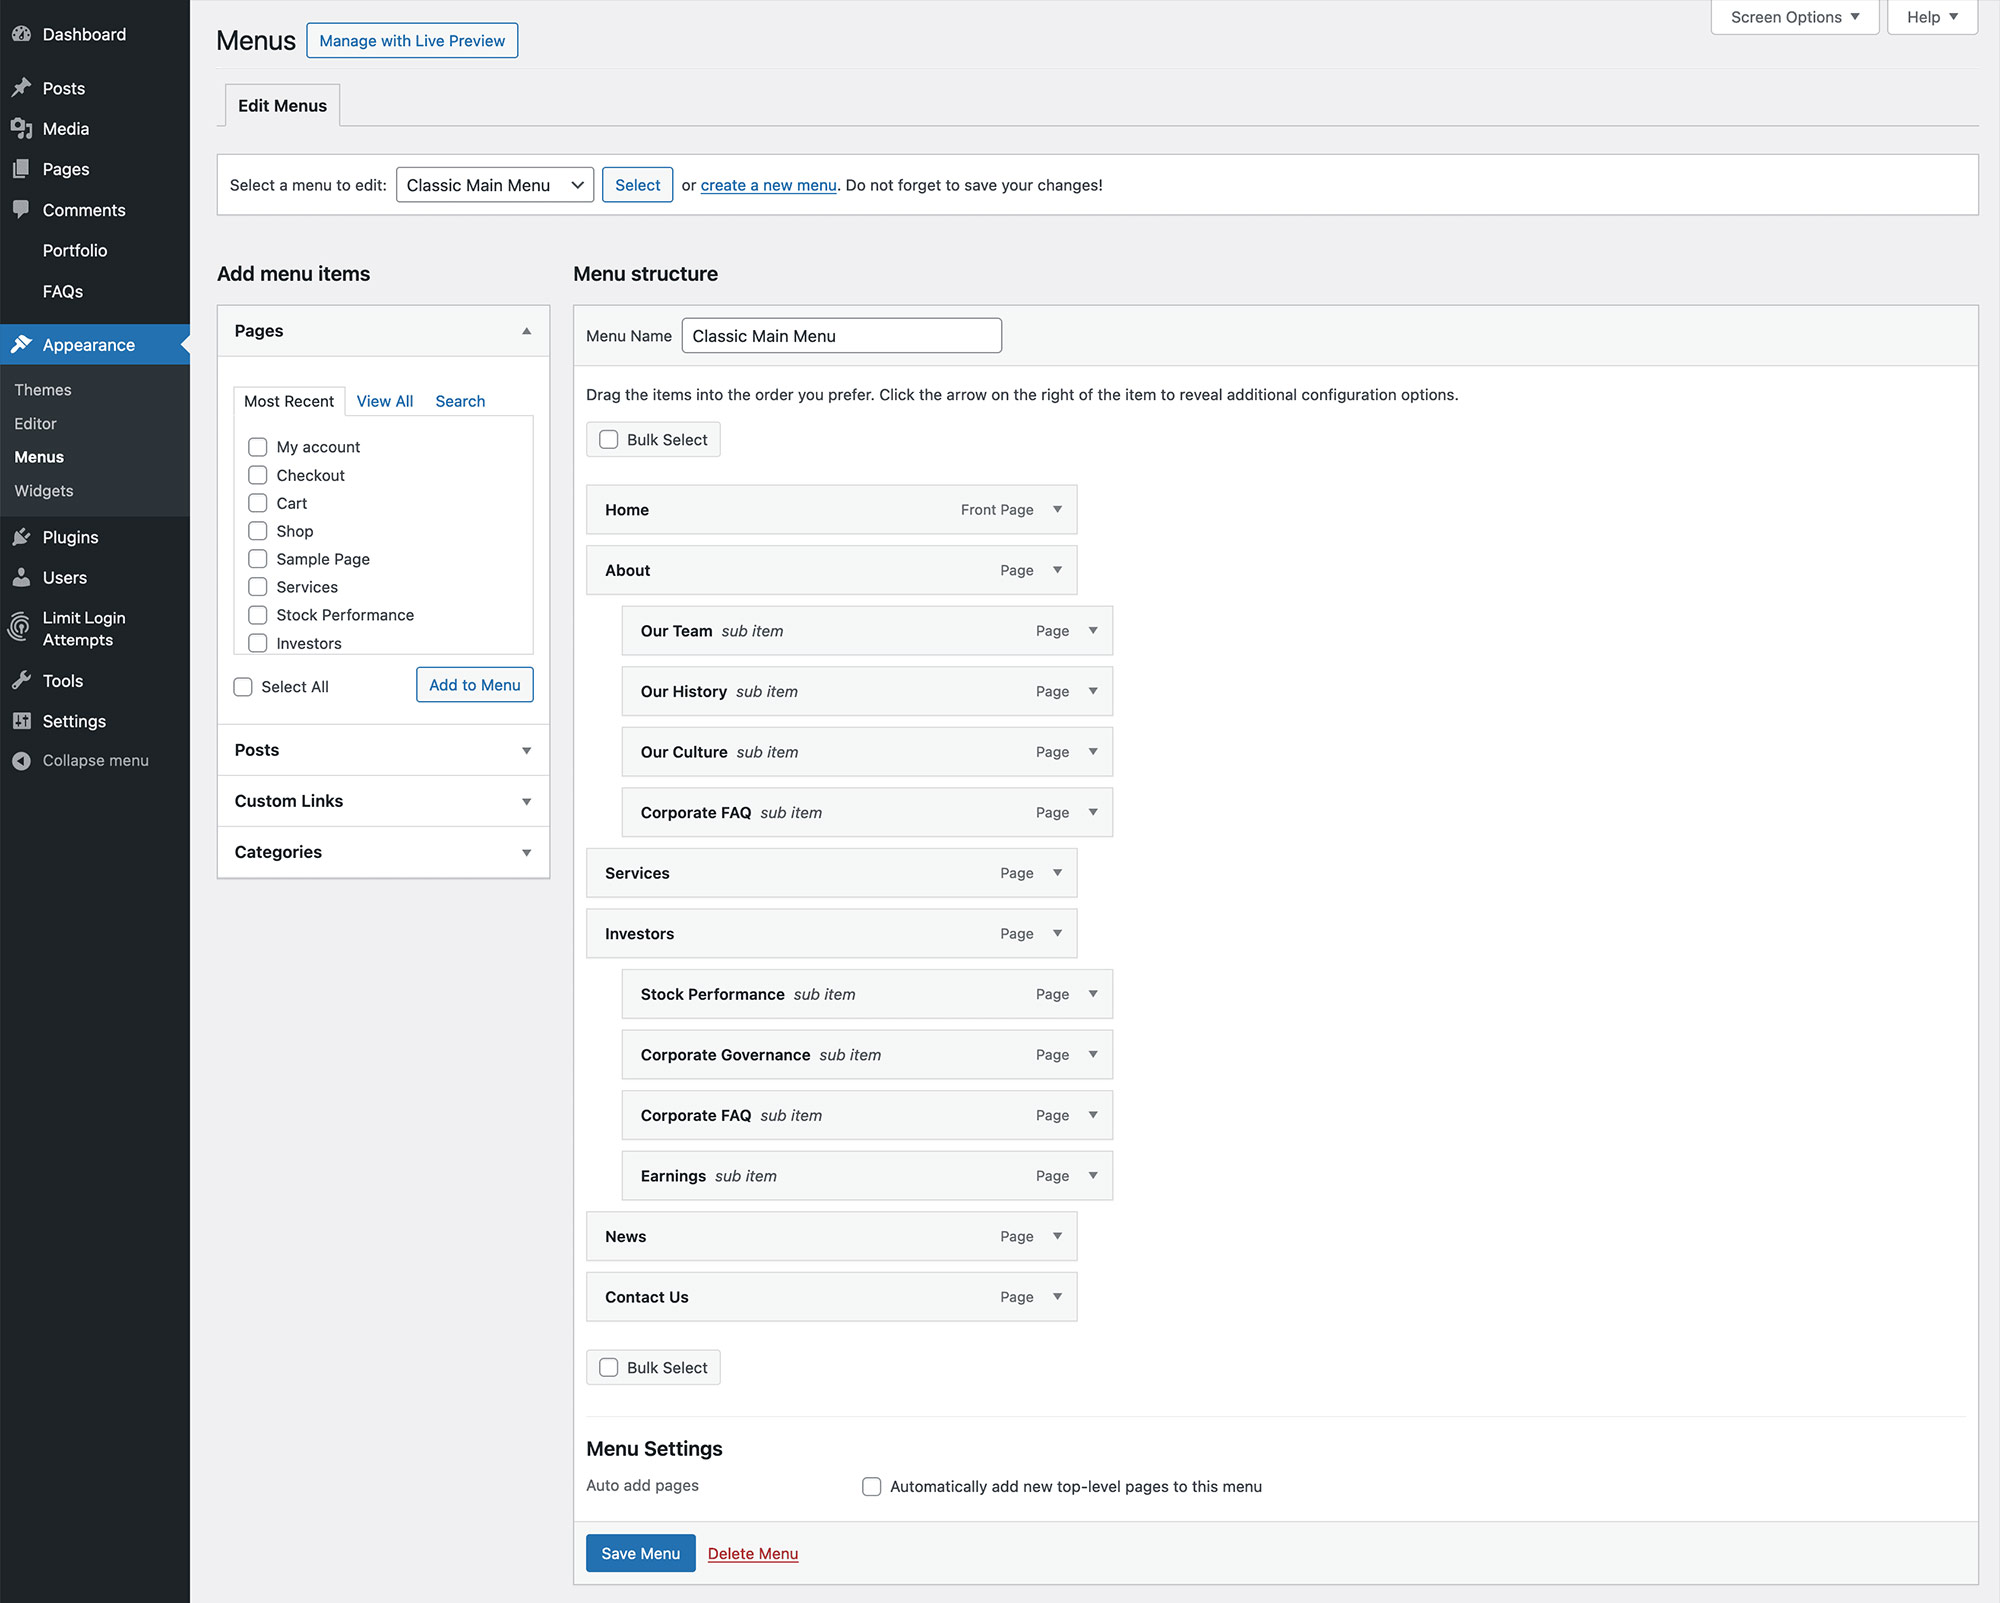
If your theme of choice relies on the core menu manager, it can be accessed by clicking on the Menus item under the Appearance menu. Doing so will take you to the page where you can create and manage the existing menus on your website.
As the menu we will now build will contain links to the published content on your site, make sure you have created the essential pages all websites should include. Otherwise, you will have nothing to add to your menu.
Creating a Menu
Again, depending on the state of your website and which theme you are using, there may already be at least one existing menu on your website. However, if you are working on a new WordPress website or want to start afresh with a new menu, click the ‘Create a new menu’ link to get started.
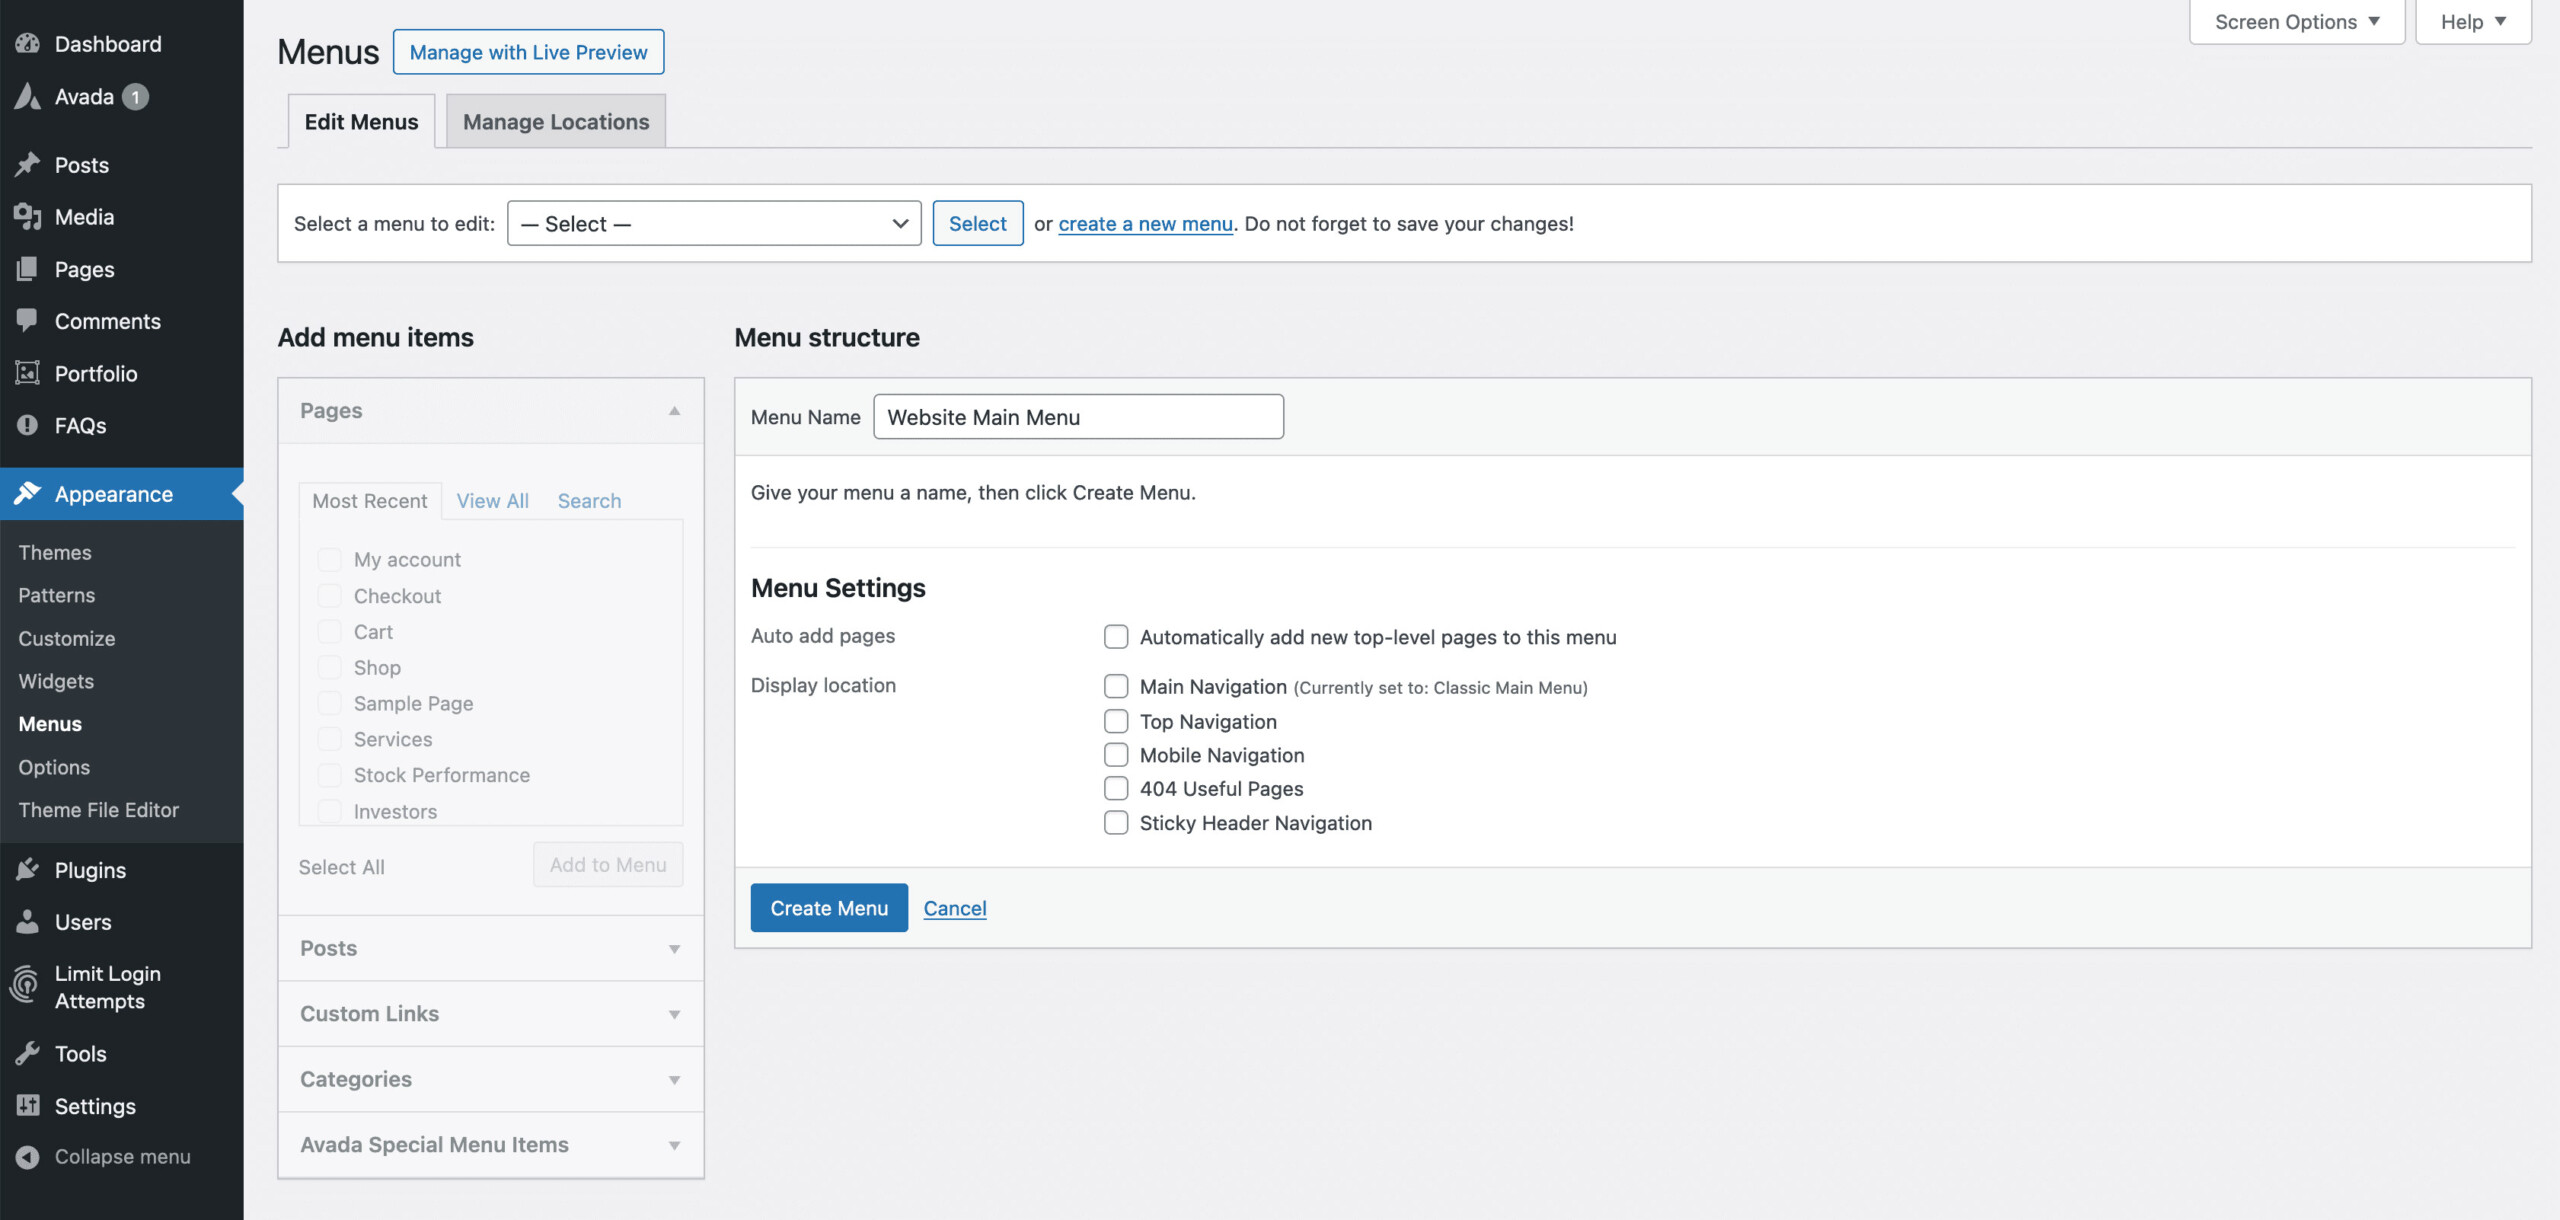
The first step is to give your new menu a name. This is just for your reference, so give it a meaningful name, such as ‘main menu,’ then hit the ‘Create Menu’ button.

Once the menu has been created, you can add items to it to build up your navigation system.
Adding and Removing Menu Items
Adding links to your published content to the menu is very straightforward. Select the items in the panels in the left column by checking them, then click the Add to Menu button.
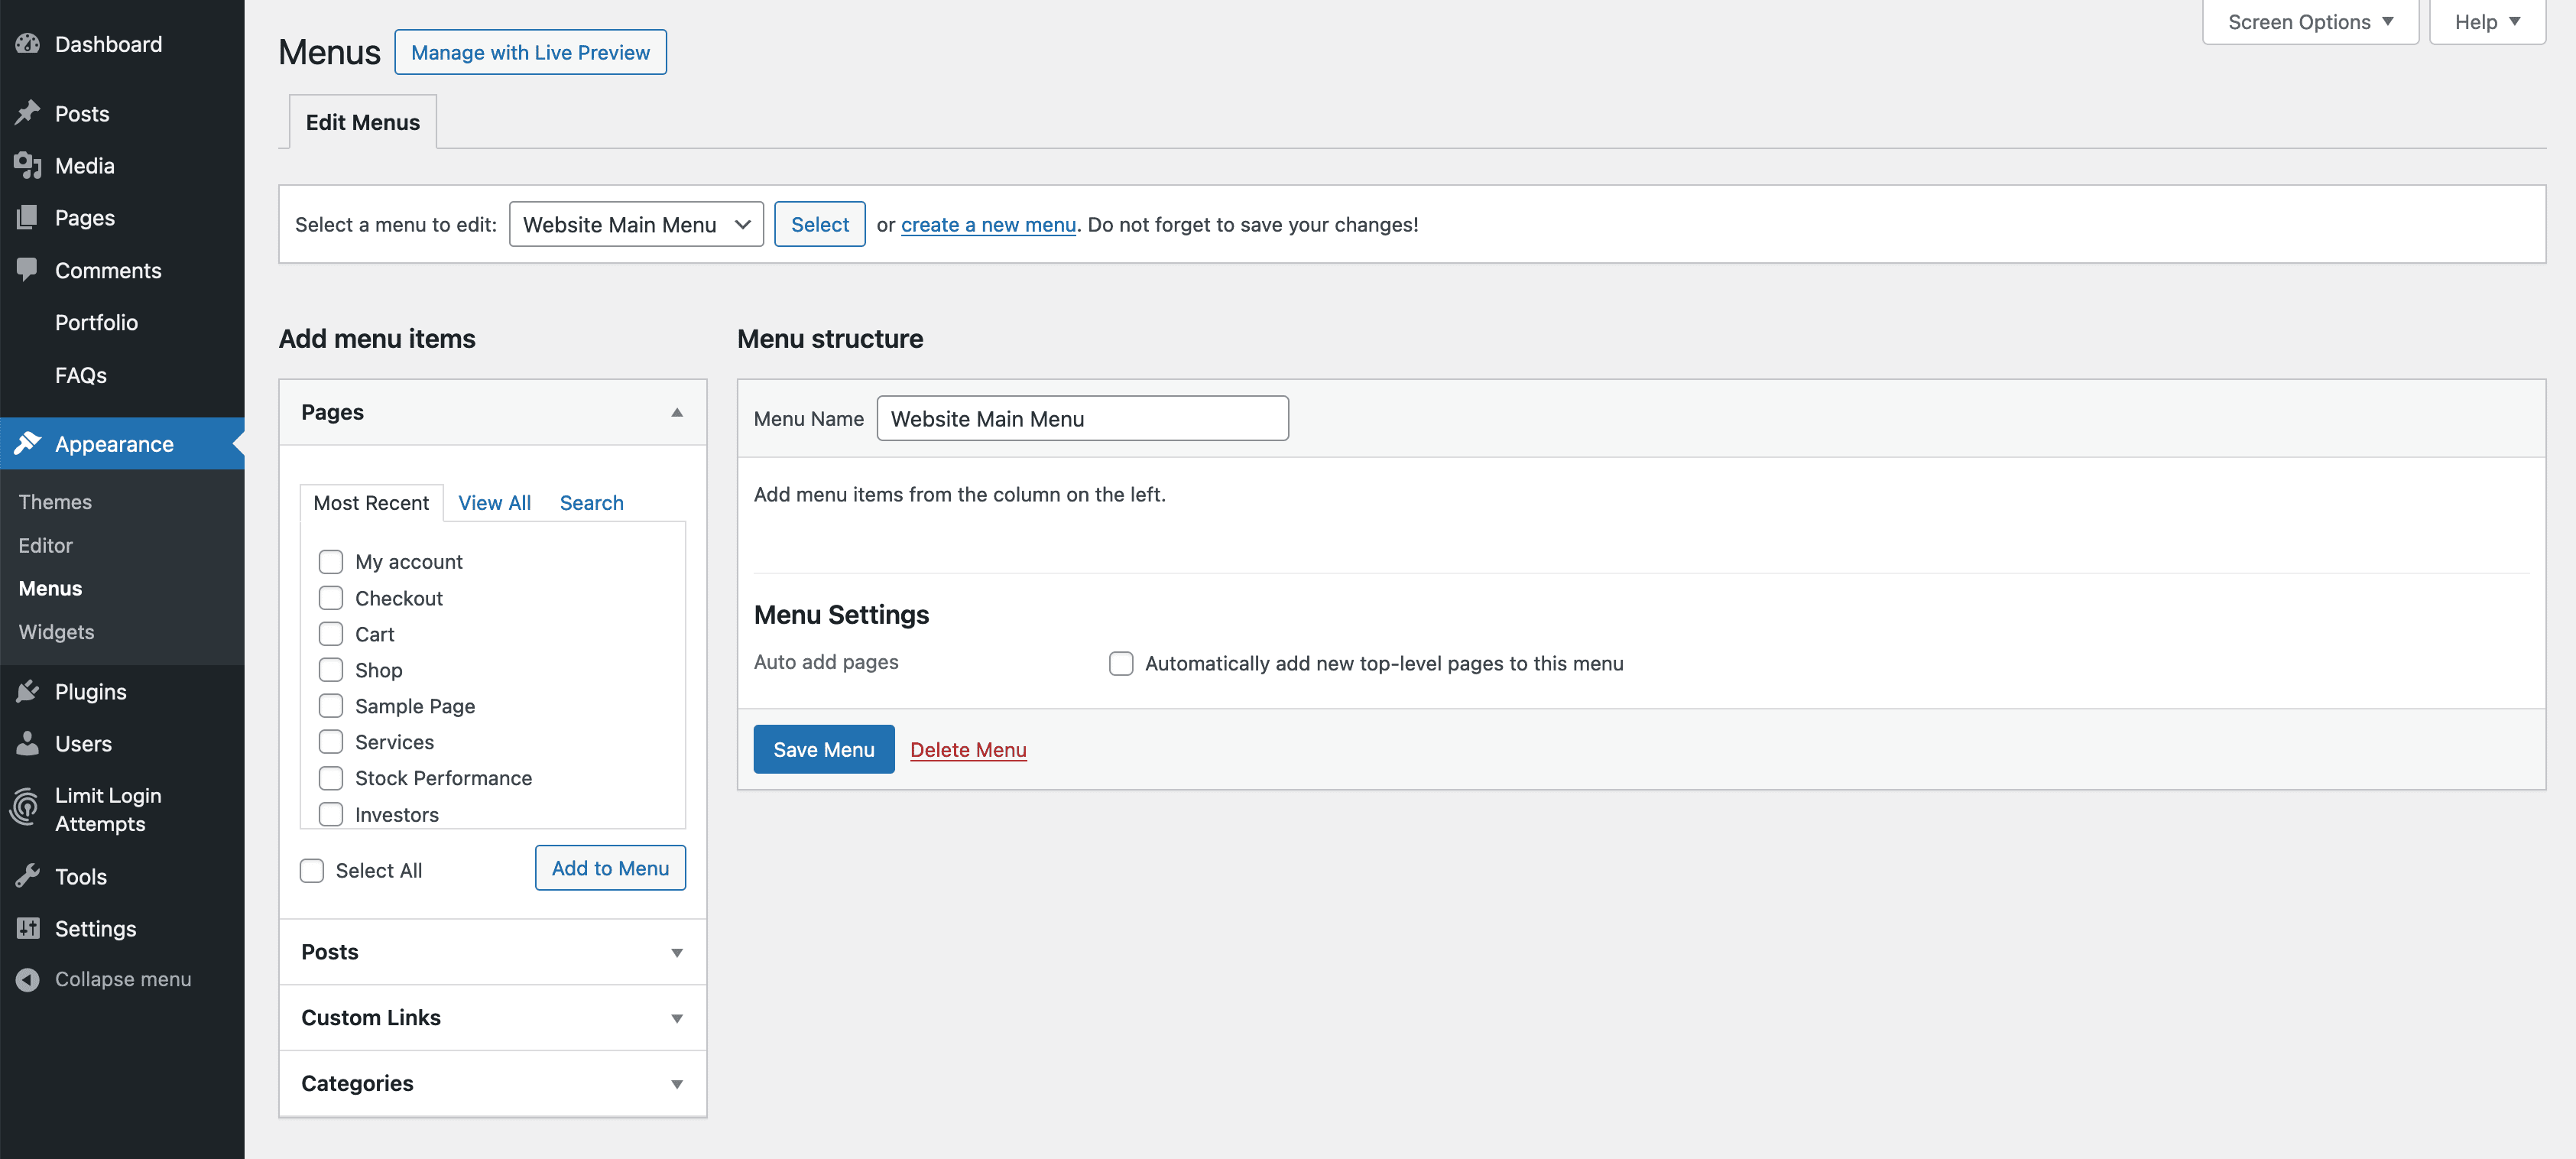
You will see Pages, Links, and Categories in the left column by default. However, if you want to add posts or tags to your menu, you can display these items by clicking on the Screen Options tab in the top right corner.

You can choose which types of content to make available from the screen options. Once you’ve added a few items to your menu, you will better understand how your navigation system is forming.
Adding Custom Links
You can add links to your website’s content, as well as external or custom links to your menu. These could include links to your social media profiles, other websites you own, recommended blogs, or other visitor resources.
To add these links, click the Links panel in the left column. From there, you can enter the address or URL of the link, as well as the link text or title for the item.
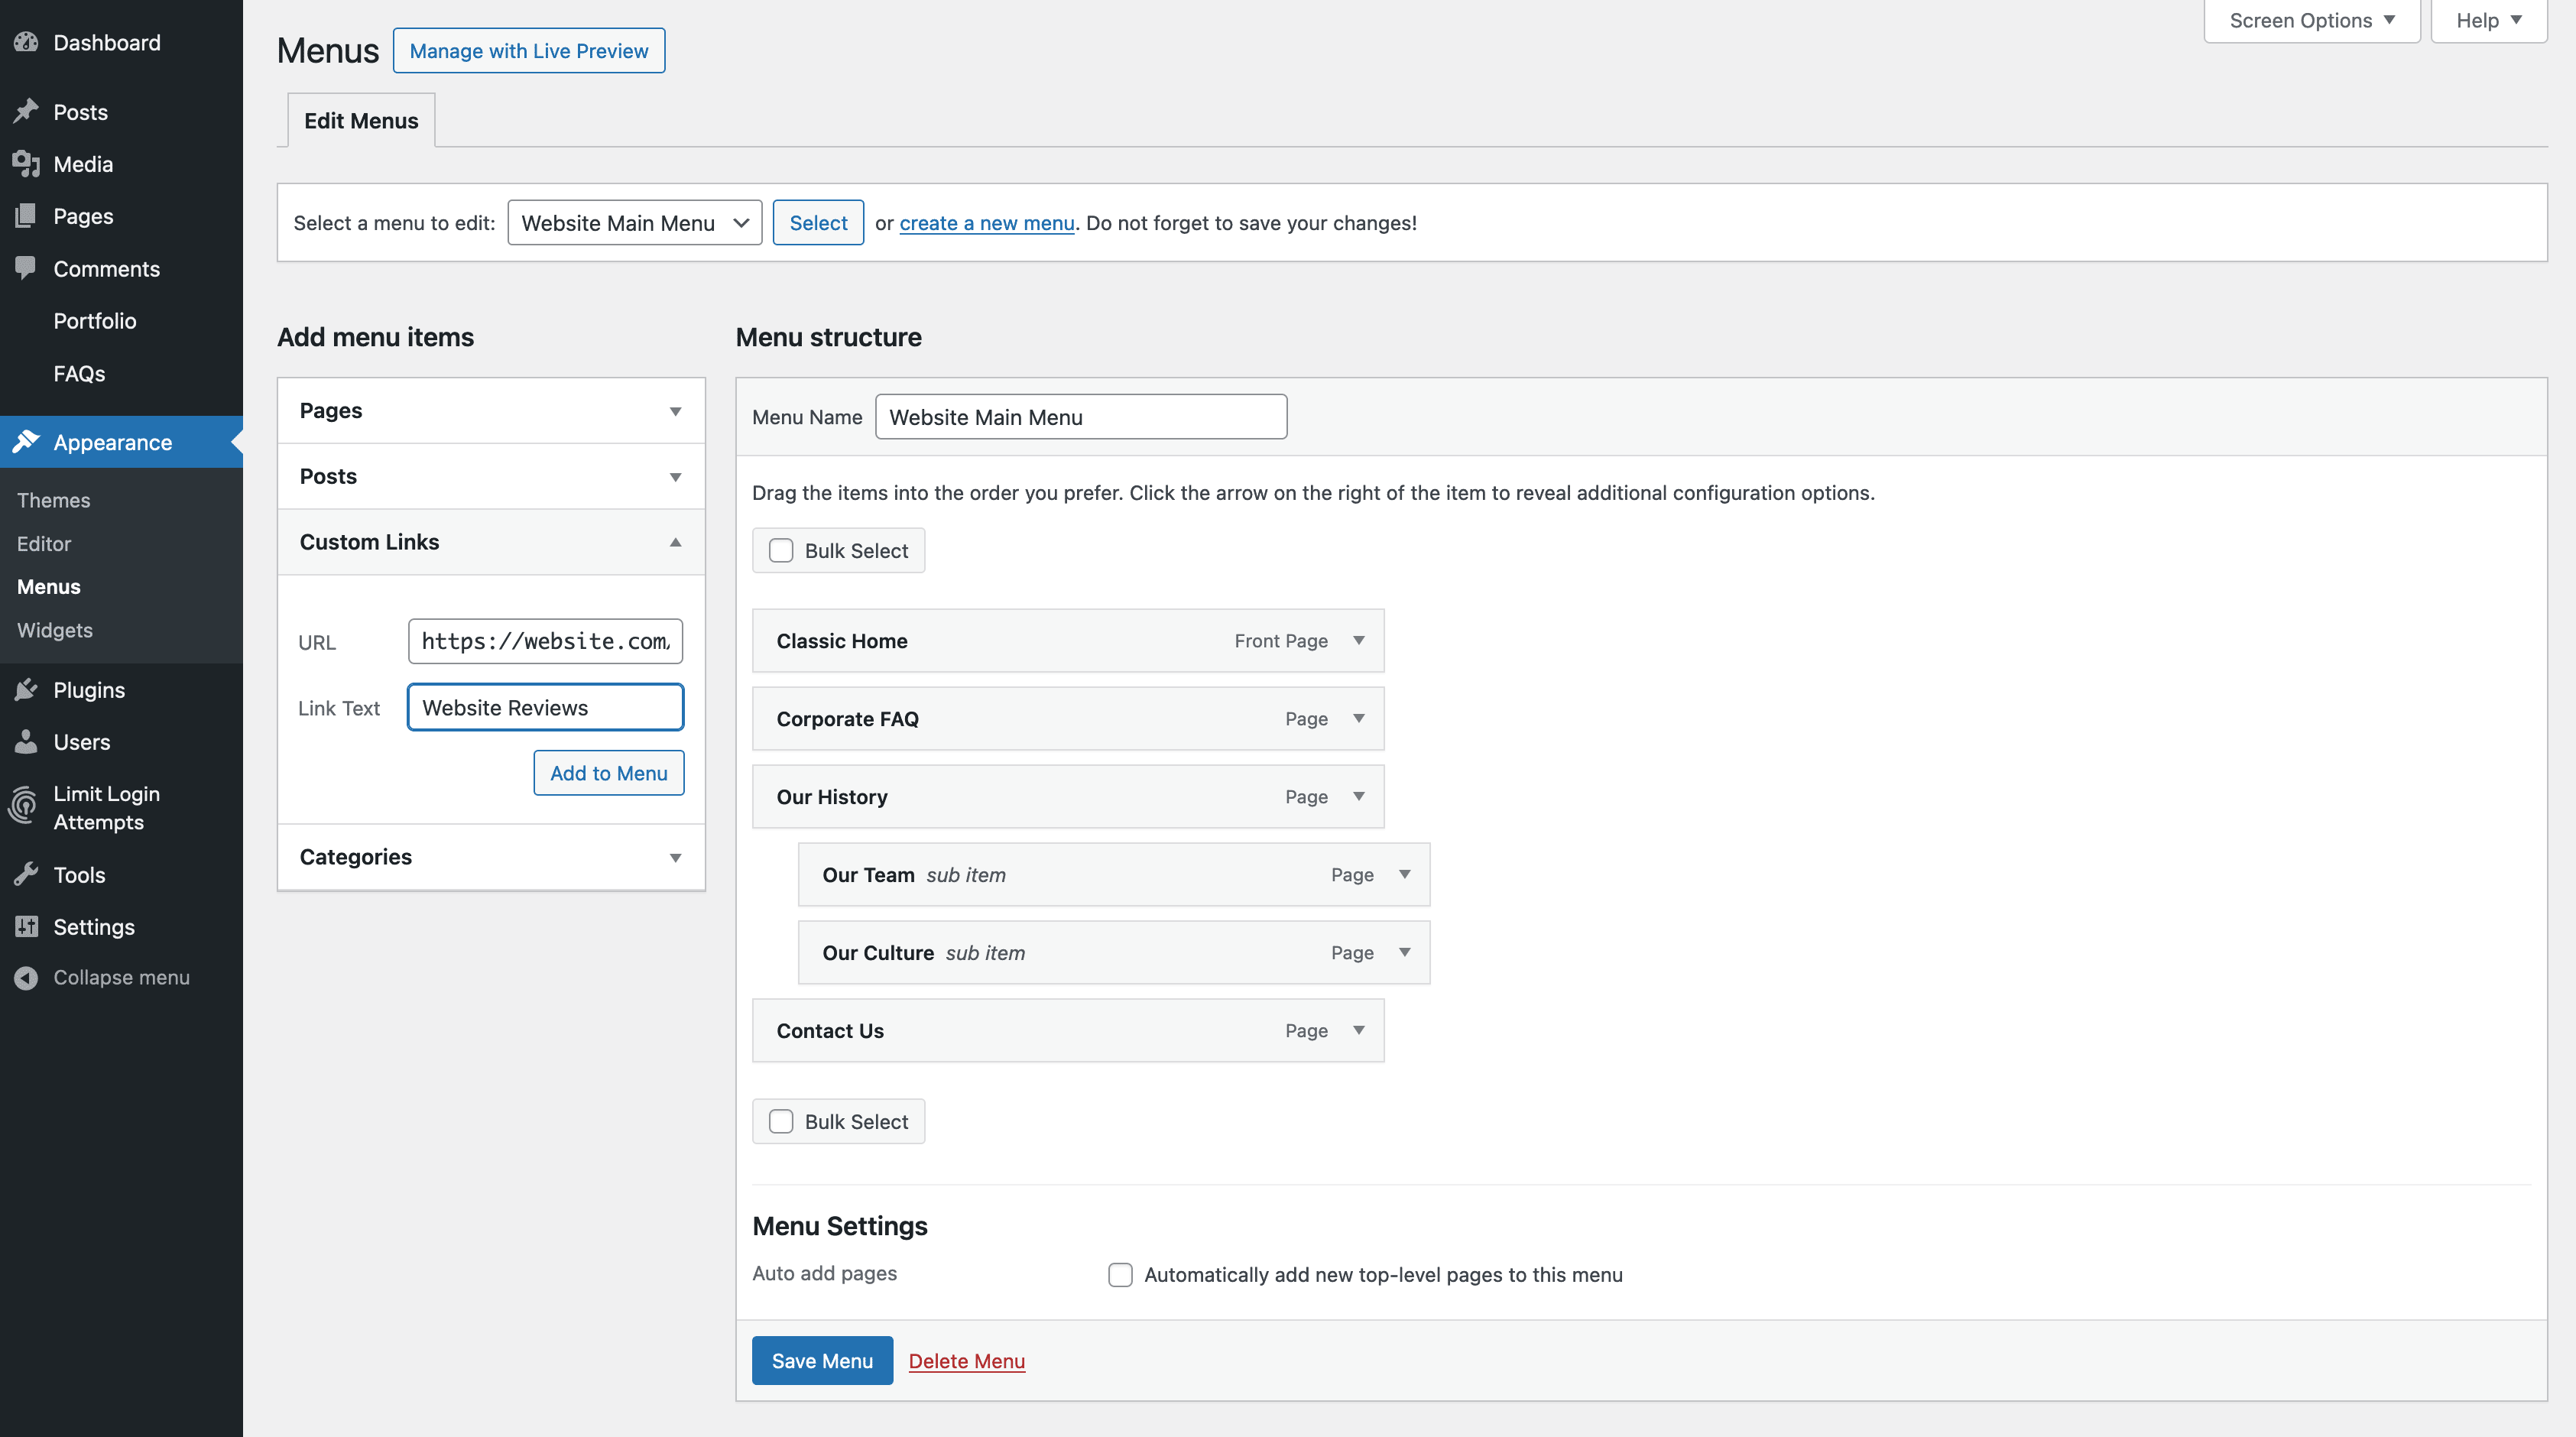
After clicking on the “Add to Menu” button, the new link will now be included in the menu. If you’d like this link, or any others, to open in a new browser window or tab, you can display this option by selecting it from the screen options settings.
After checking the “Link Target” option, you can expand the menu item to set the link to open in a new window/tab. When a visitor clicks on that link, it will open up in a new browser window or tab, leaving the current page open for later use.
Renaming Menu Items
To make your menu more aesthetically pleasing or more accessible to interpret, you can easily rename any of its items. Clicking on a menu item will display its properties. You can then edit the navigational label that is shown to your visitors.
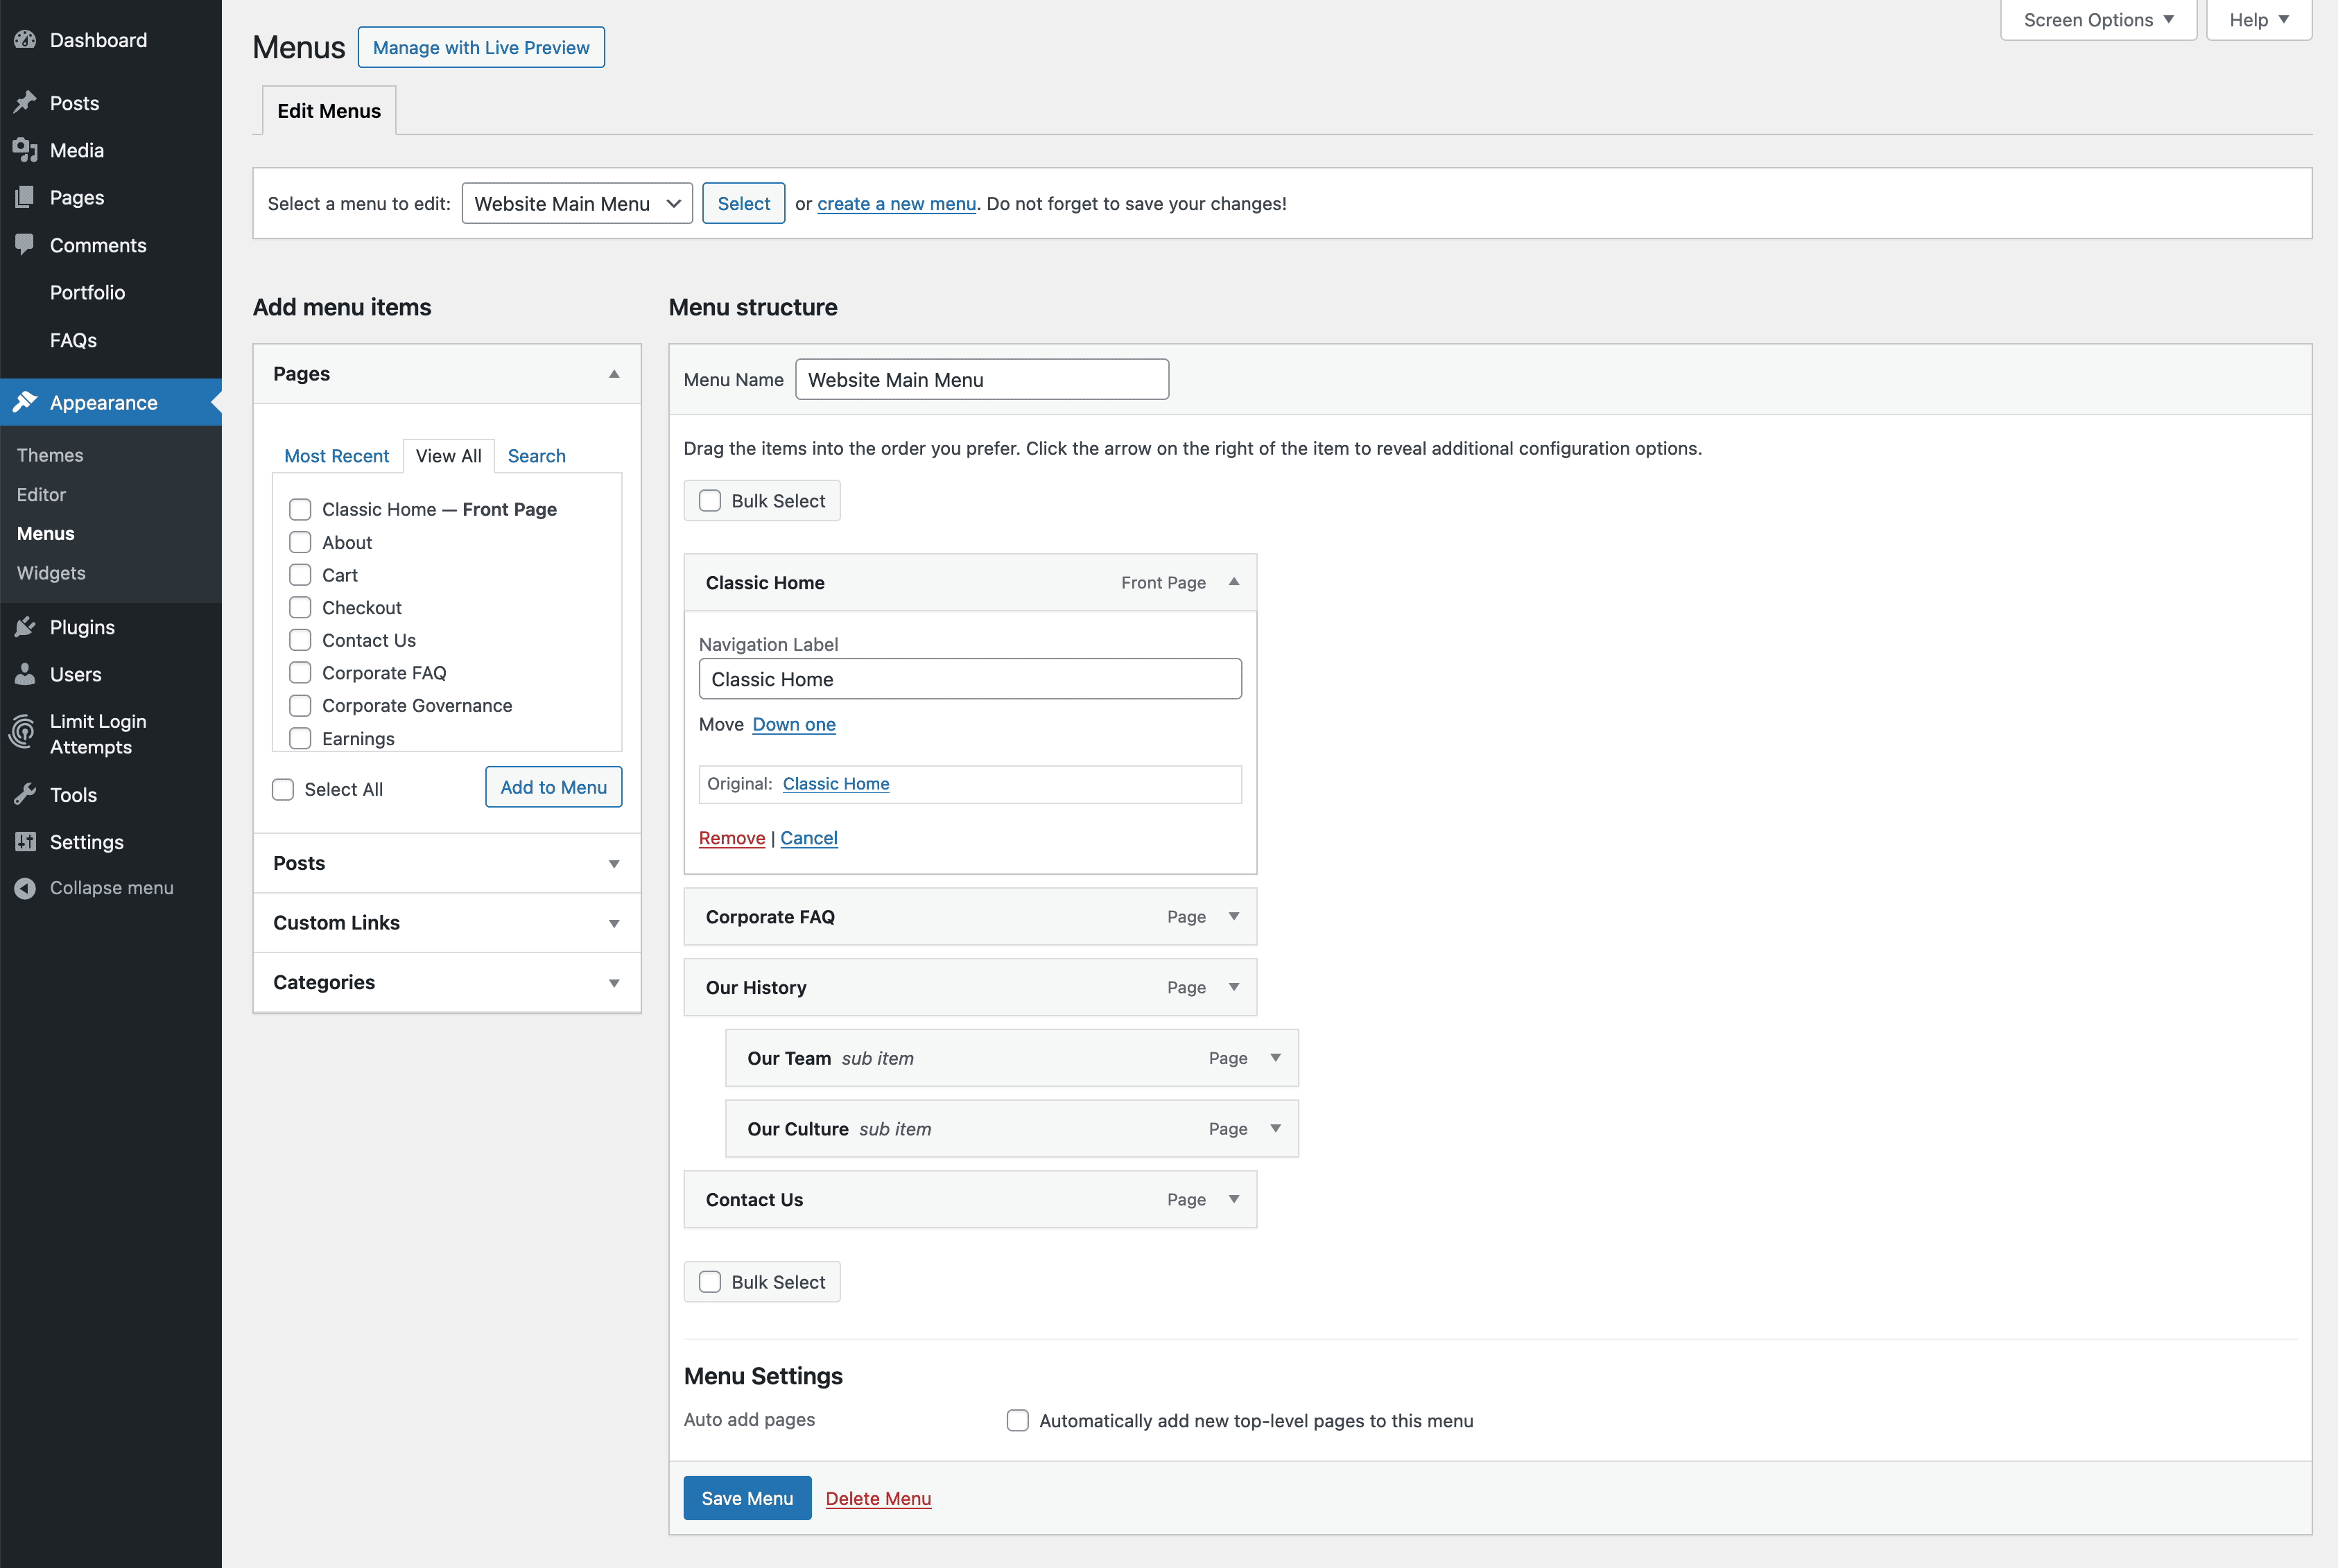
This only changes the label used by the menu and not the title of the destination page. If your menus look too crowded or it isn’t immediately clear where each link will take the visitor, being able to rename them can quickly rectify this.
Organizing the Menu Structure
Once you’ve added a few items to the menu, you will probably want to start reorganizing its items to improve the user experience. Thankfully, this is very easy and can be done simply by dragging and dropping the menu items into the desired position.

When organizing the order of your menu, the first and last items receive the most attention. Therefore, it’s a good idea to position the pages you’d like to promote the most in those locations. It is also helpful to gain some understanding of common website navigation mistakes so that you can avoid them when setting up your website.
Creating A Multi-level Drop Down Menu
To maximize the space offered by your menu, you can easily create multi-level drop-down menus. This effect can be achieved by dragging and dropping the menu items into a nested position.

Menu Settings
Now that you’ve created the foundation of your primary navigation system, it’s time to examine the menu settings.
These options determine where the menu you are working on will be displayed. Depending on your theme, you will have at least one location to choose from. It’s worth experimenting with the available locations to determine precisely where they are on your website.
There is also an option to have WordPress automatically add new pages to the menu. In most cases, you will want to leave this option unchecked as it could disrupt your carefully organized menu each time you publish a new page.
Manage Menu Locations
Once you’ve created one or more menus, you can control where on your website they are displayed from the options available from your theme.
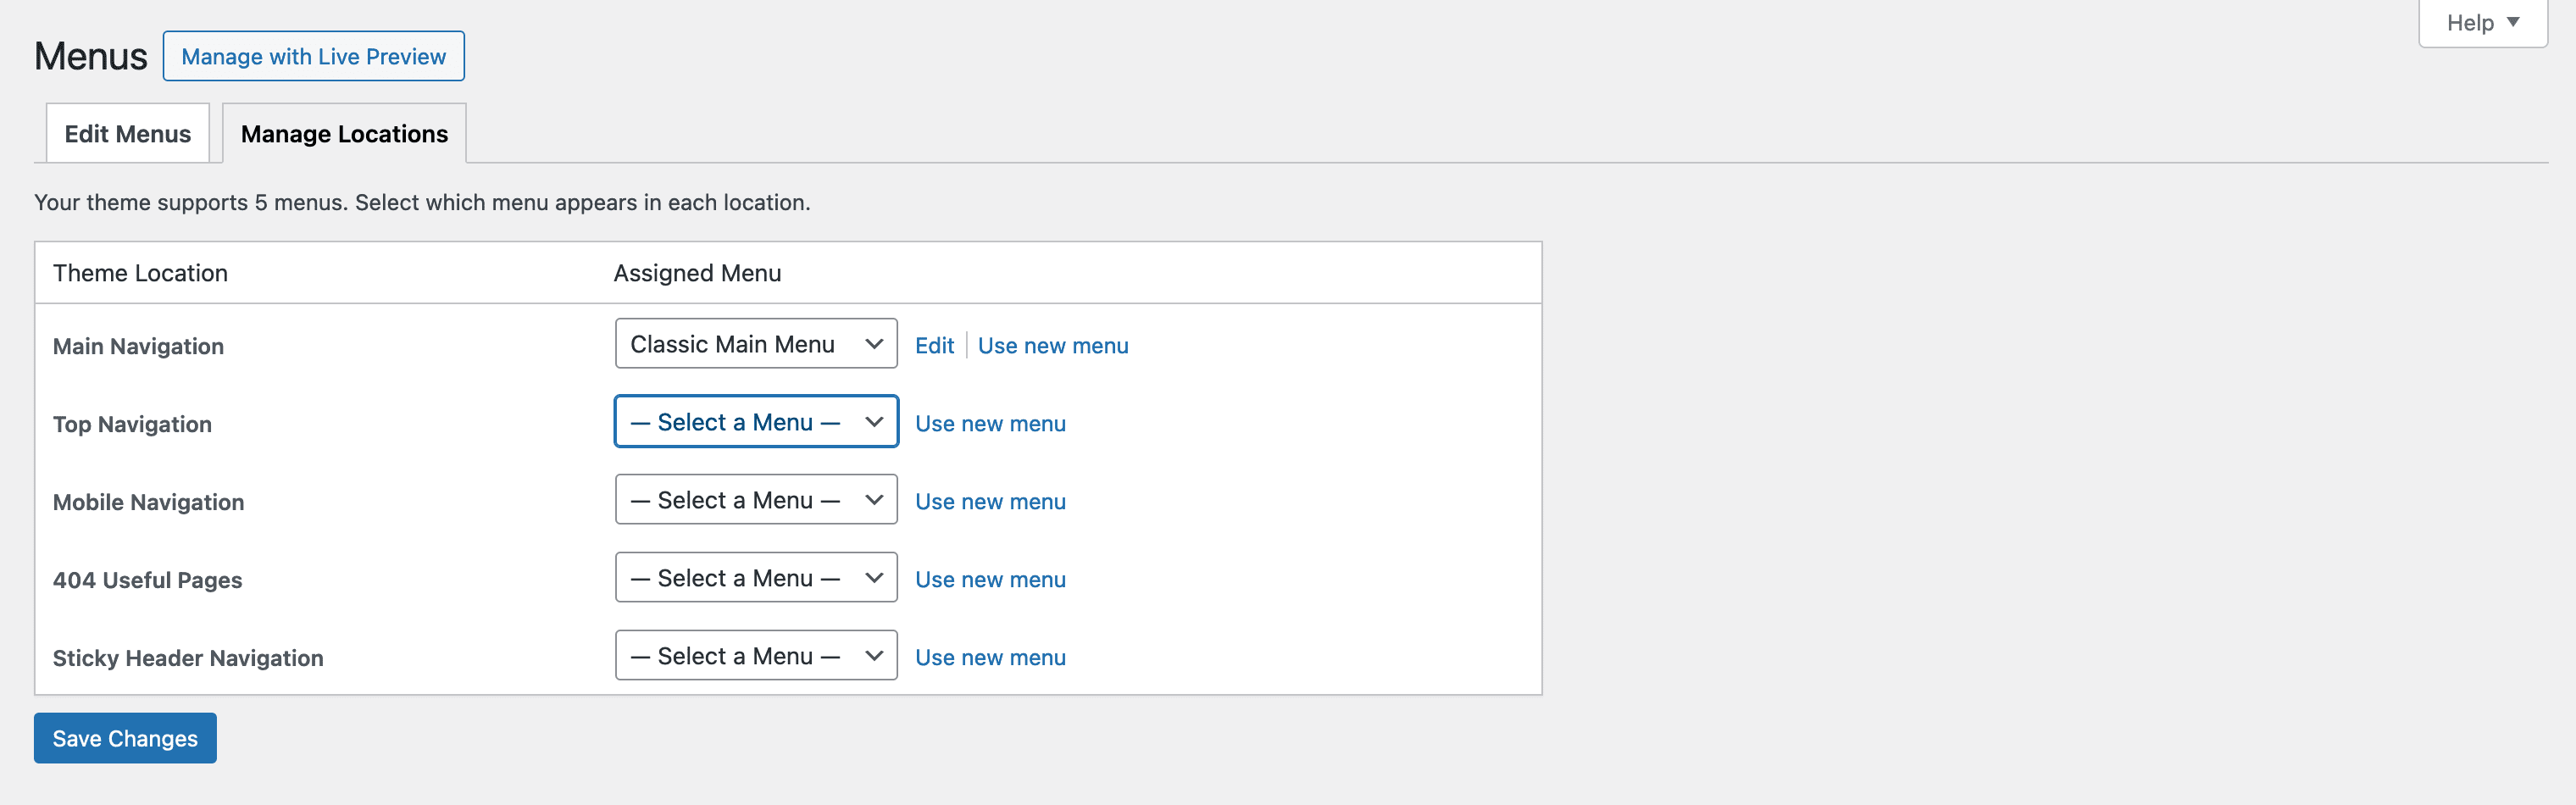
From the “Manage Locations” tab, you can select which menu to display where. This allows you to swap over the existing menus on your website quickly. After you’ve saved your changes, you can switch to the live view of your website, in order to see how your menus look.
Advanced Website Menu Options
If you are interested in more advanced menu options to enhance your website’s SEO and usability, Avada is the way to go. Avada is a WordPress Website Builder with advanced menu features that elevate the user experience. These options include:

The importance of a clear and well-thought-out website menu cannot be understated, and it will have a significant impact on your site’s SEO, accessibility, and overall customer retention. Setting up a website menu with Avada and WordPress could not be any easier. With a wide range of customization and styling options, the only limit will be your imagination.
Summary
Managing the navigation menus of your WordPress website hasn’t always been this easy. Thanks to this software’s ongoing updates and improvements, WordPress’s menu manager is surprisingly straightforward to use once you’ve become familiar with the basic WordPress menu settings.
If you are adding new content to your website on an ongoing basis, it’s a good idea to check in at regular intervals and reevaluate the posts and pages that your menu links to. The main menus are often the most used navigational aids on a website, and they can be a great way to direct your visitors to your most important content.
When setting up our menu, remember less is more. Avoid clutter and only include the essential items. While drop-down menus can remove some clutter, don’t overuse them, as they, too, like too many top-level items, can cause overwhelm. Keep your item titles descriptive, and your visitors should be able to find exactly what they are looking for as soon as they arrive at your website.