How To Use Image Masks In Avada
Last Update: August 29, 2025
Image Masks are an awesome feature in Avada. You will find them on the background tabs of the Container Element as well as in the Image Element. These masks easily enable you to constrain your images to only display through a shape, or a mask. There are lots of different masks you can apply to your images, and you can even upload your own custom masks. Read on to see how this works, and watch the video below for a visual explanation.
Container Element
With the Container Element, the masks options are on the Background > Mask tab. This is very different usage to the image element in that here, they are intended to be placed over a background image in your container, and likely in conjunction with other elements. As such, there are different shapes and options.

Mask Selection
With Containers, you have a selection of sixteen preset masks and the ability to upload your own custom mask (in svg format). Selecting a mask then reveals all the other options, with which to modify the mask.
Mask Color
All masks have a color option, and a few also have a second accent color option (as in the example above). These can be global colors, hexadcimal values or rgba values, but mostly opaque colors makes the most sense as there are options for opacity in the mask options.
Mask Style
The Mask Style option allows the mask to be inverted if required. This completely reverses where the mask itself, so that areas that were masked are now clear, and clear areas are now masked.
Mask Opacity
You can also introduce opacity into the mask with the Mask Opacity option. As you move this slider down, any solid section of the mask will become more transparent, allowing any background image to show through.
Mask Transform
There are options here for both a vertical flip and a horizontal flip of the mask (or both). So with the Mask Style and Transform options, there is an enormous amount of possibility with adjusting the mask to suit your needs.
Mask Blend Mode
Finally, you can apply a blend mode to the mask. This works in the same way other blending modes work, and allows you to choose from sixteen different blend modes
Image Element
Mask Selection
With the Image Element, you will find the Mask options on the Design tab. Currently, there are eighteen different masks to choose from, as well as the ability to upload a custom mask (in svg format).
To enable a mask for your image, simply select one of the prebuilt masks. The mask will be applied and you can then further customise its shape and position with the other mask options. To use a custom mask just click on Custom, which is the last Mask in the set, and then you can upload an image to be used as the mask. Just note that the image should be in SVG or PNG format with a transparent background.
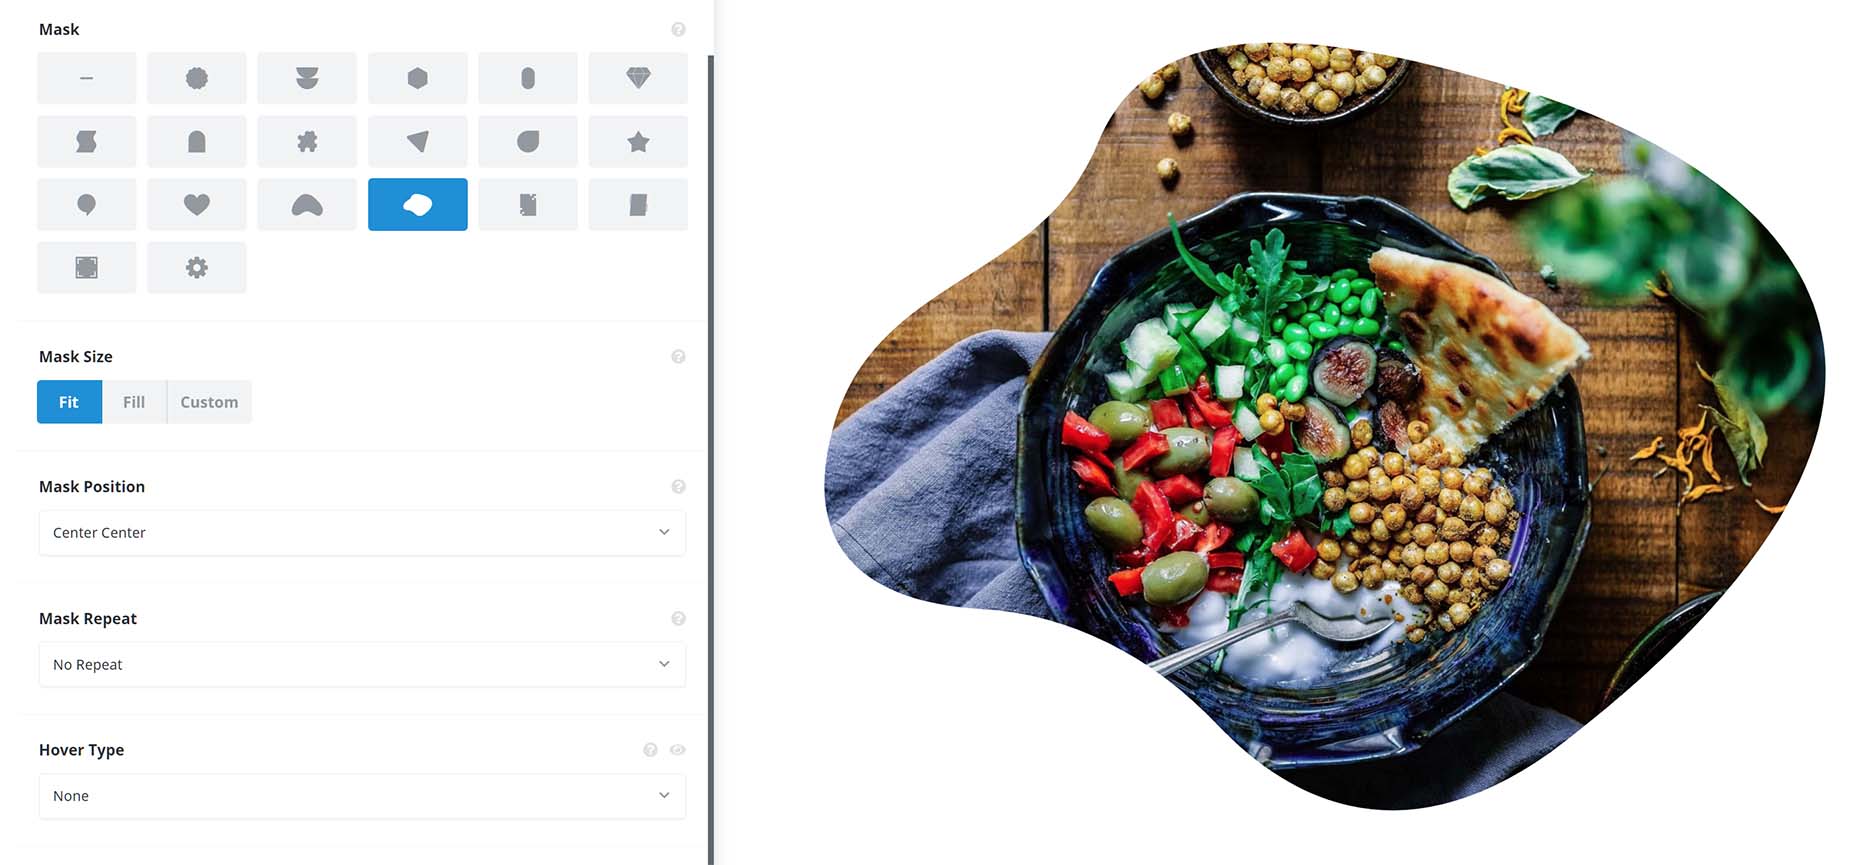
Mask Size
Once you have selected the mask, there is an option for mask size. The possible selections here are Fit, Fill, or Custom.
Fit is the default and allows the full mask to display as large as possible while at the same time making sure the full mask stays within the boundaries of the image.
Fill however, will make the mask as big as possible, so either on the left/right or on top/bottom the mask will get cut off at the boundary of the image, depending on whether the image is landscape or portrait.
Custom triggers a new option called Custom Size, which allows you to specify a size (any valid CSS unit) for the mask. The example below on the right is set to 70%.
Fit
Fill
Custom > 70%
Mask Position
Mask Position is the next option, which positions the mask over the image, and allows you to display different areas of the image. Here you have a choice of Top Center, Top Left, Top Right, Center Center, Center Left, Center Right, Bottom Center, Bottom Left, Bottom Right, and Custom.
If you choose Custom, a new option appears called Custom Mask Position, where you enter values in pairs, first for the X axis, and secondly for the Y axis, as coordinates for the position ex. 60% 50px.
Below from left to right, we have Center Center, Center Left, and Center Right. Note how different areas of the image are showing through the mask.
Mask Repeat
Depending on the Column size and the image, you might also want to employ the last Mask option, Mask Repeat. Here you have a choice of No Repeat, Repeat, Repeat X, Repeat Y, Space, and Round.
Below is an example of using the Repeat option, combined with a Custom mask size of 90px. There are many ways to use this feature, depending on your image, mask and desired outcome. As always, the best way to get to know a feature is to experiment. Go Wild!


