Using Conditional Rendering With The Current Date Condition Type
Last Update: March 31, 2026
In this document, we’re looking at the Current Date condition in conditional rendering, and how you can use it to control exactly when your content appears. You can use this for things like scheduled promotions, day-based visibility, and even time-of-day targeting.
In Conditional Rendering, the Current Date condition type takes the current date and time from WordPress, formats it using the format you choose, and then compares that value to what you enter using a relational operator. So effectively, it’s turning the current date into a formatted value, and then checking if that matches your condition.
Check out the How To Use Conditional Rendering In Avada document for general information on conditional rendering, read on to find out more about the Current Date condition type, and watch the video for a visual overview of the process.
How To Use The Current Date condition type
Render After A Certain Date
Let’s start with a simple example. Let’s say you have a container, you want to dispaly after a certain date. So, here you can go to the Extras tab of the Container, and under Conditional Rendering, click on Add New Logic, and choose the Current Date Condition Type.
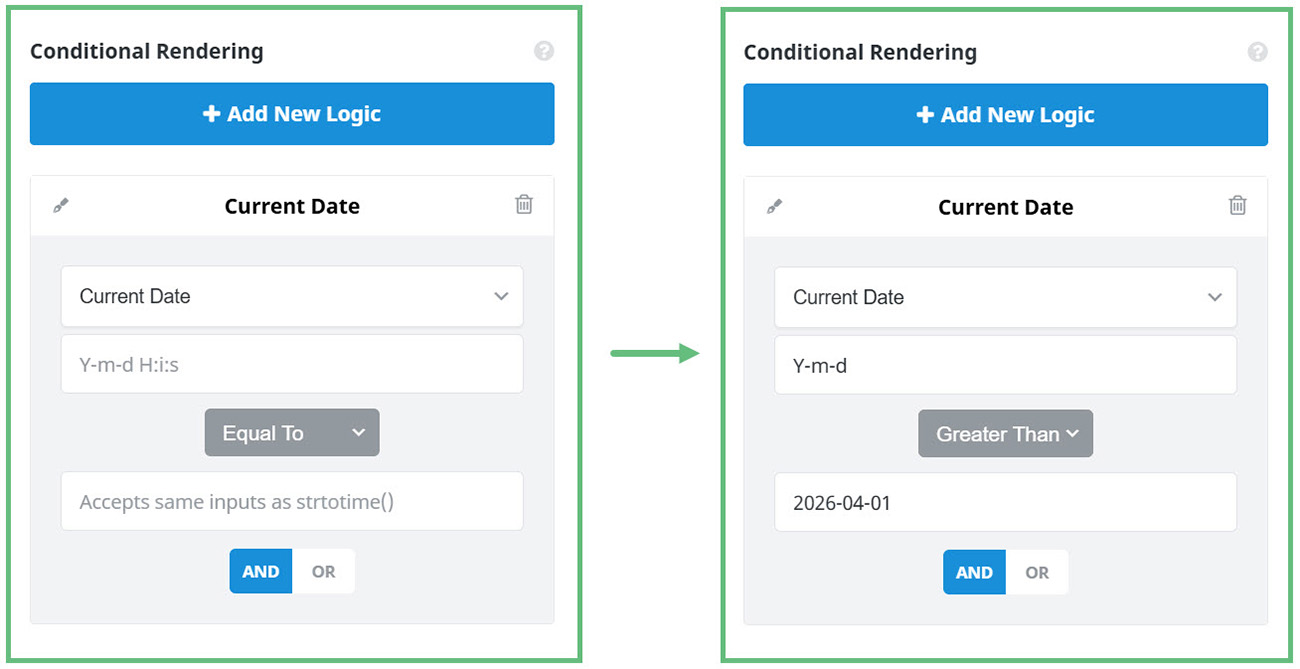
You then need to set the format of the date you will enter, so comparison can be made. Y-m-d works well as it’s a fully sortable date format. But you can use any date formate you like, as long as that matches the format of your inputted date.
For this example, you could choose the relational operator of greater than, and then enter the date of when you want it to be rendered after. So for example if you added 2026-04-01, it would mean that the container would only display after April 1st, 2026. This is perfect for things like launching a promotion, or revealing content after a certain date.
Render Between Specific Dates
This requires you to combine conditions. Basically, we need two conditions: Current date is greater than a speicific date AND current date is less than another specific date. And because these are combined with an AND condition, the container will only show between those two dates. For example, if our two dates were 2026-04-01 and 2026-04-09, the container would render from April the 2nd to April the 8th.
This is ideal for things like sales periods, limited-time offers, or event promotions.
Render On A Specific Day of the Week
Next, let’s look at targeting a specific day of the week. Looking at the WordPress article on Customizing the Time and Date Format we can see that l is the format for the day of the week. So back in the conditions, you would change the format to l. Then you would set the operator to equal to, and enter a day, let’s say Thursday.
And when it rolls around to Thursday, the container would appear. This is really useful for things like weekly specials, recurring announcements, or scheduled content. You could, of course combine conditions so that the content was rendered between certain days.
Render At a Specific Time
As a final example, let’s look at time-based conditions. This time the format to be used is G:i, which gives us the hour of the day in 24-hour format.
Now you could use a condition like greater than 17:00. This would mean the container would show after 5pm. Or you could combine conditions to target a range, like: Greater than 8:00 AND less than 12:00, which would show the container only in the morning.
This is great for things like time-sensitive messages, support availability notices, or even different calls to action throughout the day.
So, the key thing to remember is that the Current Date condition works by formatting the current date into a value, and then comparing it to your input. Choose the right format, and you can control visibility by date, day, or even time.


