Share
A recent report on ad blockers published by Adobe and Pagefair, estimates that the ad blockers are going to cost web publishers $22B in revenue this year. According to report, there was a 41% increase in usage of ad blocking software during last year and this trend is expected to continue in 2015-16.

This is why most site owners use various revenue-generating tools on their websites. Affiliate marketing is another popular way to make money from your published content. However, writing content that convinces your users to buy products on third-party websites requires a lot of effort. It’s a tough job, but many content publishers and bloggers do it successfully.
But what if you don’t have any well-paying affiliates in your niche? What if the affiliate revenue is simply not enough to continue your Avada website?
Overview
The Answer is Paid Subscriptions
Asking your users to pay for content on your website is a good way to generate additional revenue. Here are some reasons why it is proving to be a better strategy. It allows you to remain partial and not tailor your content to match the advertisements or affiliates. This gives you the editorial freedom to only cater to the needs of your users. You can create better, more opinionated, and creative content on your site.
If you could successfully rely completely on subscriptions, then your site’s users would not have to worry about spying cookies installed by third-party advertisers. A subscription-based model helps you build a loyal readership that cares enough to pay for the content you offer. You can build a strong community and a positive brand image for your site.
Using paid content does not mean the end of free content or advertising on your website. You can still offer ad-supported free content on your website for non-paying users. However, instead of selling third-party products, you can set your conversion goals to increase your own subscription base.
How To Add Paid Content in a WordPress Site
There are several WordPress membership plugins that allow you to create different subscription models to your existing WordPress site. In this article, we will be showing you how to add paid content to your WordPress site using Restrict Content Pro.
There is a free version of Restrict Content Pro, which is simply called Restrict Content, and can be downloaded from official WordPress directory. However, the free version lacks some basic features you will need to run a successful paid subscription site.
1: Setting up Restrict Content Pro
The single site license for Restrict Content Pro costs $99 per year. If you’re considering an upgrade to Restrict Content Pro, here is a guide that breaks down the key differences between the FREE and Pro versions. Restrict Content Pro adds powerful features designed for membership sites.

After installing and activating the Restrict Content Pro plugin on your website, you will see a new menu item called ‘Restrict’ in your WordPress admin menu. First, you need to set up the plugin settings and to do that, you need to visit Restrict > Settings page.
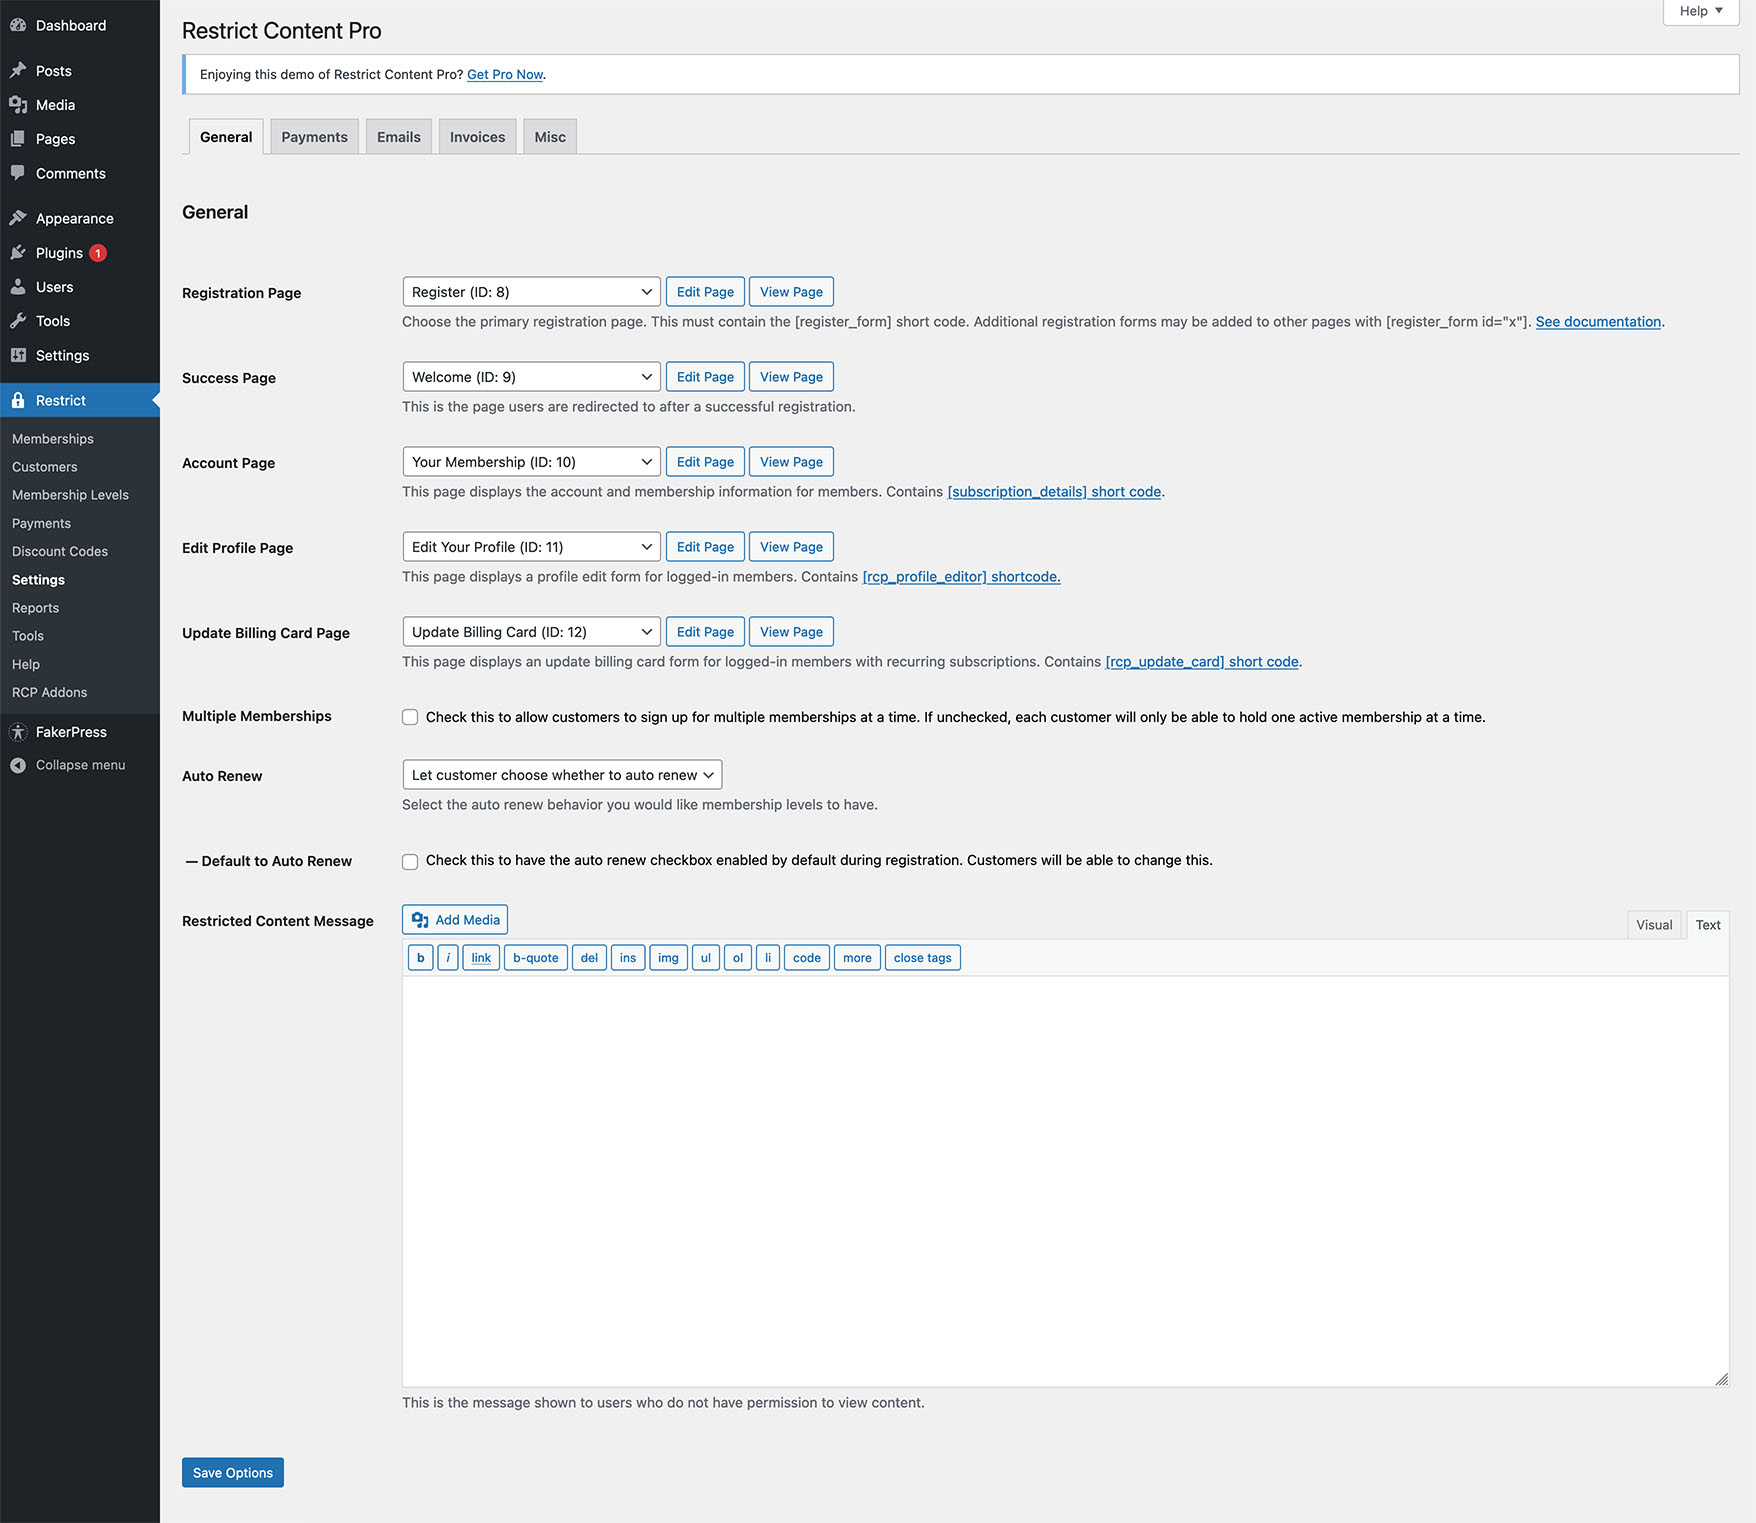
You will need to enter the plugin’s license key. This will enable the plugin’s automatic updates and hide the license key notification. On the settings page, you will notice that the plugin has already created two pages on your WordPress site for registration and welcome. You can change that and choose other pages if you want.
Restrict Content Pro can be setup to allow automatic renewal of subscriptions. Enabling this option will allow users to choose automatic or manual renewal of their subscriptions. Lastly, two text boxes allow you to enter the messages shown on free and premium content. After filling everything out, click on the save options button.
2: Setting up Payments in Restrict Content Pro
Restrict Content Pro allows you to accept payments through PayPal Standard, PayPal Pro, PayPal Express, and Stripe payment gateways. Simply click on the Payments tab under the plugin settings to set up your payment method.
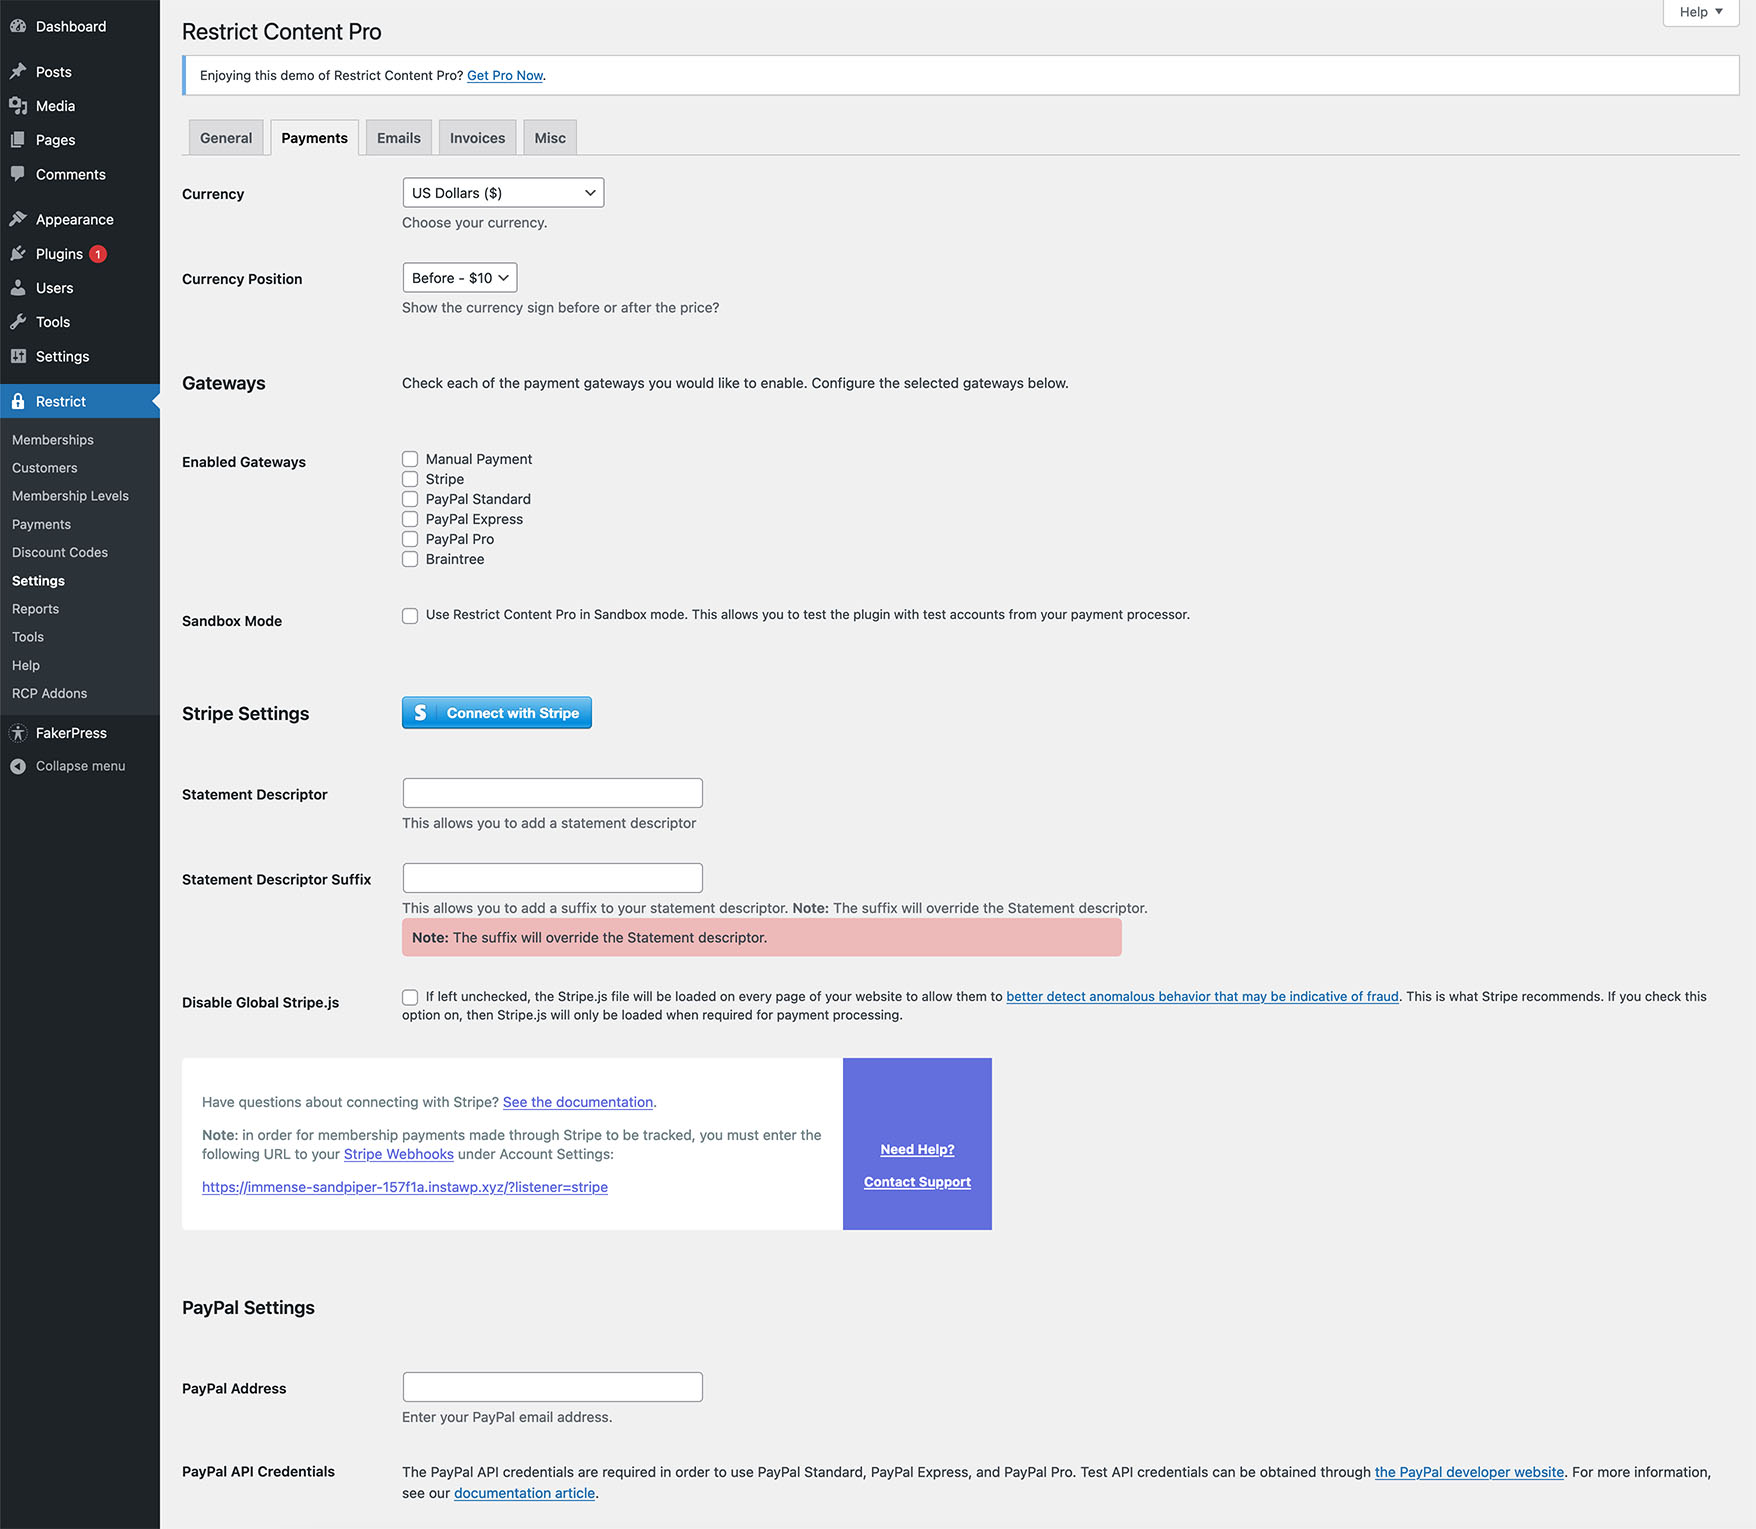
Select your payment method and then scroll down to provide your payment account details. You can obtain these details from your account on your payment service provider’s website. After entering this information, click on the save options button to store your settings.
3: Creating Subscription Levels in Restrict Content Pro
Restrict Content Pro allows you to add multiple subscription levels at different prices. Click on the Restrict > Subscription Levels to create your first subscription plan.
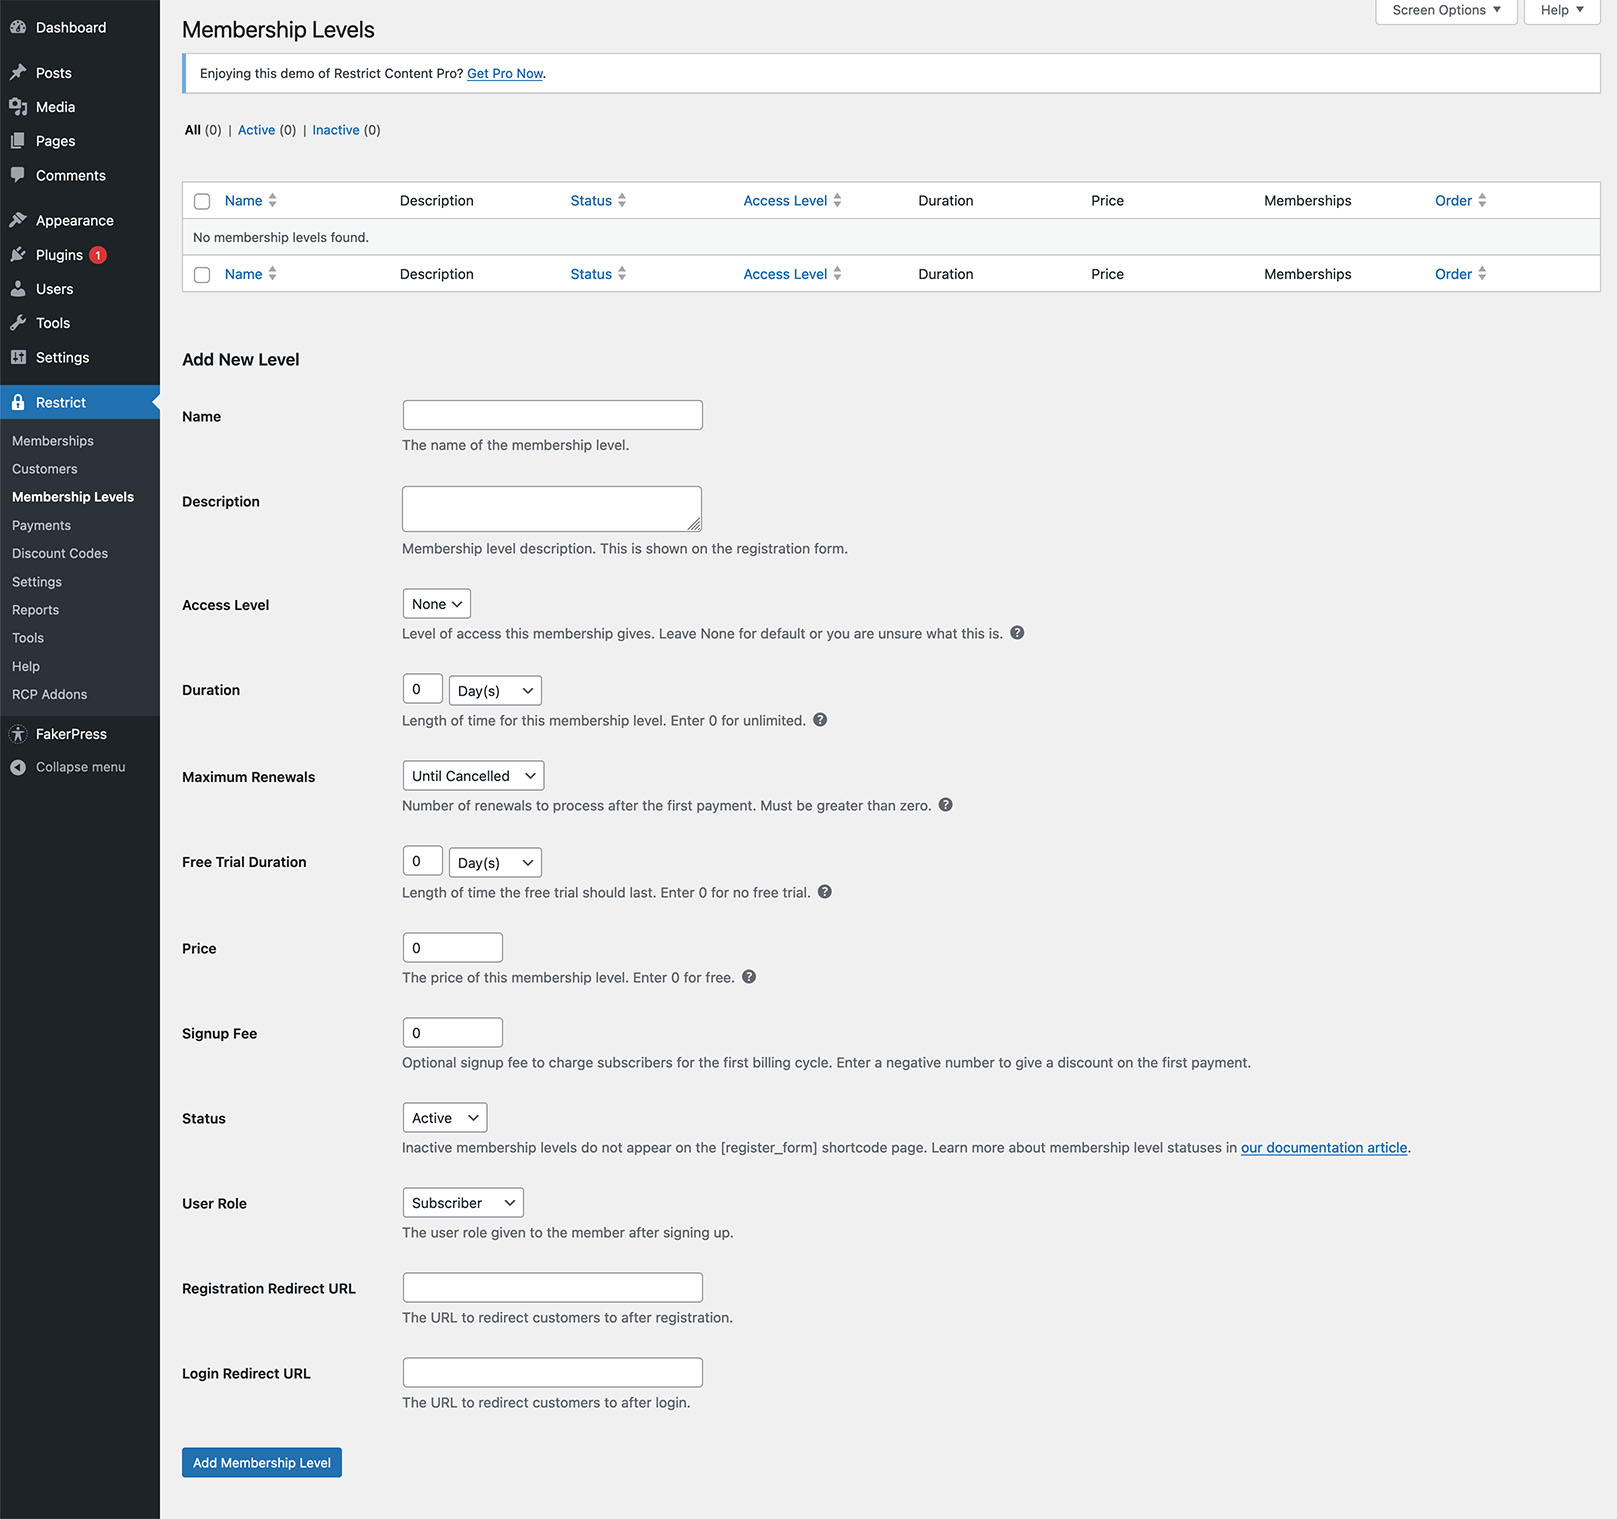
Provide a name and description for the subscription level. Then, you need to choose a subscription level. This could be from 1 to 10, but you can leave it at none if you are unsure about it.
Next, you need to choose the subscription duration in days and set a price for it. You can add an additional signup fee if you want. Lastly, make sure that the subscription status is active before you click on the add membership level button. Repeat the process to add more subscription levels if you need to.
4: Implementing Content Restrictions
Restrict Content Pro provides robust tools to implement content restrictions anywhere on your site. We will show you some of the options. For more advanced options, we recommend you take a look at the plugin’s knowledgebase.
5: Restricting Entire Posts or Pages
Open a post or page that you want to be only viewable by paid users. You will notice the Restrict Content options under the post editor.
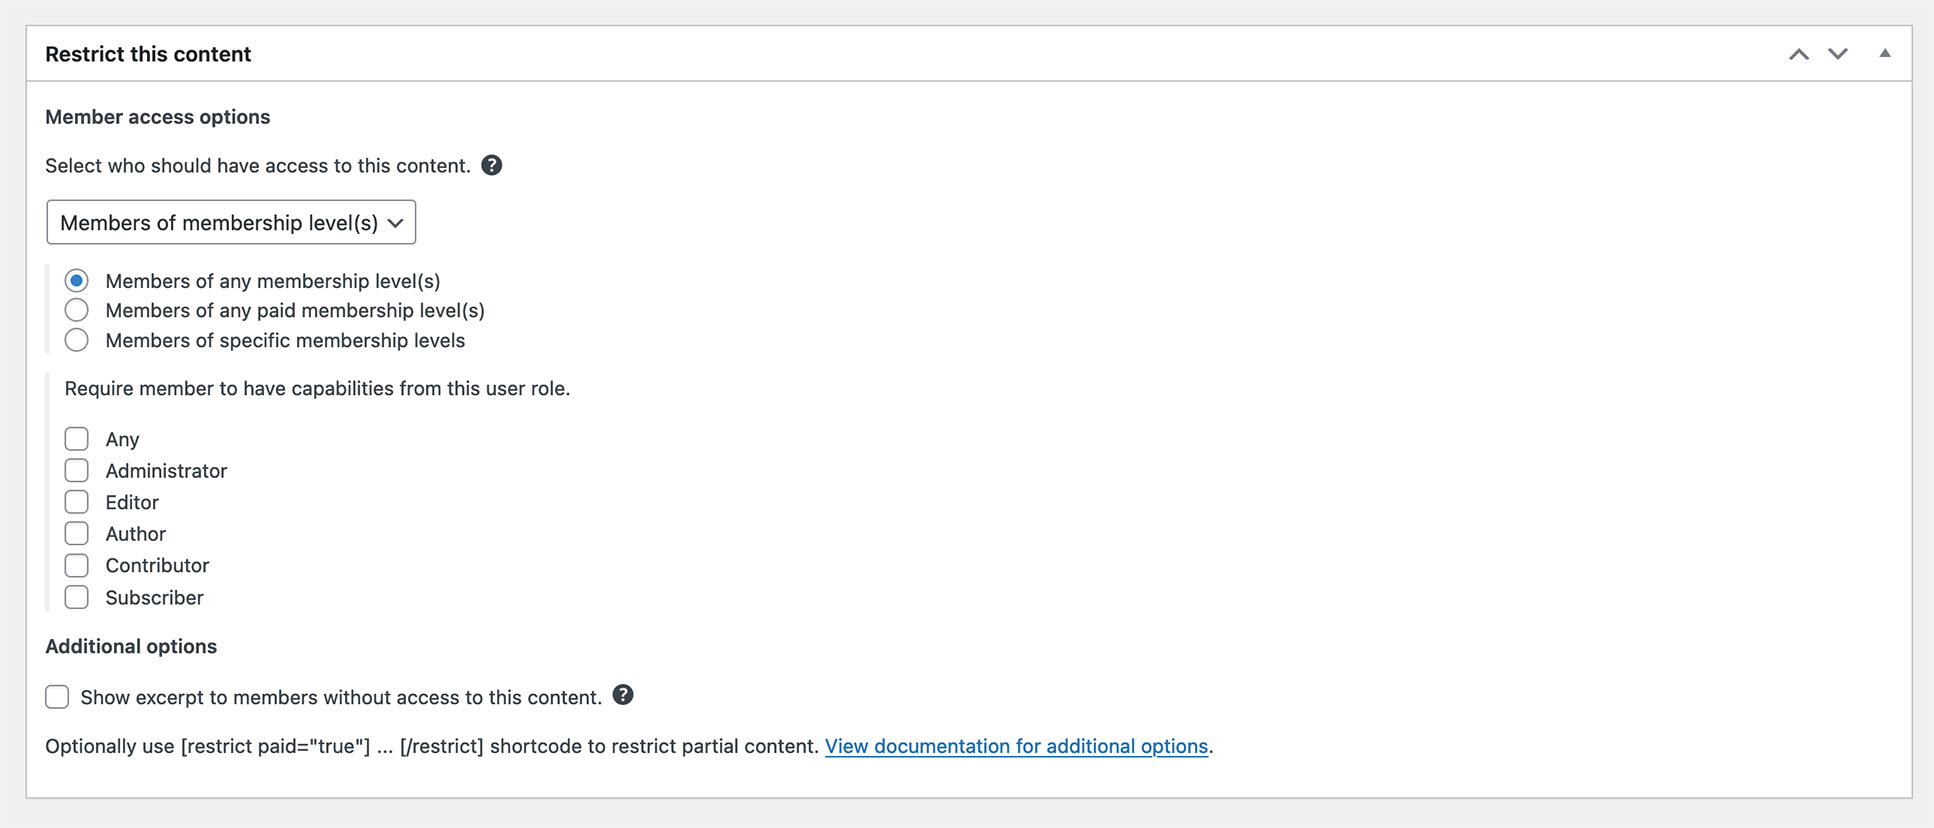
You can check the Paid only box to restrict the entire post or page. You can choose which subscription levels will have access to the content. You can also hide the content from your site’s RSS feed.
6: Restricting Portions of Content Using Shortcode
If you want to hide certain parts of content inside your posts or pages, you can use the shortcode. Using the shortcode allows you to show a teaser for non-paying users and total content for your paid subscribers. You can also hide small bits, like a video embedded in a post for paid customers only.
The shortcode comes with a handful of options. For the shortcode’s reference, refer to the plugin’s documentation. Here are some basic usage examples.
7: Restricting Specific Categories
You can also set content restrictions on selected categories. All posts filed under those categories will be only visible to paying users with the required subscription level. Simply go to Posts > Categories and click on the Edit link under the category you want to restrict.
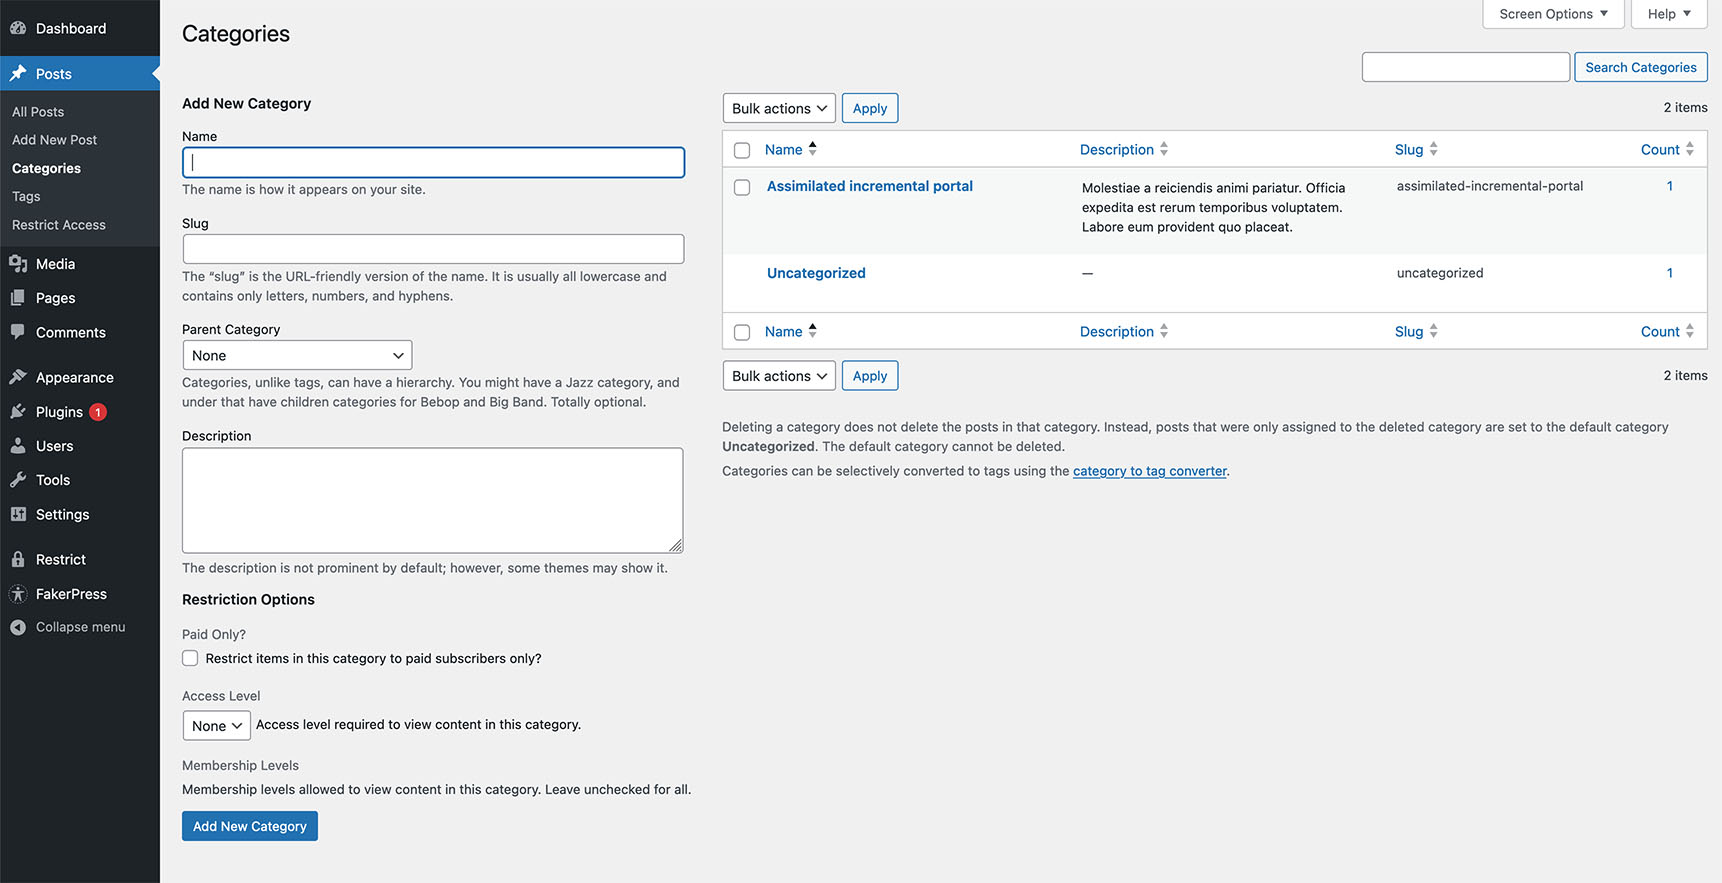
Check the paid-only option and choose the subscription level required to view content in that category.
Front End Login for Users
Each user on your subscription-based site has an account, which gives them access to certain parts of your WordPress admin area. This is perfectly safe but a bit confusing for users. Multiple WordPress plugins allow users to log in from the front end of your site without ever accessing the admin area.
Conclusion
There are many strategies for monetizing content created on your website. Every successful content publisher will tell you that you should not put all your eggs in one basket, which means you should not rely on just one source of revenue for your website.
Plenty of websites and blogs already successfully offer both paid and free content on their sites, along with ad-free and ad-supported pages. For WordPress-based sites, Restrict Content Pro makes it even easier to create paid content on your site.